Monday, February 22, 2021

Orlik Finished: First Ride

Below is Orlik's official finish picture, taken on my front doorstep on the 20th in the last hour of sun.  I really wanted sunlight for this.  What luck to have a clear path to the sunset between houses and that there were only a few clouds!  The deck, my normal shoot place, has been snowed in for months.

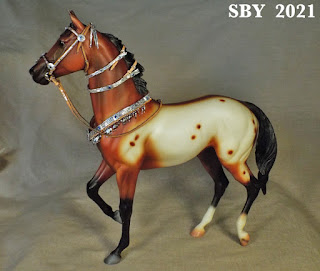
These 2 shots show that I was able to check off every goal:  Red Roan with Pearlescence, lighter over the top, Flame mane and tail (how long I've been trying for those! years!), and dapples.  This horse's painting built on the experience of the previous 3 NaMoPaiMos.  His color was new, as was his level of dapples; the rest was simpler, and that was on purpose.

On the subject of dapples, let me try to clarify why sometimes I say he's my first case and sometimes I say he's my second.  Ambolena in 2019 was technically my first; but her single, experimental layer was so minimal -- look in the upper middle ribs in the yellow (it almost doesn't show on the finished filly), that my mind is conveniently forgetting it.  How to simply explain what is complicated?!  That's a skill...
Ambolena, Layer 7 of 13
Again on the subject of dapples, here is a better look at Orlik's off side.  I really think these 'alcohol dapples' have potential for Appaloosas and other roaning effects.  I just didn't have time or desire to pursue them on Orlik.

Time and desire...  This is the first time I've finished a NaMoPaiMo horse so early.  How did that come about?  Quarantine life has bonded me ever closer to my husband, and he is much more organized, disciplined and scheduled than I am!  Also, covid life has simplified things, and I was truly able to clear off my calendar and just paint for days on end.  I wasn't trying anything drastic, and that really helped.  Even so it feels weird.

I knew from previous years it would take me between 8 and 11 days to prep and pastel a horse.  Additional days are always needed for photographing, processing, and posting -- what I call 'advertising & publishing.'  Yeah, documenting something adds time to it, Big surprise!!  My long slow photography process isn't showing signs of speeding up, either, despite all the pressure NMPM and other online activities can bring to bear...!  I'm polished but plodding.

This all boils down to:  It's easier for me to start early than to gamble I won't make any mistakes,... or that, if I do, they won't take any time to fix.   Still, waiting until the last minute is so incredibly human,... and this community is so supportive of that very humanity... that I can't scold too much.  I've been there myself, particularly with Marimba, who was not finished until the 26th.  2020 has been rather hard on my emotions, shall we say.

Once finished, what did Orlik do??  He gave a lady a ride.

I've been unable to discover any special tack that Orlov Trotters wear, (outside of Troika harness).  For his halter shots, I wanted something unusual and beautiful.  I know the Orlov Trotter is strongly influenced by an Arabian -- that is why the breed appears mostly as greys.  Brasenose wore an Arab halter when he first got finished.  Wouldn't these Russian breeds appreciate some kind of colorful, handwoven woollen gear...?  What did I have that would look good on him...


I have two amazing Arabian costume halters I'd commissioned from Joanna Bolton of Boulder, CO in the early 1980s -- she had been my neighbor for a while then.  I still have an English saddle by her and a catalog ("Black Fox Saddlery").  They're probably my earliest commissions from another tackmaker!  One was red-white-and-blue and the other a most delicious green, yellow and gold; it had originally been made for Morganglanz the chestnut.  I also had my new Field of Dolls doll Chalif, so new she is still just standing around.  To my knowledge she's never sat a horse.  Of course, Orlik was just as virgin.

Sometimes you like to set up a shot that tells a little story.

I just wonder what is going on here. 

I'm ashamed to admit that it was only now, searching for tack that Orlik might appear in, that I thought of the obvious answer.  This IS the Timaru Star II !!!!  Brasenose had gotten there without any trouble!! DUH, where is my brain!!!  After all my dreams about the next book too... 
Braidwork.  This is Tissarn's Hackamore, made in 2006.

Why does it take so long to connect up the dots??  I've had this resincast for months, I've painted him and photo'd him and had tack on him, and only now does it occur to me he'd make one heck of a spade bit horse.  The arch of the neck and the long mane are giveaways.  His lean bony armature lends itself to a scrawny Spanish look, as does his expression.  Even his color -- oh my yeah, Orlov Trotters are vanishly rare in red roan!  The pearlesence, well, we'll just accept that mystery...  Chalif knew all along.  Perhaps this explains her tender freedom of expression,... her fearlessness around him.  She knows. 

(Come on Sue, it's only because she can't stand up by herself that she's got her hand on his nose!  But she stood up with the green halter, didn' cha see?! -- !   Yeah, well that was cause she was pointed the other way, uphill... )  [Chalif was the name of a Russian dancer and choreographer; I came across it in Mary O'Hara's biography.]

This is now one of my favorite shots.

The Thank You List:

Jennifer Buxton, First last and always, for founding NaMoPaiMo and staying the hard course of its encouragement and growth (not to mention blogging up storms).  You are our queen mother.  Long may you live and enjoy the fruits of your labor.  And her NMPM helpers.

Ryan Buxton, for coming up with modern software to help us all along.  It's like magic. 

Margarita Malova, for sculpting this horse, and all 3 of my past NaMo ponies.  I can't wait for your next Troika!

Anne Field, of Field of Dolls.  Amazingly intimate blogger, talented and prolific doll maker, fearless live-sale holder, exuberant giver of gifts and just plain friend (best of all these).

Ann Bilon, for listening to me babble.   Friends are invaluable, now more than ever.

Kim Bleecker, for being there when I needed advice from an expert painter, even if for only 5 minutes.

Sarah Minkiewicz, for a great blog article on shading the face (amoungst a universe of other gifts to the world).

Isaac Brushett, for a long-forgotten mini-tutorial on painting eyes (2017).

The Mares in Black, Jackie and Heather, who accompanied my painting for hours and hours.  I might have been back in May, June and July of 2020 with you, but it was still wonderful.

And George, my husband, without whom none of this would have happened.  For a guy allergic to horses, he has supported the TSII through thick and thin.  Every hobbyist who wants my tack owes him a debt of gratitude.


Friday, February 19, 2021

Orlik Layer 8: Nearly Done


Layer 8, Near
If any of you think I'm nearly perfect, I forgot to take any pictures of Layer 7.  :~  I was going too fast.  (It also had elements of error, hah.)  I wrote plenty of notes about it (good luck reading my handwriting, which seems to warp and wriggle as I get excited), but pictures only got taken of 6 & 8 today.  This is one of the rare occasions where more than one post goes up in a single day.
Layer 8, front quarter near
I did all the corrections and additions that were suggested after Layer 6.   Layer 7 contained a straying from the path; I tried something with his dapples that turned out to be a mistake, although (I'm hoping) a minor one.  After so many iterations with Q-tips, I used a tiny microbrush with alcohol.  I was hoping to make much smaller dapples.  Instead I wound up 'interrupting' the smooth expanse of his side with little speck-droplets that looked more like corn spots than anything else.  (!!)  They might have made a whole 'nother level of detail to this horse; but I instantly changed my mind and tried to cover them over.  I had reasonable success.  Layer 8's 'more pearl' was part of this covering attempt.  

The best / worst evidence of these 'alcohol dapples' is on his off side.

Layer 8, Off


Unfortunately the pictures don't do them justice.

Layer 8 was the one where I added a custom gray mix to his ears, eyes, hooves and inguinal [genital-anal].  In contrast to earlier, this was a case where alcohol-painting worked quite well.  Dip the brush in rubbing alcohol, dissolve the powders on the brush and dab gently.  The hooves and eyes still need to be formally finished.  (Oh and signing!)  But I'm satisfied.  He is in the Land of Nearly Done.

He is hard to photograph.  Where have we heard this before!!!  (Hint:  Marimba, my last year's NaMo.) Only in person do the pearlescent back and loin really stand out.

Layer 8, Near

I even remembered the chestnuts.

Isaac Brushett's tutorial on painting eyes was posted on FaceBook during the 2017 NaMoPaiMo.  For someone like me, who is happy with (it seems to me) a fairly low bar in this sport of pastelling model horses, his series of pictures is still relevant.

I really didn't think I'd be done this soon.  What's next?   Do I pursue ConeyEye the Ziggy?  Another of my unpainteds (we have 16)??  You'd think!!  The impetus is strong, the inertia rolling.  But believe it or not, at least right now, this tackmaker thinks she'd rather restart the second Akhal Teke set, the one with the aquamarines... followed by a couple of LB-scale work harnesses.  Only when these are well in hand should I consider what I want for IMTM or Inter-Tack-Mo.  I know what I'd like.... a blue-&-white Bosal Hackamore for myself...  yet a professional tackmaker needs to see to other commitments first.

But I'll be watching the rest of NaMoPaiMo...  no way not.

Orlik Layer 6: Progress

This will be a short post, caught in the rush of things -- swift developments, speeding towards completion!  But when I saw this picture I just had to print it out and study it.  There is so much to be learned here.

Friday morning (19th).  Cleared off calendar.  Sunny yet cold.  The pattern of spraying him in the barn (shed), letting him rest for 10 mins then bringing him inside, and letting him warm up and finish drying (for at least 20 minutes), is by now well set.  All I know is it works.  Last night I mixed up new pastels, convinced that my time off from him was bearing results:  he needed more blue and purple in a darker red, as well as orange for the flame mane.  He was golden but not pink or purple, and there are tints of blue in the red roan I was after.  All this insight was accomplished when a) I compared the photo of Orlik to my reference photo as well as others' red roans, and b) I asked old time painter Kim Bleecker what I was doing wrong.  Bless her heart, she helped me.

Layer 6, Near

My new color, dubbed "Pink Rust," used Red Ochre and some Pearl Ex in Red-Blue Duo.  Although the above shot doesn't depict it as well as real life, it really is red.  This time also I tried to follow and enhance the contrasting parts of him... a little too well, as the vertical shots show!!  But that's O.K.  I now know in a much better focus just where to go next.

If these vertical pix are strange, it's because they were shot in pretty low light, and then heavily processed.  His off side (above) is considerably better than his near side, at the moment.

These pix did another thing:  They showed me that a simple shift in viewing angle could reveal tons more, and help solve problems.  You'd think it'd be obvious!  Am I closed-minded?!  After 11 months shut up, well...

Layer 6, Off side

This revealing angle (below) shows me quite the laundry list. His off fore knee didn't get any red.  Ribs are patchy; his sides need thinner layers of both red and white (Pink Rust and PearlEx micropearl).  The mane looks like it was painted horizontally instead of following his crest; go back and really define where that middle zone of color is.  His near point-of-shoulder is too white; the chest area in general can be light, but it should be unified, more blended together.  Oh and his forelock needs more red as it approaches the poll.  The hair is short there and should be closer to his true chestnut.

The tail  is OK; and I love that shine!!

See what I mean??  A laundry list of a battle plan!

The scent of victory...


Wednesday, February 17, 2021

Orlik Layers 3 - 5

All has been well up through Layer 5, but at this point an unusual thing is happening:  I feel I'm losing control.  I no longer know what color this is.  I can't seem to get to where I thought I was going.  If this is the ugly stage, it's like no other I've experienced.  Rather than a red roan, he seems headed for silver bay, or, worse, another Perlino.  Will I be disqualified... ??

Layer 3 was pleasant.  It's exciting seeing your visions come true.  He went slower than I'd prefer, and we're definitely into the ugly stage,... but that was a relief.  

Orlik Layer 3, Offside
I was happy with the dappling, and that was another relief.  

I organized my reference pictures.  Only 2 of them really depict the red roan I want, and even then I get to subtract socks!  No socks for Orlik...  Yes, he is halfway between Brasenose the dark liver chestnut and Marimba the Perlino.  But I don't want any socks.  His legs are long enough as it is!

Orlik Layer 3 Near
I felt I needed more of the deep chestnut red.  He still looked like a palomino.  In Layer 4 I started to add color to the top of the tail; that made a difference.  
Layer 4  Offside
One of my troubles is getting color onto the fronts and backs of the legs.  He really is slab-sided and so are his legs, and I'm using a rather wide brush:  wide but very short.  I'm grinding the powders into the surface.  This is what's worked before; but those thin cannons are a challenge.  Holding the brush level and stroking horizontally is about as close as I can come to solving this one.
Layer 4 Near
Here on Layer 4, I'm starting to see consequences.  The white over his back and loins is giving him a larger, longer back, while the darker red on the legs and chest is shrinking what was small to begin with.  I think he needs a whiter chest, elbows, gaskin and stifle.  Oh boy, I've already chestnutted those areas pretty well!!  Ah, me, here goes...

Layer 5  Off

 February 16, Layer 5.  Everyone else's red roan looks so different from mine.  They're all purple all over the body.  Somehow that's not what I'm after, and I'm experiencing the dreaded slowdown and doubtful phase...  None of my horses has had such a complex ugly stage.  None of them has tried to change colors like this.  I think I'm aiming for something new and strange.  I'm about 65% intensely excited-pleased and 35% worried and scared...
Layer 5 Near
 I no longer know what color I'm after.  I was so sure when I signed up for red roan; but my insistence on pastels + Pearl-Ex, no hair-by-hair, my desire for a white top -- back and loin -- instead of a purple-all-over roan, and my fanatic desire for a flame mane, is making him look a lot like a silver bay.  My original reference picture was, I think now, a bay roan and not a red.  Layer 5's darkening of the legs just makes him bay-er.  That grayish is needed for the hooves and muzzle, eyes, ears and inguinal, but why did I have to go and put it on his legs--??!?
Photo from The Baha'i Space
Original reference above; present ref below.  Note flame (orange) mane.

Photo from Aussie Girl

Groping in the dark, there is only one thing I'm sure of.  HE knows what color he wants to be--!!  If I'm sure of anything, I'm sure of that...!  I still think there's a chance of a red roan if I can redden the legs and mane-roots and tail top and the head...   And the dapples, faint but present, each layer re-inscribed by hand and eye, are exactly what I was wanting -- !  Surely there is some hope here...

It's a measure of how flustered I am that this belly-smear mistake, ordinarily a terrible flub, is no more than a minor irritant.  It'll probably be buried in future chestnut.

Layer 5   Offside Belly smear
I know by my intensity that I'm having fun.  The weather does not stop me.  Hang in there, fellow painters.  The ugly stage is real, but so is future success.

Saturday, February 13, 2021

Orlik Begins: Layers 1, 2

 Like Brasenose, Orlik is balanced between extremes.  Starting late in the month, or early for me?  Clear vision for his color, or making do on the fly with sheer creativity?  Celebrating hope for the future, or plunging on determinedly in the old nightmare -- !!??  This horse is so similar to my beloved Teke, and yet as I work with him (nothing like NaMoPaiMo to make you familiar with a resincast), I become aware he is not a mere copy of Gazyr.  He is his own horse, made from scratch, with his own integrity and grace.

Above and below:  Layer 2.  He may look like a Palomino, but he isn't.  I'm saving his mane and tail for later. 

He does not have the detail that Brasenose had, neither in musculature nor finish.  Yet this can be a fine chance to display my skill -- a good painter can really make up the definition.  Let him stand then as a test of my growing abilities in a field I didn't even start until 2018.

Below:  Layer 1.

I began prepping Orlik yesterday, Friday the 12th.  By the middle of today, the 13th, I started pasteling him, and tonight (the 2-day mark) we are at Layer 2.  Historically, only Brasenose has been started this early in my NMPMs.  And yet it is very nearly the middle of the month.  Despite not flying to Tucson for the first week of Febraury, apparently I am incapable of starting any earlier... !!!

Here, one glimpse of before prepping.  Unseen:  work on tendon-defining on the insides of two legs.

Here he is after a deal of filing, sanding, painting with Gesso and the one Primer coat.
Prepping him was relatively uneventful.  He had fewer pinholes than any of my previous resins from this artist.  He only needed the one coat.  It may not look like much of a difference, but he is smoother.  The first matte spray fix-coat, on top of the primer, is a good idea.

Here are a couple of shots of the now-famous priming, in the shed at night.  I do love this stage --  so exciting!

If you look closely you can see the headlines on the newspaper are in Cyrillic letters!!!  Guess who saves even newspapers from well-travelled horse boxes...
There are great challenges with this horse, not least of which is threading my way in between roaning and dappling.  Each of these features is new for me.  Pastelling itself is hardly a solid skill; I've only done this three times in the past 3 years!  Today I found myself combining my skills with a half-seen vision:  the back and loins would remain relatively white; the ribs and haunches would have Q-tipped dapples on them.  Said dapples are random spaced, hopefully not in unrealistic straight lines and hopefully not all the same size, which I find objectionable.

My camera's card has unexpectedly refused to yield its pictures tonight, so you won't get to see the most controversial shot.  Perhaps it's just as well.  Orlik arrived without an anus, although the rest of his stallion equipment was quite respectable.  He could eat and procreate but would be unable to digest or pass.  I created the missing part from leather (what else are they made of??) and glued it in.  Details!!  Oh, the stories that come out of NaMoPaiMo...

Because you are patient readers, here is a reward for putting up with my sense of humour.  Remember Brasenose and his computer-generated scratches?  (They really were computer-generated, by the way:  He literally fell over my Mac mini.)  Yesterday and today he got considerably closer to being mended.  At first I used alcohol-dissolved pastels; later I used direct pastelling.  I'm reasonably happy with the results.


I have yet to determine the relationship between these two horses.
In the Orlov Trotter breed, only 20% are bay, and only 5% are chestnut.  Here I am aiming for a red roan.  Maybe they can be half brothers.


Sunday, February 7, 2021

TSII Akhal Teke set No. 3

Back in August of 2020 there was a contest on this blog.  The winner was randomly drawn from those who commented; she would have the opportunity to order one of my Akhal Teke Presentation sets, the third I'd ever made.  I hadn't anticipated the pleasantly positive response.  Somewhat surprisingly, I also didn't anticipate how long it would take to build the thing,... even after 40 years in this field!  and in a season when everything seems to be taking forever.  Thanks to my winner for her superlative patience.

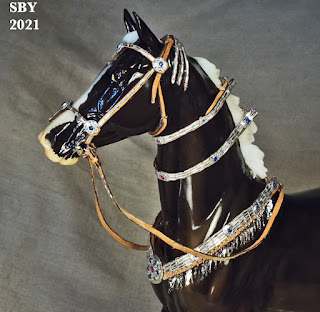
This set uses real sapphires and real rubies, which I got at the Tucson Gem & Mineral Show (back in the days when flying to Tucson was what I did during the first week of February).

The bridle was the last part to be finished.  I thought I'd completed it on Sunday the 31st.  When I sat down to photograph, I discovered I hadn't quite finished it; a few strap slits hadn't gotten in and the poll keeper was too tight. 
The photo session for a piece of TSII tack is a critical time.  It's the tack's last chance to have any errors or mistakes found and fixed.  It's my beta-test time.  No one is harder on this tack than me.

I had known all along that this style of bridle uses two buckles to take on and off:  both the throatlatch and the poll (crown) buckle must be opened completely.  What I hadn't known was how impossible that soft leather was to feed through a tight keeper!  I invented something new:  coating the underside of the tip of the crown strap with nail polish to stiffen it up.  It worked.
I also made a bigger keeper.
One of the pleasures of such a photo shoot is what I learn each time.  Every shoot has a lesson and sometimes there is more than one.  This time there was a lesson in trying to make the colors of the precious stones stand out.  Note that the above pinto (Breyer's Wapasha) shows the rubies at the throat exceptionally well.  I did retouch this photo (stone colors) but I didn't have to do anything to those rubies!

Another trick I learned this time was the difference between regular close-up (macro) and using macro while zooming in.  My camera has 2 settings for macro and the first one allows zooming, something I hadn't known.  I needed to get further back because the lights were in the way, yet zoom in close.  I was enchanted to find out I could get this:  No long ears!!

Lonesome Glory really does have two romance sides!  And, Look Ma no retouches:  the blue sapphire and red ruby colors are as they really are.

(This Wapasha has been customized.  The Indian warpaint markings were removed and semi-realistic pinto markings left in their place.  Technically it's an etch.)

The macro-while-zooming allowed me to solve another problem. Compare the following 2 shots (and try not to laugh).  When I finally put the bridle on Altynai/Talisman (he looked so regal and royal without it, it took courage to finally curb that holy beauty), I tried with zoom and without.  Take a wild guess which one I now prefer:

Until you see them side by side you would not believe how distorted the plain lens makes him!

The next two colors of Lonesome Glory looked, to my surprise, just as good as the others.

Black is certainly a classic color for the Akhal Teke.  Here is a close up of the neckpiece detail:  Again, no enhancing needed!
 I'm aware that the neckpiece could be worn with the fringed ends pointing downwards/forwards and the strap in front,...this would certainly be more realistic, and work well on a model with no mane.  But the customer asked for LG.  (And I wanted to show those rubies.)

I really like this portrait, another one gotten with the help of zooming in while using close-up.

I have 7 Lonesome Glories.  I didn't want to shoot this set on wild Appaloosas, so Quelle Surprise/Riverside Property was out.  Likewise the Goin For Gold/Dunrovin, the horse the set was built off of, had that awful white face and an uninteresting color.  You would think a golden buckskin would do the trick! but somehow the set did not look good on that one.  It was with trepidation I put it on a red Appaloosa, my earliest Lonesome Glory, good old Mardi Gras (appropriate!).  Yet somehow this looked the best of all.

Of course I know Akhal Tekes don't come in Appaloosa or Pinto.
The decision of how to show these tack pieces is up to the owners.  This is as close as I could come to a bay, any bay.  Blue and red have always looked splendid on bays.

Another really lovely portrait, courtesy zoom + macro.  Remember those bi-eyes -- year 2000!

Photographing model tack of this level of detail, with actual sapphires and rubies, depends, in the end, on getting close enough.  The last shots of this post show much better just what AT3 looks like.  Here is the cape and forehead ornament.  Those tiny red rubies came from jewelled watch bearings.  What better fate!

Here is a close up view of the breastcollar center and noseband drop.  The center medallion has one sapphire that is lighter than the others.  The sapphires really do come in a variety of colors.
Here is a close up of the neckpieces.  Authentic Akhal Teke tack does not usually use two colors, so I had to make up how I was going to get "accents of ruby" on a sapphire set.  I chose to balance the tiny tips of the cape and face with the larger rubies of the breastcollar and neckpiece centers.  I think it worked.

What's next?
Again acknowledging amazing patience on the part of my customers, NaMoPaiMo is what comes next.  It seems that I really am programmed to paint a horse in three-quarters of a month.  I've never done a roan and almost never done dapples, so it will be an adventure.  Oh and I still have to get my Christmas letters out!!

But two things at once is better than my usual five.