Sunday, February 24, 2019

Ambolena Layers 10 -11: Gilding the Lily

If this little filly didn't already have a name, nothing would've been more appropriate than Gilded Lily!  The phrase stems from the Victorian age and means to opulently decorate something that is already perfect and needs no more decoration.  I just found out it is based on Shakespeare.  :)  This third post of the series tells how I managed to capture the Akhal Teke's metallicism.

As near as my notes can tell me, this third wave started when I golded Ambolena's right eye.  I do tend to save the eyes for last, not because the horse doesn't need them (often desperately) but because I think my skill will be best by then.  Even so I referred back to Isaac Brushett's tutorial, posted in the first days of the first NMPM.  Painting Eyes.  I'm not the greatest at this particular part; I think Brasenose got the better of them.  But I learned and am satisfied.
Near eye:
Layer 10, face
This critical part got two coats of clear nail polish.  The whites are from the hoof nail polish.  This shot shows her blaze, something added at the last moment trying to enlarge the head and muzzle without wrecking things too badly!

Off eye.  This shot shows the black-tipped ears.  They and the mane are darker than the muzzle.  Although the Edge Cote was marvelous, I didn't quite dare use more than a few dabs on the muzzle.  I think I'd got used to her as she was in that area.

 My NMPM Notebook says  UNKNOWN HOUR -- POST GILDING.
 1902.22-23
"All I know is that a Microbrush dipt in rubbing alcohol, then in Pearl Ex Brilliant Or (Gold) and made a paste of, then applied sparingly to a horse already finished & sealed, gives a clear transparent yet pure gold coat.  I was unable to stop.  The edges run out & blend together.  Only small areas at a time -- less than half a square inch.  If you scrub too hard the sealant is dissolved and you take away existing color (bucksin becomes white).  If you don't dip your brush every area, you get crumbs + flakes of drier lumpy gold.  Only by constant wiping & dipping and paste-making did I cover her; and even now I don't know how I managed it.  I do know the alcohol dish had to be refilled 3 times.  That's how fast it evaporates."
(Note the 'dish' is one of the salts:  about 2 teaspoons.)

The first shots of the transfiguration merely made it look like a gloss coat.  I had been afraid of this.  There are limits to the camera, especially in the middle of the night when one's exhausted spirits are up in the clouds trying to find Bible verses that refer to transparent gold.
Layer 10, off

 Revelation 21:21:  "The great street of the city was of gold, as pure as transparent glass."
Layer 10, near
 "The gilding disguised & lessened the sootiness of the shoulders & darkness of the rump.  I am ever more amazed at what I've done!  This is only the 7th day.  So this is what God feels like...  Surely He was not as surprised as I am right now...  I am afraid to show her off.  No camera could capture it.  She is a different filly - she's been dipped in gold."
Layer 10, rear off quarter 

And from my main Notebook: 
"2:08 am   Well we know what happened!  You discovered gilding-by-alcohol and didn't stop til the whole filly was covered, sans points.  It was now 1:30 in the morning (I have a trip tomorrow morning) and I had no real way of spray-sealing this unbelievable delectable bauble of a horse, this halfway-to-Decorator, this Renaissance gilded lily, this Pearl Ex overload.  I am ashamed to show my face -- she is so over-the-top.  I am no better than the kids with their blue color-shift Albicorns. 

Except that she's a Teke.
Except that I've loved and collected Decorators all my life.
Except that this cracks open Hillingar's case, and every metallic horse I've ever admired.
Gilded Lily!!! 
I had no business complaining about my earlier problems (I can't even remember them!).  Events have moved too fast.  We've catapulted way beyond even Brasenose.  He has outbred himself..."

Next morning, I shot her on the railing outside, and the true tale was revealed.   My fatal flaw was that inability to stop.  I should have left the sooty parts alone.
Layer 10, Birds Eye near
 As lovely as the gold was, it hadn't covered exactly wisely.
Layer 10, Birds Eye off
Sunlight is the final arbiter of painting a model horse.  If it does not pass this test, no matter how striking it is, more work needs to be done.  With quiet glee I realized I had another chance to make the withers and the rump match colors.  I went back inside and punched dry powders with a Q-tip again, as well as re-golding a few areas I thought could stand more of it.  Then I sprayed her on the deck railing.  (No more trips to the barn!)  This stage is so familiar from tackmaking:  the last few dinkings when your Muse is exhausted and only plain discipline keeps you going.  It is a calm place when you're proud of your work.  This was the shot I turned in as my official 'finish' later in the day (the 23rd).
Layer 11, offside
It started raining, and you can see raindrops on her back in this nearside shot.
Layer 11, nearside
Brasenose took 11 days.  This little filly took 8, though not contiguous.  I learned so much.  I'm still catching my breath, but I have a feeling my next paintjob will be sooner than a year.

Many and heartfelt thanks to Jennifer, Margarita, Jenn Danza, Sarah Mink, Isaac Brushett and the whole phenomena of NaMoPaiMo.


Ambolena Layers 8 - 9: Almost went Appaloosa

The second of my three finishing-posts on Ambolena, my NaMoPaiMo pony, might look like there is only one story.  But this middle wave includes everything from her sock to the threshhold of her final and greatest transfiguration (the Gilding of the Lily).  When I started I had no idea of the wild ride in store -- Brasenose was not like this! The bulk of what I've learned on her, errors to triumph, is what I want to cover here.
Layer 6, offside
On Feb 20, I wrote:
"I'm plunging blind in a parallel Universe.  I've never heard of anyone doing what I'm contemplating now; but I'm a tackmaker, I confess, 'tis not so strange.  It'll just require a huge amount of skill...   .... The idea is to dissolve the pastels in rubbing alcohol and paint them on, using alcohol as the medium [I meant solvent].  You gotta work blindingly fast.  The strength, or density, of each brushful changes by the second as the alcohol evaporates out of it.  You have mere moments of workability....  This is in NONE of the tutorials...!!  This would only occur to a tackmaker who'd spent 40 years working w/ dye and about 20 years mixing her own dyes.  
I did use dye on Brasenose.  Remember?  It wasn't so hot.  But now...  we're desperate..."
          "The legs were a good teaching field, except I don't quite like the purple note.  Not sure where it came from:  Black + brown + gold shouldn't be purple!!  But "interference gold" was in there.  Maybe we should leave that out,..."  

This was the state of the legs after my first attempts at alcohol-painting:
It worked!  The alcohol didn't evaporate that quickly.  I still had to refill the dish twice, but the edges of the brushload had a pleasing habit of melting into their surroundings.  I loved the darker color, except there was a mulberry sheen to it.  This camera doesn't really pick it up; still, you can see the difference at the transition zone.  Currently I credit this to the action of the interference-gold Pearl Ex.  I later mixed up a new batch of dark for the points without it, and the purple was absent:  case closed.

While letting the points dry on the 20th, I did her sock.  I had long known I didn't want socks on the front legs.  Magnolia/Ambolena's pose makes the most of her legs, and white emphasizes a limb, making it look bigger and longer.
Just like Brasenose's, her sock was a simple affair of Gesso coated with pale pink nail polish.  This gave the sock a lifelike glow as well as protecting it.  (Growth rings, or ermine spots, at this stage, were as far beyond my skill (& desire) as the moon.) 

I also dipped a brush in alcohol then straight into the copper Pearl Ex, and annointed her muzzle in honor of her sire.  Instant cute!
What I didn't realize until later was that this copper functioned as pinking for the nose.

After Layer 6, I was unhappy with the state of the top of her rump.  My reference photo clearly showed dapples there, as well as a darkness equal to that of the withers and neck, if not more so.
photo by Nadja Tarasova   'Riza'
The success with the Shoulder Spot spurred me, rashly, to take off most of the pastel from the top of the rump.  I'm not sure whether I used sandpaper or alcohol.  The shape of the muscles could partly hide it from the world, but this is one step I regretted later.
It was here I thought 'I could have me an Appaloosa.'
Although she would have been supercute, my devotion to Akhal Tekes was strong enough to hold me steady.  I alcohol-painted the same layers I'd tried with the Shoulder Spot.
Layer  7, rear elevation
But it didn't really work.
Layer 8, rear quarter
My ability to match colors was nowhere near what the situation required.  I would spend the rest of NMPM trying to fix this.  I only succeeded due to another mistake - !! 

I should mention the dapples.  I did indeed try the 'removal' method, with a cut eraser, and they were mildly successful.  If you look closely at her upper barrel, you can see them, in miniature.
Layer 7, nearside
In stamping a Q-tip on her rump, trying to darken it with pastel powder, I uncovered a better way for me to do dapples.  This method worked beautifully on her withers.  I am proud of those, even though such a dark patch re-emphasizes the curve of her posture (as if it weren't enough already!).  In the end I was swept away by other temptations and dapples ceased to attract my attention...

I also read Mink's tutorial on Shading the Face, used last time, and tried it with Ambolena.  I had kind of left this too late, but some of the highlighting worked.
Layer 8, near, before hooves
Hooves and chestnuts came next, the last steps before transfiguration.  I mixed up Earth 155, 165, 181 and some gray (which has no wrapper or number).  It was too green so I added my earlier dark mix of black, dark brown and gold.  This was so successful I did all the dark places again, painting in alcohol.  I used its dissolving aspects to lighten the upper parts of the hooves, near the coronet.  Afterwards a coat of clear nail polish helped (see below).

Absurdedly I have only one shot of Layer 9, with its transformative black
Layer 9, midway through the black
By now, late on the 22nd - Friday - I was reckless.  I thought she only had eyes and tail to go, and opened the Edge Cote.  This is a plasticky water-base paint designed to protect and color compressed-smooth leather edges.  I was thoroughly familiar with it and trusted it.  The switch from pastel powders to alcohol-pastels easily morphed to this liquid acrylic.

"The advantage of Edge Cote is it can be wiped off.  It can be thinned with water, like watercolor.  Here is the black I was missing!!  It brings risk of too sharp a contrast w/ the rest of the body's texture,... but oh, the snap of her now!!  It's like she's popped into life..."

The above photo tells the story.  I did her ear edges, tail, eyes, and the challenging knee and hock shadings with my black Edge Cote.  I was on a roll.  It was at this time,
in the depths of Friday night,
that the miracle occurred.
But that's for the next post.

Saturday, February 23, 2019

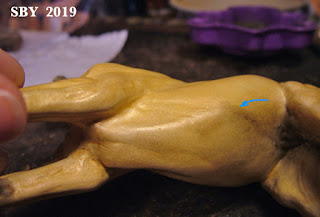
Ambolena Layer 7: Fixing a Shoulder Spot

Painting the remainder of my NaMoPaiMo pony, Ambolena, naturally divides itself into three waves.  I'm going to try a separate post for each.  Titles for them could be:  Layer 7, Fixing a Shoulder Spot, Layers 8 - 9, When Ambolena Almost went Appaloosa, and Layers 10 - 11, Gilding the Lily.

Layer 7 could also easily be called How I Turned Myself into Jenn Danza for One Spot.  In order to understand this, you'd have to know that Jennifer O'Donnell Danza is reknowned throughout the hobby as a repairer of broken and damaged model horses and a fixer of paint boo-boos of every stripe.  Take a look at the point of the offside shoulder on this delicious little stretching Akhal Teke filly.  You will see a nasty brown bubble.

Layer 5 went more-or-less normally but Layer 6 went all wrong.  I was shocked and hurt.
This bubble was the result of too-heavy spraying of the sealant between pastel layers.  Her withers were freshly pastelled with the darkest mix yet, and it just ran down and pooled.  Gravity wins again, my Mom would say.  I am not much practiced with spray cans, and this was proof.  I felt that the grainy darkness over the rump and face were dreadful (see above).  It was Feb 20th and I was on a roll, having had success with every layer so far.
Near side after Layer 6:
Without hardly thinking I grabbed my sandpaper and filed the bubble down to the resin.  I had recently read, in the firehose torrent of helpful ideas and wishes that is NaMoPaiMo, that step by step repair of a pastel error is the only way to cure them.  I wonder now if that wasn't from Jenn Danza herself.
My Gesso is completely dried out, but that's not stopping me.  Wet the brush and scrub.  I used Gesso a lot during Ambolena's priming.  She is smaller than Brasenose :)  yet needed more priming.  Somehow I'm missing a shot of the primered spot  :(.  I broke out the Layer 2 powders.  I've been storing finished-with pastel powders in pill pouches.  (I did this for Brasenose.)  For working, I put the powders in what are called 'salts,' little glass dishes that are round on the inside bottom.  You'll be able to see some salts later on in her odyssey.
This next step, innocent as it seemed at the time, I do believe laid the groundwork for all the great changes that followed.  Because I was in a hurry, I reached for the rubbing alcohol.  This is something my tack shop keeps on hand as a matter of course.  I use it for mixing dyes and for cleaning.  I poured a little into a salt dish and dipped the brush in it and dipped the brush into the pastels, working up a paste.  And on it went.  So much faster than powdering on with a Q-tip, much thicker, and much more controllable.
My NMPM notes say I did this first with darker pastels.  "Instant paint!!  In a trice I did her points, eyes, mane and lips.  Think I'm onto something here..."   I was wanting a darker rump, following my example photo.  I mixed up a good bay color, adding in Brilliant Gold, which was darker than the Sparkle Gold I'd been using.   LESSONS LEARNT:  "Only works if pastel is powdered finely!!  So used my dapping stick." [I meant my doming punch.] "Only works with a medium-stiff brush, not the little detail ones.  You can control paste to a fine degree by buffing it w/ a wet, clean brush, so having a  paper towel handy to wipe off the brush is crucial.  When dry, buff further with a Microbrush."

Of course, the Shoulder Spot took several applications.  Each time I smoothed the surface with a clean Microbrush when it was dry.  The above is up to Layer 4.

Something the Spot taught me was that I didn't have to go all the way to the barn to spray (seal).  I could step out onto the front porch!  Like the use of alcohol as a solvent, this simplification would grow to be an important part of my painting.  No more walking around the end of the house, unlocking the barn and getting out the flashlight if it was dark...!!   Just a mask and a latex glove on the hand that held the horse...

In this picture the  smoothing has taken away some color, but the upper part of the Spot looks very good.
The thrill of victory was in my heart.  "It isn't perfect but it's the best I can do."  The Shoulder's lessons were being used for the rump, a subject for my next post.  "Her smaller size is counterbalanced by her more difficult color and the rabbitholes of her shoulder and rump."

Really, the only thing to do is keep trying, keep layering, with these injuries.
Gradually the Spot was disappearing.  Other portions were taking my attention.  When the final Layers were applied and the whole filly turned golden, the Shoulder Spot officially disappeared.
This concludes the first third of painting Ambolena Snow.  Stay tuned for the second and third installments.
And thank you to both Jennifers. 


Monday, February 18, 2019

Ambolena Layer 4

Like her famous sire, Ambolena the Akhal Teke filly is putting me on notice that not all is smooth sailing in NaMoPaiMo!  Whereas Brasenose had his problems in the beginning, Ambolena is having hers in the middle.  Literally:  I'm at Layer 4 (of supposed around 10), and there are three areas I'm stuck on.  She has pits in her shoulder, staining on her neck & belly from overspray :(, and I have an unmentionable wish for dapples.  I'm reasonably confident I can solve these problems,... but now is a good time to pause and draw breath.

Before we get further into problems, I'd like to relate triumphs.  Here she is at Layer 2 (after sealing).  Somehow I did not get a picture of Layer 1.
I had forgotten how pale and gentle and light the pastel approach is.  Spraying her primer with sealant, a suggestion from FaceBook, made sense to me as a way to combat graininess. Were not all other layers painted on a sealed surface?  I even buffed her with a soft rag (a tremendous pun, given that she is named after a ragtime strain of music).  Graininess has not been a problem.  The lightness of each coat, then, was the surprise.
Here's Layer 3, near side.
We are using the old scrub brush with two different mixtures (body and points), each made up on the spot from shaved stick pastel colors I thought "looked good."  The mixtures are also heavily dusted with Sparkle Gold Pearl Ex, and along about now I started putting this gold straight on.  One of Brasenose's lessons had been to 'keep on Pearl-Ex-ing.'  Layer 3, off side.
After Layer 3 I realized I had a couple of problems.  As before, they were with prepping.  Ambolena had a couple little pits in her shoulder I wasn't happy about.  I should have filled or filed them with the rest, but somehow they evaded me, perhaps because they were so big.  I chose to try and ream them out, then pack with spackle, my latest material for divots.
One can only use what one has on hand, and the knowledge one has at the moment. Hip pit.

NaMoPaiMo gives the opportunity to REALLY get to know a sculpture!  Previously this act had been tied to tackmaking -- it is a privilege of the tackmaker to know a model so intimately.  But Ambolena is a foal and won't get to wear more than a halter.

Problems don't come singly.  Sunday she went from unfinished to Layer 4 in one day.  But she also picked up another difficulty when I sprayed too close to freshly-dusted black pastel on the last layer.  You can see it on her full portrait too.
I post these pictures in the hope that somehow, somewhere, they will help someone.  I am not infallible.  My lovely filly is not perfect.  Perhaps I am the one who needed the reminder.

Worms-Eye view.
Overnight it dawned on me that the neck staining looked a lot like cobwebbing.  After all I am going for a 'sooty' buckskin!  And the belly staining might well be absorbed in a darker shading.  We'll just have to see.
As for the dappling, there won't be much (this is a filly).  Let's just say that I can sense the growth of dreams and wishes when they're only a few minutes old... and that there is room for dreams, during this magical month.


Tuesday, February 12, 2019

Gem Show goodies

What does the Tucson Gem & Mineral Show mean to me?  To start with, it means Netsukes:  those charming little handcarved boxwood beads that Orientals use on their sashes and closures.  To end with??  Every year is different and this one, no exception, ended with something amazing that wasn't even at the Gem Show.  You'll just have to see it all!  Like BreyerFest, the Gem Show is sensory overload.  Imagine 45+ hotels instead of one, celebrating jewelry, gemstones, lapidary, minerals, fossils, rocks and every associated craft...

My pleasant habit of attending the Gem Show each February started somewhere in the mid-2000s, when I and my husband fell so in love with Florida canoeing that we didn't want to spend Christmas vacation anywhere else.  Not even with family!  A bit of a puzzler because I still loved my parents dearly and still wanted to be with them over the holidays.  He solved everything by offering to fly me to AZ any other time.  I had known, since the 1980s, that the Gem Show happened in February.  I think my first visit was in the mid-1990s, when my tackshop was heating up and looking for supplies.  Over the years I acquired the Hill Tribes Silver beads used in Fancy's Hackamore, precious and semi-precious stones, great tools like the Precista wire brush (used in prepping Brasenose: Prepping 2018) and was exposed to technologies such as silver engraving and Argentium.  There is no doubt about it:  Jewelry-making is one strong strand of the art of making model horse tack.  Or should I say facet...
Refinement of my habit started somewhere around 2009 when I offered to get my sister jewelry in February for her Christmas present (which I could never manage on time).  She agreed.  I had always liked dabbling in the art (Something Different) and it was easy to transition over to being a hunter-gatherer-dealer for her.  Each year she would ask for one or two things, and each year I'd thus have the excuse to focus down on just them -- a godsend with so much distraction!!  Only those who have attended BreyerFest (or other gem shows) can imagine the chaos and glory of it all...  truly an overwhelming experience.
Where was I?  Oh yes, Netsukes...  So this post will show only this year's catch.  It has been a particularly good one.  Keep in mind that my sister only asked for jewelry; the Netsukes and other carvings are for me.  I added earwires (hooks) to the above, to make earrings.
2019 is the Year of the Pig.  These larger carvings are twice the size of the little ones above (and below).
I completely fell for the little ox with his braided rope halter.  When I got home I found I already had one of that pattern.  Since they're hand carved, there are subtle differences.  Look at the feet and ears:
Here is a view of their undersides.  The Chinese characters are the signature of the artist. 
If you ever think I'm immune to a cute little face, think again!!  Who could resist this?  And WHAT is he??  My guess is no one knows what a Nautilus looked like, so the carver was free to depict whatever they wanted:
Something new this year for me was bone carvings (cow).  I thought these two made a great pair.  The green frog is hiding his eyes.  "See (and Hear) No Evil."
Also new were the buttons.  You can't see them but there are wood button shanks beneath all 3 of these.
Such irresistable little animals...!  Netsukes do, of course, portray horses.  For reasons entirely personal, I have never collected them; fear of burnout, perhaps.  But that doesn't mean I haven't gone over for a white rhino!  "Where the whole silly myth got started," says Schmendrick, meaning unicorns.  My travertine rhino, above, still shows dirt in his cracks from years of rolling in his tray, just waiting....

You can guess my sister asked for blue earrings.  These originally had lengths of chain hanging from them; I took them off.
For these, I left half the chain still on.
It is hard to photograph jewelry.  The teal color below is more true.  I put the tiny glass beads on the ends of the chains.
To go with the earrings, I found a bracelet of Mexican make, silver with blue Fire Agate insets.  For this piece it was very helpful to have known the ancient art of bargaining.  Once again, the photo does not really do it justice.

The last thing my sister asked for was a suncatcher, "like from the 1970s."  Abysmally, I could not find one at the two venues I visited (Kino and Pueblo Gem & Mineral).  I looked everywhere.  I even asked.  No luck.  Instead, being in a mineral area, I found a lot of crystals.  To give you an idea of prices, the lower left was $12 and everything else altogether was $10.  The dealer gave me the broken pieces free (upper row), and I glued one back together (upper right).
Remember I said the amazing part this year was not from the Gem Show?  My budget did not cover leaded-crystal cut Swarovskis or diamonds(!).  I felt, in the end, that I was in the wrong place, and should look elsewhere for old-fashioned glass suncatchers.  On the third day, shopping for something entirely different (food), I slipped into the craft aisle of an enormous department store, and found a decorative dangle.  It was probably intended for a shade pull.
We tested it and it threw the best rainbows of all.

The greatest and only rule in collecting, for both BreyerFest and the Gem Show, is to get what you like.  Don't be afraid to like common glass or cheap crystals.  No one else need dictate what you love.  Buy what you really want and can afford (and enjoy the rest).  Let your heart be your guide.  If you are true to it, your choices will last a long time and give you great pleasure.