Friday, May 27, 2022

Progress Report on TSII #430


In the past week much progress was made on updating this 2003 saddle.  All 18 drops were made and installed.  New saddle conchos were invented and put on, something which involved taking the seat off!  The silver of the pommel was fixed up with a new underlayer.  At this point only two steps remain, the tapadero conchos and the cinch.  I am pretty pleased with #430 at this point.

Eighteen new drops were hung, 10 on the breastcollar and 8 on the serapes.  I finally got into the groove of making the drops.  It involved a white-glue phase where the Mylar tinsel was inserted into slits and held down; then the pins, strung with silver balls, had to pierce the middles (they are folded over). Then the two halves of each drop had to be glued together.  Then I trimmed off 4 corners per drop.  I had bought new scissors and I really liked how easily they could do that trimming!  Chop, chop!  I liked the almost-jet-jewelry look of the new drops; they remind me of great beads.  Yet it's just Mylar and leather.

The seat really did come off.  I'd pulled off the lining and cut all the pins that held it on.  I decided I didn't like the green corrosion on those pins and sought for a way to replicate the job they'd done -- hold the seat on and the saddle together -- without using pins.  This was a strikingly major design change from all my past.  Yet it was solved within a day.  Just sew the little things together.  Place an ikandi (iron-on) concho where the conchos should be, and roll on.  And so it happened.

I did, however, need to place a pin at the 2nd concho point, the one below the pommel welt.  I used a stiff steel pin for them, hoping it would corrode less than the soft brass ones.  As evidence I point to the same stiff pins used for the tapadero necks.  They don't seem to have gone green in their 19 years.  I really like working with these tack pieces after 10, 20, 30 years because I can see what corroded and what didn't -- it is fascinating.  Aluminum works; brass does not.  Dang I wish I had Aluminum pins -- that would solve everything!

The tapadero conchos remain to be dealt with, more Rio Rondo conchos which I am no longer happy with.  The picture doesn't show it, but they gained a coating of yellow-greenish exudate as well.  I've scratched it off here, but their silver-color and texture does not match the rest of the saddle.  I have a few options here, but I'm afraid the pins (necks) will have to come out and be replaced.  And I ran out of time tonight.


On the good news side, the new cinch for TSII #430 should be fun.  I've printed out my Willow Northland cinch tutorials and will be taking them along on the next birding vacation (May 28-June 5).  This is just the right project for evenings.


Saturday, May 7, 2022

Needle Chisel Repairs Part II of II


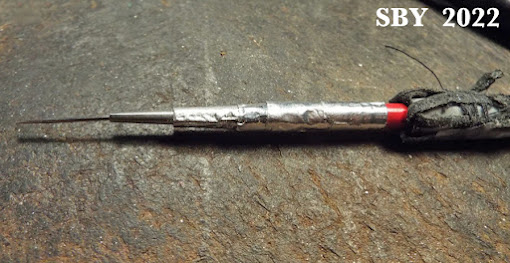
This is my oldest, best and favorite Needle Chisel.  I honestly don't know how old it is!  This portrait is a snapshot, one glimpse of a tool that has changed over time; we're talking probably more than 20 years.  It may change again, who knows.  This post is about one of those changes.   The story begins when I bore down on it too hard (possibly sidewise) and it crunched and folded in my hand:

The first step is to expose the damage.  On a braid-covered handle, I start by undoing and tying back that end's leather lace;  rebraiding will come later.  I'm using thread and Scotch Tape to hold back the leather.  Next, form a plan of battle.  This photo shows both the action plan:  A Pin!  and some of the tools to execute that plan:  the Pin Vise and a wood file.
What had broken was the wooden handle.  Unlike the last broken Needle Chisel [Part I], this one still had its already-perfected needle end, blade and ferrule intact.  All I had to do was stick the halves back together.  I don't have a photo of the wood handle before I filed it smooth (above).  I decided a pin, made of wire pointed on both ends, was the way to handle this join (o pun not intended... maybe....).

The wire is probably hammered slightly for strength.  I drilled a hole in the ferrule's wood and inserted the pin.  I'm not sure whether I glued it.  Friction is amazingly functional and tight at this scale.

Next is drilling the hole, same size, in the handle.  Here the hard part is keeping things lined up.  I'm afraid I rely solely upon feel and eye for this.

Centered!
Test fit for alignment.  It looks pretty good.  If there is gluing to be done, now is the place and time.

Here is something we saw with Part I's broken Needle Chisel: using Aluminum tubing to make a ferrule.   In this case it isn't really a ferrule but a sheath, a sleeve for strength and alignment.  I've hacked open one end to help it fit.

This next step is some real magic.  To achieve a taper, I'm squeezing part of the tubing together, tightening the remainder.  Heavy wrist pressure can do it; I'm using my normal pliers.

Having made a flange of extra Aluminum, I next cut it off, using nippers and the X-Acto.  With the same file, I made the join as smooth as I could.  You can just see the join line here.

More magic.  I am adding aluminum tape (the much-vaunted Silver Tape, or plumber's metal mending tape) to this seam.  That's a folded rectangle of silver tape standing on its edge above the chisel, with the white paper of the used part still showing.

Getting there!

The goal is strength, smoothness and tightness.  I rub out any wrinkles and file smooth anything that needs it.  Rebraiding is somewhat unorganized as I figure out I was using a 6-strand round braid.  I even things out as best I can and re-use the gold-plated wire that was originally holding down the lace.  There is also a good deal of new waxed thread wrapped around it.  My braided handles use thread, wire or both to hold down the leather ends.

Ready for another 20 years! 


Friday, May 6, 2022

Friday Report: Restoring TSII #430


 For many months I've been sending Friday reports to those customers concerned with that week's model tack work.  Today I feel like posting such a report to the blog, something I've long threatened.  Usually the two or three people get two or three pictures.  We'll see if this Friday's decision changes anything!  It already has -- there are 8 pictures here.  There needs to be some background to this story...

Let's start with TSII #430.  Built in 2003, this was our fourth Little-Bit scale Silver Parade Set.  So far it is the ONLY saddle I've ever made using Mylar Tinsel as its main silvering element.

Thus #430 is 19 years old.  This is what it looked like (above) when it was new.  Fast forward those nineteen years, and now look at it:

The owner quite reasonably complained that the silver drops (teardrops) had tarnished, and she could not keep them clean.  There were other problems.  The central conchos, main design element of the breastcollar and the serapes (drapes), were badly corroded,  no longer silver but dull brass and green.  Most of the saddle's fastening (structural) conchos were a deep yellowgreen, coated with some awful exudate.  And the cinch was terribly twisted, something I've come to expect with TSII work of the time.  :(

The customer asked whether I could replace the drops.  I said yes.  Then I asked something extremely daring and unusual:  Not to give a quote until the job was done.  I have never done this before;  it's too much to ask.   Amazingly, she said yes.  I am still in a state of humble shock and she will get a discount for such faith... !

Here you can see the old central concho's condition.  They were plated brass and over the 19 years that brass reacted to the leather in no uncertain terms.  I took them off by peeling/cutting the lining and clipping the Mylar tinsel tie-downs.  

By great good luck, I had used separate ties for them.  This meant I didn't endanger anything else when they were removed!  I then made 3 new conchos from i-kandis and hot-ironed them on.  Normally I detest glue, but I haven't yet had i-kandis fall off.  This iron-on approach is simple, fast and guaranteed not to tarnish.  It allows me to match other elements of the saddle's overall design:  circular conchos with a center stamp and squarish borders.

Offside serape with new central concho

Here's what the brass domes did in those 19 years:


All you tackmakers out there who think that brass and leather together 'do nothing:'  This is what can happen.  Verdigris [the green corrosion] is created by the chemical reaction of the tannins in the leather to the copper in the brass.  But beyond that, I do not know the names of the involved chemicals, nor why it happens with some leathers and not with others.  On the same saddle, note (above) how the structural conchos merely turned a bright yellow-green.  I shall have to remove the seat and replace those pin conchos. 

Meanwhile, replacing the drops was progressing.  There are 18 teardrops, so that means eighteen handmade drops with Mylar.  I chose to re-use the small silver balls because they had not turned black like the sterling.  I will be re-using the drop pins.   you can hear a pin drop...

I apologize for the fuzziness.  This gives some idea of what the restored breastcollar will look like, and thus all the new drops.


Future plans include cleaning and replacing the structural conchos (oh boy, another seat to take off, Yarkk!) and making another cinch.  

This will all be put on pause while we go canoeing on Kentucky's Cave Run Lake from the 8th to the 17th.  Spring Migration!  :)   

As ever, thank you so much for your patience.