 |
| TSII #89 after restoration |
I have built over 450 saddles across 42 years, yet it's rather rare that I get the chance to work with an early one. In January of this year I chose to accept a trade-in deal. TSII #89 was built in 1985; by a slip of the pen I referred to it as #85 for the next 4 months, for which I must apologize! For a piece of model tack 35 years old it was in astonishingly good shape. It was so ancient that silver paint had been used for its corner plates and stirrup spots (a method used before Rio Rondo opened in 1990), yet the paint was still so bright and sturdy I decided to leave it as it was. Kudos to its owner, who had kept it all 35 years!
 |
| TSII #89 before restoration |
What constitutes restoration? What did it need, if it was in such good
shape? Since the materials were so well preserved, only technological
advances and silver polishing really needed doing. 'Technological
advances' expanded, by that mysterious grapevine of artistic rabbit-hole
enthusiasm, to include major reshaping of the seat. This meant
disassembly of everything except the pommel. I have learned a lot about
improving tack in 35 years, and this was my chance to bring #89 up to
standard; yet I wanted to retain as much as possible of the original
spirit and look.
Detailing how I restored this very old TSII saddle will take several posts. Part I approaches this saddle's restoration in general, and starts with something small but representative, the back cinch. Part II moves on to the fenders, which necessitates peeling off the fuzz lining. Ever wanted to look beneath on an old treeless?! Part III will backtrack a bit to show disassembly, that is, pulling off the seat, and then depict how I reshaped it. The seat is the heart of a model Western saddle. Part III should include views of a new cinch. Part IV will celebrate the finished piece on two different horses in two very different places!
 |
| TSII #89 before restoring. |
My main selling point in restoring old TSII saddles is replacing the galvanized steel hardware (buckles, rings and wraps) with stainless steel wire, which does not corrode gray and remains bright and shiny. Secondarily I chose to raise the hanging of the fenders and to reshape the seat by bracing and darting. I made a complete new cinch: this was a real tech advance for me, something I had learned just a week ago!  Thirdly I chose to replace the brass crimps on the bridle with stainless steel wraps, decoratively stamp the existing conchos and make new back cinch keepers since I didn't like the old ones. I cleaned everything, stitchmarked everything that didn't have it, oiled everything with leather conditioner and polished all the silver, a delicate job since I could easily have broken something. I was ready to replace whatever I broke, -- but (again astonishingly) nothing broke, -- not even when I rolled it back and forth vigorously during polishing. No. 89 was well built. Wonders never cease.
TSII #89's Back Cinch
If ever you get a chance to tinker with one of these, (there are over two hundred out there, depending on how you count; I was hanging fenders higher by #145 and darting seats by around #250), start with an easy part, like the back cinch. In the beginning it looked like this:
 |
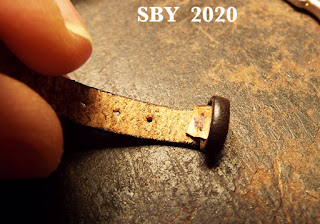
| TSII #89 back cinch buckle, and one of the bc straps |
(Apologies for the different background colors. I'm still learning PhotoShop, even after 20 years.)
 |
| TSII #89 back cinch connector strap, Before |
These buckles, all handmade from 24 and 20 gauge galvanized steel wire, show the typical gray scaly texture of galvanized steel after 35 years. The above also shows my signature wire wrap, on the buckle of the back cinch connector strap. Cut the stitches, and unwrap the wire with needlenose pliers. Clean the leather; just wiping it free of the gray gook will do.
I'm jumping ahead somewhat, but here's the pile of old hardware I took off this saddle. The long wire at right was the wrap around the main cinch tie strap. The large rings were the girth rings, the pins (looking like little 't's) were the ones that held on the seat, and the brass bits in the lower foreground were the brass crimp beads set on the bridle.
 Some of this hardware is green with verdigris; this indicates the presence of copper in the metal. Wipe verdigris off the leather with Q-tips or dissolve it off with rubbing alcohol. Replacing the offending metal was the largest part of this saddle's resto job.
Let's return to the back cinch. This is what the billets looked like when it left the shop in 1985: neatly sewn, with a simple three-hole tie done with waxed thread.


 Other work concerning this part of the saddle included cutting the slots for the tongues a little wider and painting them with Edge Cote.
Cut the stitches and clean the billets.
Make new lace keepers and sew them on by lapping over the top leather and attaching them as closely as possible to the top. I'm trying to save strap length here.


This next picture shows sewing on the new buckle for the back cinch connector strap. The new buckle is bright and shiny, made from 24ga. stainless steel wire. You can't see it in this pic but the ring has been replaced with stainless steel too.
This interesting shot shows my grab box of roller tongue buckle parts. The wire is 20ga stainless; the ferrules are cut from Aluminum tubing, a section of which can be seen. (They don't actually roll.) A couple of pre-made tongues (22ga here) can also be seen. Getting the curl right on those is an art in itself.
One can never have enough pre-made parts on hand. I swear most of my saddle-making work is in these humdrum parts, filing and bending and filing some more, hammering the tongue bases flat and filing the ends square across so they close smoothly, hammering the tips the other way so they'll fit into slits easier,... filing the tongue tips smooth and round so they don't prick you... filing your fingernails...
And here's another shot full of work. I hated the old bumpy leather of the back cinch keepers. (I'm afraid there is a lot of that leather in TSII pieces from the 1980s.) I replaced them with new, smoother, stitchmarked lace keepers. Can you tell the difference?
I'm pausing at this point. Work will resume with the fenders in the next post, Part II of IV.

Very clear explanations. I know nothing about tack-making but I'm able to follow what you're doing here. It's an education!
ReplyDeleteI started getting JAH in 1986, I think, and one of the things I remember best about my early issues was an article about TSII. I never did get much into tackmaking but I think the idea of it was a big part of what hooked me into the hobby.
ReplyDeleteOh, man--handmade buckles. I made a whole lot of those for my early and minimal tackmaking efforts. I remember getting Rio Rondo cast bit shanks for Christmas one year in the early 1990s; they were still a really big deal then.
I really like your Mexican Blanket Saddle Pad. I've been figuring out how to weave those (and South American Blankets) on this scale recently.
ReplyDeleteHow very cool that the saddle has been with the same owner for 35 years!
ReplyDeletevery nice improvements!
ReplyDelete