It is more of a challenge than I thought to depict every step in the making of these mecates (and these hackamores). I confess some steps are going to be skipped. Some of them are too difficult and complex to portray in anything like 20 pictures or with my camera, which takes at least one hand to hold. Some of them are waiting for the next book, itself a difficult, long term and complex subject. And some of them... well... despite my best intentions, I'm just not ready to share.
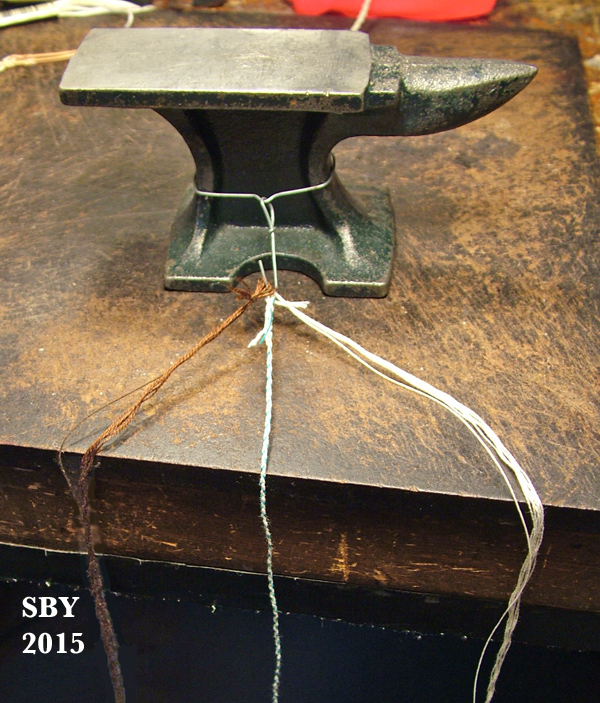
Having said that, I'm amazing myself with how much IS being shared here! We have already covered the ingredients of a model mecate in great depth; now for combining the parts! In this first shot, the three parts are hung on the braiding anchor hook.
The idea is to spin them into a triple-twist rope. My procedure is to combine two parts for about 4 to 5 inches, and then bring in the third. The spin of the whole is to the left, around an invisible centerline, so the twist of each of the three parts (strands) is to the right individually.
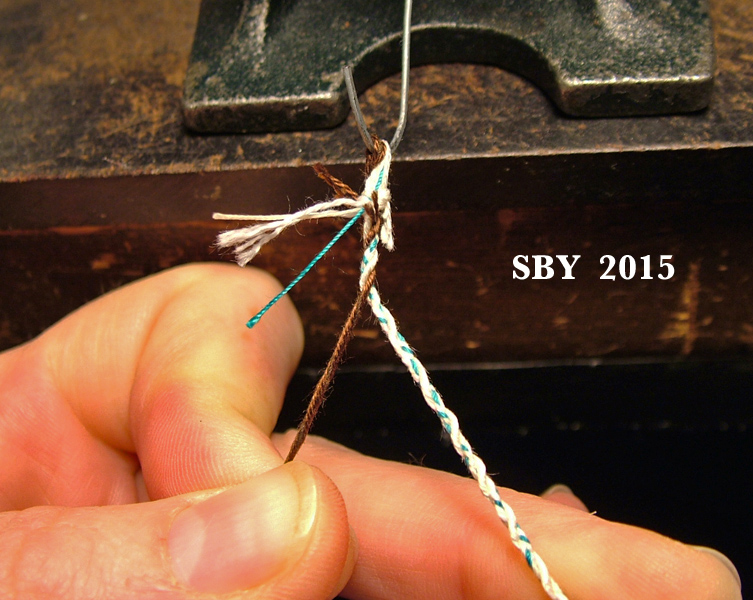
(Pardon the lighting; this shot was taken too dark.) No machines are used in the spinning. I twist and spin entirely by hand, trying to achieve a consistent tension, neither too tight nor too loose. Fingers must be very clean to get a good grip, so I'm constantly wetting and wiping them.
This above shows the third strand coming in, after the first two are together for a few inches. The spinning is around an invisible centerline. If the blue and white are too tight, they are loosened to allow the brown to slip into place. You know when the spinning is right because the strands will hold themselves together in place if let go.
A trick I use is to alternate which two colors (strands) I first blend. This is to even out any errors (and believe me, there
are errors!). I have noticed with my hand twisting that I overtwist each strand, and they unspin when I let go. But I can't get the tension I want any other way. I twist tightly (to the right), right before each strand goes into place, and somehow it works.
Naturally, the ends didn't come out even! In this case the blue-braided (checkered) strand was the shortest.
Time for a correction. In my last blog I indicated that 3'2" was too short, by saying "O.K., Fancy's original mecate was a bit short..." By the numbers, one-ninth of a twenty-two foot mecate would be 29.3 inches. Far from being too short, 3'2" is nine inches too long. We'll have to see how much is used up with tying on the quirt and the tassel...
Here I'm doing the quirt end first, for ease: the tassel end is definitely harder! Notice the silver beads and the pre-made quirt with its braided ring. I've tied a thread around the mecate to keep it from unravelling. As it happens, the thread is untied and retied around everything once it's through the ring --! and will later be removed.
The trick here is to spin in the ends: to open the twist and allow it to 'grab' them, and blend them in.
The silver bead acts as a crimp. We know from historical photos there were two beads to Fancy's original. The scissors clip off the thread ends, right at the second bead. And the quirt is on.
Next is the tassel end. This is a lot more work. An end knot must be formed, a horsehair tassel installed, and then the end knot covered with a braided button. And then another silver bead goes on. My way of making tassels is described in the Guide, but I haven't said anything about end knots. Here goes! In the case of this mecate with its three parts, a classic Crown-&-Wall is used.
The Crown is the first part of the two-step process. Each strand goes over and under.
A Wall is the second. At this point, I like to remember famous words from Mark Twain's renown book
Tom Sawyer: "
Under the Cross!" Each strand is worked back around and up through the center, "under the cross" formed by the other two colors to its left. This shot shows the white strand threaded on the needle, about to be drawn up through the center.
When finished, the end knot is tightened. If it's done right, a three-strand-braid pattern shows around the edge (rim) of the end knot. If you weren't picky about the color of your tassel, you could quit right here.
But I want a white horsehair tassel. The time to put it in is
before any buttons are braided over the end knot.
As I've proudly told my dentist, the best miniature white horsehair in the world is made from dental floss. : ) The unwaxed, shreddiest kind! These pictures show a 6 tassel, made from 2 x 3 strands of dental floss; in fact, I later added a doubling (2) to make the tassel an 8. Eight (8 pieces of floss) is perfectly in scale for most Trad mecate tassels (and many other tassels, may I add).
The procedure is to thread a sharp needle with three lengths of dental floss. You want to minimize drag through the middle of the end knot, hence the folding and going twice through the needle's eye (shown above). The needle pierces up through the end knot, (in amoungst all those threads), then crosswise through the mecate body and then back down from another location, emerging at the same spot. Below we see the needle just starting to pierce back down.
Pull the floss down snug. Clip any loops, to free the needle. Everything's upside down in this shot, but this is what it looks like now:
And now we start clipping again,
very carefully. A few at a time, remove the threads, but not the floss! Believe it or not, they won't unravel. Friction makes good glue at this scale. The picture shows just one thread to go.
A few strokes with the dull awl will fluff it out. I find that natural wear does the same job. Of course, I have Fray-Chek'd the end knot.
Voila: horsehair tassel.
But don't trim it just yet. You need that length to hold on to during any braiding of buttons. This being a TSII mecate, it's gonna have a braided button. : ) Here is where I'm invoking previous statements. To fully cover miniature braiding would take a book. I refer to earlier blog posts, such as
A Very Long Button: Tightening and
A Very Long Button: Finishing. Braiding is covered in any number of books; that's how I learned it. Don't despair; the way this blog is going, I'll be covering this subject before all is said and done.
This button is a 7P 6B with two rings of Interweave. It was done in self color, that is, all one color: rawhide heavy thread.
As of this writing, both mecates are done. The second one, on the left, is an inch shorter.
As of this posting, we're at work on the headstalls. Maybe I can squeeze in the bosals during BreyerFest. Look for this project underway in Room 610 of the CHIN!!! I'm hoping the second hackamore can be auctioned off to the highest bidder.
See you at BreyerFest!


Dental floss - I never would have thought of that. Looks very realistic. Can you dye it also?
ReplyDelete