Tuesday, February 26, 2013

Goehring Breastcollar Rough Cut


Remember how this is supposed to be my Sneak Peeks page?  Here is a snapshot of the process of creating a fabulous almost-solid-silver Parade breastcollar.
I have made parade breastcollars before -- heaven knows --nearly 100 times.  But this is truly the first one to have each spot and plate individually hand made from sterling silver.  I am choosing silver because the saddle this is a portrait of is clearly using silver.

The process starts with a paper pattern. 


In this case I turned to one I'd made ten years ago, in 2003, for TSII #428, Bilon's.  Even this one was made by copying from an earlier pattern and imposing the circle template on it.


The  paper used can be ordinary office paper.  I like to using drafting vellum, found in large office supply stores or artist supply places.  This medium is tougher than paper and can handle water spots, yet is transparent for easy tracing and transference from one side to the other. 
Symmetry is all-important...  even if the horse is not symmetrical!

For Goehring's we are doing a portrait of a real breastcollar, so it's merely a matter of graduating the spots and drawing the joining  plates between the conchos.

The numbers refer to the diameter of the circles.  For example, the largest circle is fifteen-thirty-seconds of an inch in diameter.  I get these numbers off the circle template -- an orange plastic jobber I've had since college. 

My degree was in drafting, so I have all kinds of triangles and templates.  Down through the years, they've come in VERY handy for tackmaking!


I place some tape on the vellum to protect it further -- but only on one side.  I cut out the pattern.  Next, some fun -- testing it on the horse.  Excuse the awkward angle of the photograph.

It's very, very important to constantly hold parts and pieces up against the horse.  In another world, it's called playing.


I took the step of cutting out the centerplate pattern, for ease of use on the hunk of silver I have to burn.  This is an ancient earring I purchased from the local goldsmith-&-jewellers as scrap silver.  You can see an earstud post sticking out of the lower corner.  Ye gads, the weight of the thing -- I've cut it down before this.


This is after chopping around the edges with the slit punch tool and cutting the straight sides with the wire cutters.  Twisting and bending will help the silver break apart along pre-stressed lines.


This shot shows the cutting out of silver blanks with an old pair of scissors, which I keep exclusively for metalwork.  These blanks are also earrings.  A complete earring can be seen in the lower left corner.  I cut off the posts and hammer them flat.


The first Rough Cut of the breastcollar... very rough!


At this point I've done a LOT of hand filing and shaping, trying to get those joiner pieces right!  I've stuck every piece on the sticky side of some tape... one way to keep small pieces in order.


This is where things stand right now, when I must leave this project for a week.  On the left half, doming the conchos has led to a much more realistic appearance.  On the right half, what you see are the back sides with little loops of flat sterling silver lace soldered to them.  This is part of my design for this particular breastcollar.  How to get silver pieces to stick when you don't trust glue -- ... believe me, it's a lot of work!, but I am confident in my engineering.  Oh there will be glue; it'll just have some help.
Next: a lot more filing... and then, engraving.


I would like to congratulate Jennifer Buxton on achieving one million page views!!  It happened faster than I thought -- and before I left town!!  Technology is wonderful, and you should know that I believe I now have the technology to stay in email touch even while on the road.


Wednesday, February 20, 2013

Something Different

I have often said in every model tackmaker there is a jeweller.  It should not come as a surprise that I make necklaces.  Nor should it be so strange that now, right after the Tucson Gem Show, I am indulging in making necklaces (instead of making tack).  Every artist needs something different every now and then (thanks, Heather, for supporting this idea!) and this is what is calling my Muse right now.

I picked up these clever ceramic fish beads at a previous Gem Show... a few years ago.  I can't remember exactly when; it could be as little as one year ago or as many as three.  (Let's call it two.)  They are handmade and hand painted, so each one is different.  In a fit of generosity I promised a necklace made with them to a friend.  I KNOW that was a year ago -- it has been hanging over me ever since.
The white beads are Howlite, a sort of white turquoise.  The blue ones are lapis lazuli.  The silver beads are just that, silver; they are bench beads, made to look like the old Navajo handmade ones, with Indian-looking key markings etched on the big ones and join-rims on the little ones.  It was only this latest Gem Show that gave me the clasps I used here.  These clasps are magnetic ones.  The devices are new to me; this is the third time I've ever used them.  The first was a simple chain necklace for my mother in Tucson and the second was the bottom necklace shown below.

I have made all three of these necklaces in the past few days, the center one last.  The bottom one is a replacement for my favorite necklace, which unfortunately was lost on the airplane flying back from Tucson in 2011.  It looked much like this one.


The story of my necklaces starts in Denmark in 1995.  We were on sabbatical in Roskilde on the island of Zealand.  In the town square, I bought a couple strings of amber from an old Russian man who couldn't speak English.  I remember his inspired method of showing me the price: he drew with his finger on the palm of his hand.  Later I used ferrules from my tackshop and hooks-and-eyes, and put together a pair of amber-and-silver necklaces, a heavier fancy one and a light one.  I wore the light one so much I think the nylon string finally wore through and broke. 
The heavier one is shown here.

The Danish amber was of a superior quality, with tiny circular inclusions which sparkled beautifully, and was polished very smooth.  When I told Dad I'd lost my favorite amber necklace, he surprised me by purchasing another string of amber beads practically on the spot.  Okay, yes, we were at the Gem Show and standing near a booth that sold amber...


So that is where the above two amber-and-silver ones came from.  I have now used up my supply of amber.


I was surprised when I sat down and tried to count up how many necklaces I'd made for myself and friends over the years.  I honestly had not kept track.  No records exist.  There was the dogtooth one for Gretch the vet (she gave me the dogteeth) and there was one or two for Eleanor.  There may have been one for Mom (before the current chain, which barely counts). 


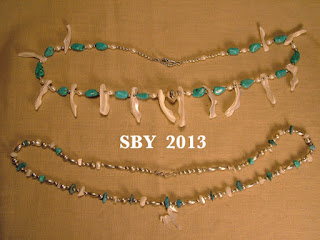
There are these two turquoise-and-silver ones.  If you're getting the idea that I use a lot of silver, you're right!!  I'm quite sure of the date on the top one:  I made it to wear for my sister's second wedding in 2008.  Those long things are mother-of-pearl "frangia."  The bottom one is more of a mystery.  It could be as old as the early 2000s, and the little pearl horse on it is decidedly as old as my high school years.  I recall I got it from a mail-order jewellery catalog source, whose name escapes me now.  I was not much of a jewellery wearing person, but I loved that catalog.  This was in the mid-1970s.


He once had four legs, if you can believe it.  The other front leg was curved and lifted, elegantly balancing out the little guy; but it broke off a few years ago.  The long-lost hind leg was so far back in time I can't recall what it looked like, only that it once was there.


This one is the queen of my collection, the netted-wire Chrysoprase.  The large green stones are D-grade Chrsyoprase, a variant of Chalcedony.  I could only afford D-grade.  Higher grades, up to A, cost hundreds of dollars for this many grams.  The smaller round green beads are green turquoise; the white is opal; the yellow beads are a touch of carnelian; and there is a bit of silver in there too.  I made it to match a dress I had, but I also made it to match itself; I loved the color.  The stones were not drilled, and I had no way to do this myself, so my only choice was to enclose them in a twisted mesh of fine-gauge stainless steel wire.  Hhh mm, this dates it:  I didn't get into stainless until around 2000.  Humph.  I thought this one was older than that -- !!  In any case it goes a long way back, and it has remained my favorite.

I feel nearly through with my current phase of necklace-making.  The Muse is almost satisfied.  I am feeling much more ready to start afresh on tack.  Are not the little bridles a form of jewellery for the model horses, themselves?

Tuesday, February 12, 2013

Chestnut No Longer


The week in Tucson resulted in many pleasant things, Rinker progress being the most noticeable.  In addition to working on him, I was privileged to visit some of the local model horse crew: Chris, Pat, Leanne and Debi!  If ever I should have to live in the Southwest, I am sure I would be involved with these folks.  They call their shows SPORK because being both a spoon and a fork it can thus cater to every need.  I find this sense of humour only slightly spicier than Region X itself....

 For that one week, I broke my Thursday-only vow.  I worked on Rinker nearly every day -- and often more than once a day!  Opportunities came up before breakfast, after lunch, and late at night... and I could not resist.  Notably, opportunities came during long phone calls with my sister.

First, of course, I had to buy a knife.  No travelling on commercial jets with an X-Acto.  The TSA did let me carry my blanket kit -- only after they'd spotted it, pulled it out and scanned it separately!  This for a small pair of needlenosers and a little pair of sewing scissors, both of which fell within the published guidelines for tools (less than 7" long and blades less than 4").  However, the guy was polite, and I managed to show him tack on the horse...  ah, the life of a baggage inspector...


The knife had a #2 blade sharp-point, not the half round I was used to.  A close inspection of Rinker's face will reveal the difficulties I had.  I've known from the beginning I didn't intend to halo, yet using this shape of blade has resulted in nearly that.  I still mean to smoothe these spots with solvent sometime down the road.

The off side of the head and face, shown here, was done during one long phone call.  Imagine holding the phone with the left hand and holding both knife and horse with the right.  My family has repeatedly commented on the little scratching sounds heard on the line while talking with Janet...


I guess I like doing two things at once.


 No one has told me about, nor have I ever seen, efforts to sign an etch job.  So I made up my own. 


As this project has progressed, my attempts to try out various effects have come to light.  One of the most obvious was the love and respect I had for Breyer's old resist-splash type dappling:  the very type used on the Decorators.  I know academically that such dappling is not seen on real horses.  Certainly not the drips!  Hardly is it seen on Appaloosas, loud as they are.  But on this Appaloosa, I found myself recreating the look and feel of what I have long collected and admired.  I was sort of surprised... but I shouldn't have been.  He is such a voyage of imagination!  Then I found the greatest challenge was to transition successfully from chestnut-spots-on-white to white-spots-in-chestnut.  It wasn't easy.  There were several ways to manage it.

 Around the eyes, the muzzle, the groin area, under the arms and especially the offside forearm were places where I wanted to use this effect.   Blending this fantastical idea of what a spotted horse should be with Mudflap's existing spots, and with my dawning awareness of what real Appaloosas look like, is resulting in Rinker's uniqueness.


Speaking of Mudflap, the above two pictures best show that I made a mistake, and copied a triple-spot twice. (Many of Mudflap's spots are doubles, that is, two spots set touching each other.)  Look on the offside belly just above [appears below] the midline.  Then look at the still-chestnut area of his lower ribs.  Same spot.  This picture also shows how I'm doing the Mudflap copying:  not all at once, but in sections, hand-drawing in a few spots at a time (with the blade). 

To try and copy the whole of Mudflap at once would've spelt sure doom, through inability.

 There is another factor in this horse's spotting.  I am fortunate to have a complete collection of Just About Horses magazines (from start to finish; that's 1976 to 2010, thirty-four years' worth, folks), and one issue had stuck in my mind in relation to leopard appaloosas.  It was Volume VII Number Four, from 1980, just about the eighth issue ever published.

credit to Just About Horses Breyer Animal Creations 1980
I never forgot the rearing appy image.
Just About Horses Breyer Animal Creations 1980

Part of the text says "He was extremely loud colored (without overdoing it)."  This was exactly what I had in mind for my Rinker.  I wanted to convey that off forearm, and distinguish my stallion yet further from Mudflap.  This is pretty much my sole "real" horse reference for the etch.   The article had 3 pictures of his off fore and only one of his near, the cover.  How handy.

from Just About Horses by Breyer Animal Creations 1980
Note that I did not copy the Sundance horse's neck, nor his face.  It's true I still have a chance to do the offside hind hock.  We'll just have to see.  Rinker has been pretty consistent in telling me what he wants to look like.

Thanks should go to Margaret Loesch who kindly let me photograph her Mudflap from every possible direction.  For those who cannot find his offside, here's a glimpse:

Photo by SBY

Obviously we're not done yet.  But we're past the halfway and the end is clearly in sight.  I am very much enjoying this journey, and look forward to not only making tack for him, but possibly cutting other appys.  See what refusing to paint horses for 30 years has fostered.  Whoever invented etches, I owe ya one.