
This is one of those posts that has only 4 pix. I meant to take photos of the whole process, but in the manner of deeply personal non-tack items, I got carried away and forgot,... or just didn't interrupt! Wood is the most likely material for this to happen with; if it had been a vehicle, like a sleigh, the chances of documentation would have been no better! And just think of the snowshoes,... photos didn't happen there either, at least not during the construction.
We do have a lovely lay-out shot at the start of making an entire new Needle Awl. Coping saw and dowel, hand drill, brass tubing, soldering gun and drill bits are all here.

The broken old one is central at top. The black cone-shaped braided button has been slipped off, and just below its bare wood can be seen two needles, the old blade and the new. This is the only way to discern that the new blade is actually a large-eye beading needle that broke off half its eye at some unknown earlier time.

Honestly I have made most of my tackmaking tools from broken needles. Call it supreme recycling. I don't have the courage, or the knowledge! to break one on purpose.
The length of the old wooden handle was 5 inches, and its diameter started at 15/32", just under half an inch. In any case I later filed the new one a lot thinner!! The approach was to solder the new blade into 1 3/4" of my smallest diameter brass tubing. Its diameter I measured as 9/64", really close to 1/8". This soldering was unfortunately quite difficult. I failed on the first end (the half-eye broke off inside!) and had to try the other. I'm not at all sure I got the needle far enough in. In future, if my new Awl fails, it will be here, where the base of the blade only goes so far in: about 1/4" I'm guessing.
While the metal cools I'm drilling a hole down the length of the dowel, about 2 " long. It turns out to have been a mistake to start tapering the tip so soon; that made it harder to center the drill. Drilling itself was also difficult, requiring starting with a small drill bit, about 3/32", progressing to a medium bit size (about 1/8") and finishing with the 5/32". Even though this is larger than the brass tubing, the friction of the wood was tremendous -- well above my own strength -- and pushing my largest tube into the dowel before it was ready was a big mistake. I struggled so hard getting it back out again,..

Back to the blade. Slip the smallest tube into the next size up, 7/64". The fit is very tight; no glue or soldering can happen between the tubes. This size's length I cut slightly less, say about 1 1/2 ". Next, slip that tube into 1 1/2" of my largest brass tube, 9/64", again a tight fit. Each tube I cut slightly shorter so that I'd have a tapered telescoping to hold my needle. I later soldered and filed this taper smoother with a metal file.

It looks so much like nothing! It especially looks like an assymmetrical fit in the above photo. But this was before I filed the wood cone even. At least we are not dealing with what we had before, that added-on cone.
Fitting the soldered nest of brass and blade into the handle was a matter of finding a crack in my worktable I could push the needle all the way down into. Then, with the needle safely out of the way and the weight resting against the tubes, I jammed the wood down as hard as I could, trying to force the brass into the hole. Bit by bit I succeeded. Of course the blade is a bit crooked [not centered exactly] -- that is a byproduct of my soldering -- but the old awl was that way too. It is not a flaw that will affect its performance as a fid.
Lastly came the process of getting the braided buttons back onto the handle. For some reason the longest button would NOT slide. I filed and I filed and I filed [the dowel smaller], -- for two days I tried!! -- to get that darn thing to move into place. Yes, I wetted it, greased it, you name it! It never really behaved, so I gave up and braided a new button into the space that was left.
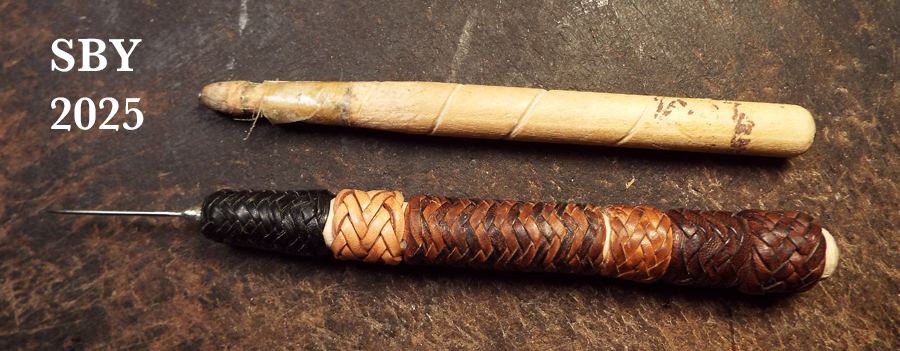
So that is how the exact same length of handle and the same buttons didn't come out the same way. Go figure. The new button, I am proud to say, is a 9P 7B Fan, subtitled 1-3-3-1; you can see each pass can be described by going over 1, under 3, over 3, under 1. This beauty will be in my next book; it is heavily used on Tissarn's reins as well as Peet's Romal Reins. It's one of my favorites. [Ed. note: In the final finishing the lace covered up many passes and so it looks like 1-2-2-1.]
Also, this new needle was so sharp I had to blunt it a little. It took some using to reveal that it needed a bit of shaping with a fine metal file. It works fine now.
*****************************************************
IN OTHER NEWS: Rinker's bosal is done. After photography, I will be putting it up for auction on MHP at an announced time. I'm thinking of asking $75.00 plus postage.
No comments:
Post a Comment