Saturday, May 31, 2025

The Spring Morn Puzzle


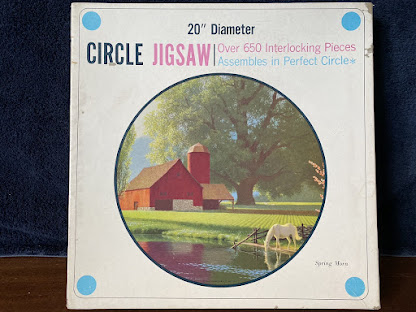
Ever since I learned how to search for things on eBay, I've been looking for this puzzle.  I know I said the same thing about the Copper Queen puzzle, but that one I found after about 10 years' hunting.  This one I've been hunting for what feels like my entire online life.  That would be since the late 90s, and here it is 2025.  By my math that can pass as roughly 30 years(!).  I tell you, the search had settled down to very occasional,... but it never really quit.

I had nothing to go on except memory.   I had worked this puzzle as a teen.  I had enjoyed it very much.  I remembered doing that great big green tree, and the peaceful stillness of it.  It was such an idyllic scene, and it had a horse in it.  You know girls and horses,...

Somewhere in my college years or shortly thereafter, I picked up a poster print of Spring Morn.  I don't remember the where or how, only that I had it when I got married in 1988.  When we bought a house together, the first thing I did was pin up posters everywhere.  This one went into the tack shop.  It's been there ever since.


 The print gave me the name of the artist and the idea that the puzzle which I remembered had been taken from a larger picture.  No surprise with a circular puzzle, really.  But there was, in fact, a surprise to come.

 When I got good at online research, I eventually dug up information about Paul Detlefsen.  He is not unlike Maxfield Parrish in painting Americana, but of a later generation;  Parrish was born in 1870 and Detlefsen was born in Denmark in 1899.   Paul Detlefsen became famous for gentle farming scenes;  serenity was his trademark.

It wasn't until this phase of my search (2020) that I found out that my art print itself had been an abridgement.  To my delighted surprise I found an even larger picture.  I hadn't known about those trees across the river!  Oh the joys of online hunting!


 Ultimately I found two photos of this wonderful painting.  It is not one of his most common.   The careful viewer will detect that this second depiction is even wider than the first.

Maxfield Parrish may be famous for the intensity of his colors, but this print might give grounds for competition!

When I saw what I did on eBay that May day, I didn't even stop to save the pictures.  You may imagine my fingers flew and I bought it very fast.  The seller could've had a bad reputation for all I cared!  Some things just fall into place, pre-arranged, long since decided.  There are very few items I have been looking for as long as this puzzle.  A book or two, a certain model horse,...( though that without any hope of affording it, hah [it's a Decorator]),...  Honestly, at the moment, I can't come up with an equivalent.  (cue the laugh track....)  I got the pictures later.

Photo from the eBay listing.  I had never heard of this puzzle company, Saalfield.  There was a date at the bottom of the front cover: 1965.  The great age of the puzzle helps explain why I could not find it for so many years.


Working it again has been one of my most amazing puzzle experiences, akin to what I wrote about with Copper Queen, except the memories were much fainter.  Also, my husband George was working this puzzle with me and he did much more of it than I'd planned on.  We have done hundreds of puzzles since 2019 and we're good by now.  This one still managed to be unique in its radial cut -- no other puzzle I own has that -- and its soft though firm grip despite its extreme age.  Although the missing pieces were unexpected (the seller had said nothing about them), I was still so glad simply to have it that I decided they were minor.  After all I have other puzzles with missing pieces,... missing a lot more than 3.


Photo from eBay listing

I have many puzzles; but this one is a very special favorite.


Tuesday, May 20, 2025

Progress Report 6: Rinker's Hackamore

After nearly 3 years you can be forgiven for perhaps thinking this massive project would never be completed!  Yet as of May 18th, Rinker's chapter is done, the 7th of the 8 pieces.  His hackamore actually has 2 chapters, as both Fancy's and April's Hackamores had before him.  However, Fancy's and April's had their bosals split off,  while Rinker had his mecate split off.  In all honesty he should have had his bosal split off as well -- it was so long and complex, ultimately coming in at over 70 photographs and 3 Plates! -- but his mecate was even more long and complex.  You see, mecate-making isn't braiding at all, but miniature rope-making,...  Yes, Rinker's Hackamore has been quite a challenge for me.  When you count up that I've been working on it since the third week in February, you can see I'm actually speeding up.

At this point I can focus on what's left better than what's been done.  What's left is the last piece, Tissarn's Mechanical Hackamore;  also, there's the back cover, the front cover, the frontispiece, and a mass of what's euphemistically called "editing" and rewriting.  I'd call it bringing up to snuff.  As might be expected, the whole book has undergone considerable evolution over those 3 years.  An entire blog post, if not the book's introduction, might look into those changes.  Oh yes, and there's also digitizing and uploading!  but those are separate beasts.  


At the moment I'm drawing a sigh of relief and looking up from an all-absorbing but hard-fought grind, kind of like a bear emerging from a difficult hibernation.  Advertisement?  Sales?  How about a bosal for auction!?   Such a bosal you never did see:  Every millimeter of its making has been exhaustively documented and photographed, examined, described, drawn and preserved for posterity.  It's amazing how much psychic oomph is in that little thing.  Except that I'm keeping the original Rinker's bosal, of course;  this bosal is merely a copy.  That there will be untold copies in the future is something my mind thinks it knows while my heart cannot begin to comprehend such a thing.  At some point children must leave home and their parents know not their future.  


Rinker's headstall was comparitively easy to describe, given how much has already been covered in this not-done-yet book.  His bosal, however, was very new.  The first two bosals to be covered were 4 bight;  his was a 3, and that meant a lot of changes.  This was just the beginning!  Both sets of side buttons, upper and lower, were different from April's or Fancy's:  the upper were irregulars, which meant nearly a whole Plate just for themselves;  the lower sidebuttons were a new formula, again calling for a separate Plate.  Rinker's heel knot was also very new, being an 8P 5B instead of the more usual 7P 6B, which is easily raised from the Pineapple.  I had included this formula on an earlier Plate, then changed my mind;  then changed my mind again, and used it for his.  The changing-of-minds about various aspects of this project seemed to take larger swings and become more common as the book went on.  Even now I need to rewrite Fancy's chapter and take out complaints about enlargement of the nosebutton foundation:  What I was tempted to use for hers but fought against manfully (and windily excused myself for), I wound up using for his.

Interweaves are zigzags in braided buttons.  Well, this book has more than a few zigzags!


The book's methods of documenting tackmaking changed when it came to Rinker's bosal.  The 'ingredients,' as it were, and layout of the contents of each chapter, evolved.  In the beginning, there was no "list of ingredients" or materials for each piece;  there was much less coordination with what had gone before versus what was to come.  There was also a smaller list of what was to be included.  This is one place where the book has really shifted:  I am sorry to announce there will be, after all, no inclusion of edge-braiding, which I once promised.  Nor of braided medallions, nor of any kind of braiding on a Western saddle.  😞  The book must stick to its 8 pieces of headgear, and (aside from braided rings) they have no edge-braiding.  It's as much as I can do to squeeze in what's there-!!  The inclusion of all the asides, the galleries of pictures, and the Interlude -- which covers braided rings, hobbles, curb straps, braided connectors and other peoples' rawhide bridle parts -- is more than enough to make up for the lack.


The book has experienced misison creep on a larger-than-Trad scale.  I think you will not be disappointed with what it covers.  If you get through this, braided Western and even Peruvian will be quite within your grasp.  Every picture in this post will be in the book, ... (note the little numbers in some);  we're up to 300 as of this writing.  There's one more chapter to go.


 This is my Covid baby.  Yeah, yeah, way overdue and extremely late, like nearly all my tack projects;  like my FB reactions;  like my very life, it seems, sometimes.  Not Done Yet, even now!  But pause and celebrate one of its major milestones with me.  There's a light at the end of the tunnel and it isn't a train.


Tuesday, May 6, 2025

A New Needle Awl


 This is one of those posts that has only 4 pix.  I meant to take photos of the whole process, but in the manner of deeply personal non-tack items, I got carried away and forgot,... or just didn't interrupt!  Wood is the most likely material for this to happen with;  if it had been a vehicle, like a sleigh, the chances of documentation would have been no better!  And just think of the snowshoes,...  photos didn't happen there either, at least not during the construction.

We do have a lovely lay-out shot at the start of making an entire new Needle Awl.  Coping saw and dowel, hand drill, brass tubing, soldering gun and drill bits are all here.

The broken old one is central at top.  The black cone-shaped braided button has been slipped off, and just below its bare wood can be seen two needles, the old blade and the new.  This is the only way to discern that the new blade is actually a large-eye beading needle that broke off half its eye at some unknown earlier time.  

Honestly I have made most of my tackmaking tools from broken needles.  Call it supreme recycling.   I don't have the courage, or the knowledge! to break one on purpose.

The length of the old wooden handle was 5 inches, and its diameter started at 15/32", just under half an inch.  In any case I later filed the new one a lot thinner!!  The approach was to solder the new blade into 1  3/4" of my smallest diameter brass tubing.  Its diameter I measured as 9/64",  really close to 1/8".   This soldering was unfortunately quite difficult.  I failed on the first end (the half-eye broke off inside!) and had to try the other.  I'm not at all sure I got the needle far enough in.  In future, if my new Awl fails, it will be here, where the base of the blade only goes so far in:  about 1/4" I'm guessing.

 While the metal cools I'm drilling a hole down the length of the dowel, about 2 " long.  It turns out to have been a mistake to start tapering the tip so soon;  that made it harder to center the drill.  Drilling itself was also difficult, requiring starting with a small drill bit, about 3/32", progressing to a medium bit size (about 1/8") and finishing with the 5/32".  Even though this is larger than the brass tubing, the friction of the wood was tremendous -- well above my own strength -- and pushing my largest tube into the dowel before it was ready was a big mistake.   I struggled so hard getting it back out again,..

 Back to the blade.  Slip the smallest tube into the next size up, 7/64".  The fit is very tight;  no glue or soldering can happen between the tubes.  This size's length I cut slightly less, say about 1  1/2 ".  Next, slip that tube into 1  1/2" of my largest brass tube, 9/64", again a tight fit.   Each tube I cut slightly shorter so that I'd have a tapered telescoping to hold my needle.  I later soldered and filed this taper smoother with a metal file.  

It looks so much like nothing!  It especially looks like an assymmetrical fit in the above photo.  But this was before I filed the wood cone even.  At least we are not dealing with what we had before, that added-on cone.

 Fitting the soldered nest of brass and blade into the handle was a matter of finding a crack in my worktable I could push the needle all the way down into.  Then, with the needle safely out of the way and the weight resting against the tubes, I jammed the wood down as hard as I could, trying to force the brass into the hole.  Bit by bit I succeeded.  Of course the blade is a bit crooked [not centered exactly] -- that is a byproduct of my soldering -- but the old awl was that way too.  It is not a flaw that will affect its performance as a fid.

Lastly came the process of getting the braided buttons back onto the handle.  For some reason the longest button would NOT slide.  I filed and I filed and I filed [the dowel smaller], -- for two days I tried!!  --  to get that darn thing to move into place.  Yes, I wetted it, greased it, you name it!  It never really behaved, so I gave up and braided a new button into the space that was left.

So that is how the exact same length of handle and the same buttons didn't come out the same way.  Go figure.  The new button, I am proud to say, is a 9P 7B Fan, subtitled 1-3-3-1;  you can see each pass can be described by going over 1, under 3, over 3, under 1.  This beauty will be in my next book;  it is heavily used on Tissarn's reins as well as Peet's Romal Reins.  It's one of my favorites.  [Ed. note:  In the final finishing the lace covered up many passes and so it looks like 1-2-2-1.]

Also, this new needle was so sharp I had to blunt it a little.  It took some using to reveal that it needed a bit of shaping with a fine metal file.  It works fine now.

*****************************************************

IN OTHER NEWS:   Rinker's bosal is done.  After photography, I will be putting it up for auction on MHP at an announced time.  I'm thinking of asking $75.00 plus postage.