Wednesday, October 30, 2013

Goehring's Fenders Etc


This will be a brief and -- yippee skip!! already outdated!! --  update on the progress of this marvelous Mexican saddle order.  Pictures are always behind actual construction, for which I can only blame my photographer (me).  I needed some fresh outlook, so I tried the bridle and breastcollar on a different horse.  The result you may view above.  Oh, he looks good...

When last we saw this saddle, the stirrups were here:
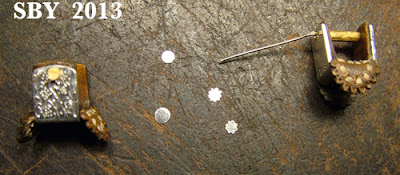
Since then, I've finished them.  The bolt ends of the necks are covered in the tiny Aluminum star conchos, all of which were made by hand.  It's amazing that an X-Acto knife can cut metal, but it does.  The necks were painted in my Fiebing's Saddle Tan Oil Dye, the only bottle of such stuff on hand.  Boy it stinks but nothing else gives that color.  I tried it on the tree too:
I am pleasantly surprised at the results.
I still have a few questions about the tree, and the seat in particular (right now).  All my references but one did not show the seat front, er, the exact place where the rider's buttocks would rest.  It was hidden in shadow.  I supposed it would be covered in the same basketweave as the rest:
But a closer look reveals that it is plain.  There was one shot that showed clearly it was not stamped.
Surprise, surprise.  I think I can handle this.
While we're on the subject of Mexican style Charro saddles, I'd like to include a link to an amazing collection of reference pictures, posted by Luis Aguilar of Mexico City.
Nohuanda Equineart   If you aren't drooling by the end of that, you're dead!  On the other hand, I wasn't all that thrilled by Charro saddles when I started this order, yet now...  Oh now...
It has the challenge of something a miniature saddler can really sink their teeth into.

 Next was tooling the fenders.
The patterns seem to be a combination of traditional floral motifs and swirlies and mildly geometric intercrossings, almost Celtic (the strap).  This is the second time I've run across this particular phenomenon:   Interlacing geometric patterns, such as are found in Celtic knotwork, look exceedingly good on Spanish and Peruvian tack.  The first is in the TSII Peruvian sets.  See our website.. Timaru Star II Peruvian page 2

The scallops on the edge of the fenders was all cut by hand.  I did it in our local Toyota dealership...

What I've really enjoyed is the checkering on the fenders.
I'd known from the beginning that, while these are made with leather (or rawhide) lacing in full scale, they could not be made by interlacing at one-ninth scale.  Not by me!  I made the slits with my largest needle chisel.  The thread is the same as that used on the reins: waxed linen.  It has that old-ivory color, that ancient-linen off-white creamy color that goes so well with these old dark saddles.  One arm's-length of thread was the perfect length to go three times along one fender.
Close up it's clear it's made from passes of thread; but even at a short distance away, the effect is (I think) acceptable.

I had to make up some of the tooling on the flap of the fender... my references didn't show more than the bottom third.

Here is the finished product.  I'll have to lace-tie the strap ends together... there is not room for a buckle, neither vertically (in the thickness of the straps and the tree) nor in the length of the leather straps themselves.  My reference absolutely shows no buckle, so all I've got to go on is experience of how Old West parts of saddles were tied together.


And now for something completely different.  A friend was admiring my neckerchief slide, and I let her talk me out of a short order.
The first one, on the left, wasn't quite right.  But I was having so much fun I kept going.  There is a braided-leather core inside these slides.
Having filled an order in less than two days, it has now taken nearly two weeks to contact the customer, and we still haven't gotten together!  Frustrating and foolish as this is, it's a pleasant change of pace for me.  It is very important, sometimes, to succeed at something...!  when the rest of your life is stuck...
But fear not.  Progress is being made.  Things are, in fact, going well.  Next post should have more details on this extraordinary saddle, TSII #451.


Thursday, October 10, 2013

Goehring Stirrups

I learned a very important engraving lesson with these stirrups.  It will be forever impressed (I almost said engraved) upon my mind.  It will also be connected with the movie I was watch/listening to at the time, which was Hiyao Miyazaki's My Neighbor Totoro.  I don't have pictures of exactly what happened, only before and after -- but oh Lor', never again!
But to begin at the beginning.
Every big project has to start somewhere.  Thanks to Alison and Jennifer I had the tree.  Thanks to other factors, I'm finally starting to have some time, although 'tis a fraction of what I could spend on model tackmaking!  And thanks to some odd idea of working from edges inwards, I eventually decided to start this monster saddle with the stirrups.  Once it was broken down into parts, things began moving.
I'd better show you the reference.
This is the real Clyde Goehring stirrup.  The white checkering is present on both sides of the foot rest drop, front and rear.

Paper patterns are what I use.  This is a critical step, to practice with before actually cutting leather.  The bottom patterns here are for the stirrups; the rightmost one came first.  I knew I wanted to use the sheet aluminum ("Create With Metal") I'd gotten at Hobbytown USA.
Although the reflections are bad, you can detect a strip cut off from the lower right corner.  It was easy enough to bend this strip into a U shape.  It was very hard to drill holes through it.  This took a long time.  I knew what I wanted to use for the neck:  None other than a bamboo skewer I'd snuck home from an Asian restaurant!!  Ah, recycling at its finest...


The decorative pattern on the real stirrup was somewhat mystifying.  I'd rarely seen anything like it:  triangular groups of dots.  Grapes?!  In the stamping, they simplified themselves, a skill I don't know how to explain, other than to say that 10 groups just wouldn't fit.  At this point all was well. 
 It was time to try out my ideas on the checkering.  Like so many tackmaking solutions, this one came to me in the middle of the night, out of nowhere.  I knew I couldn't use leather interlacing -- the material has its limits, as does my patience!  But the soft Amish harness thread seemed to hold promise.
 And it worked.  It even had that weary-worn look.
At this point, a most enticing idea crossed my bows.  Should we not try to engrave the little beasties?  Fatal choice!!!
This is the "before" picture.
Take it from me kiddoes:  Choosing to engrave these stirrups AFTER putting the necks and leathers on them, burying them in a huge lump of plastic, was WRONG!!!!  BAD IDEA!!!  Oh, I thought I was clever:  I knew better than to put Thermo-Loc right against the leather, and embedded them in paper towels... but Oh, OH, DID I calculate the consequences of burying a 3-dimensional, inch-square leather-covered object in solid grey plastic??
DID I realize how hard that stuff would be to get OFF??
No, gentle reader.  Not at all.
It took an hour to free just one.  An hour of tiny little cuts, shaving the Thermo-Loc off bit by bit, aware every stab how easy it would be to cut either myself or the stirrup, making a pile of thin grey scrapings.  The Thermo-Loc could not be saved.  It is a miracle I saved the stirrup.  The second one took only 20 minutes.  There was some damage, but nothing that couldn't be glued or Edge-dyed.
Whew...
I only engraved one side, my own compromise.  The result was lovely and it matched the rest of the bridle and breastcollar.

These stirrups are incomplete.  Neck leather wraps are still needed, as well as conchos.
This extremely handy tool is my circles template, a heritage from my drafting days in college.  I have used this more than any other drafting template in tackmaking, throughout the history of the TSII.  Note my last name inked on it:  the 'N' is not curved, something very early in my career as a draftsperson, before I developed my "hand" (handwriting).
The scissors are my 'tin snips,' an old sewing pair kept exclusively for cutting sheet aluminum.  The tiny circle of the concho is at the upper right of what I'm holding.
One down, eleven more to go.