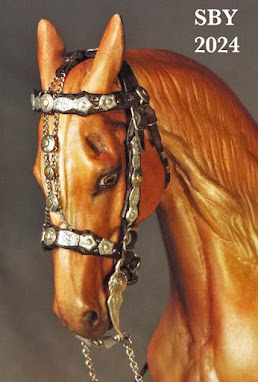
A few years back, an old tack customer of mine had been asking about a minor repair for a silver Parade bridle, but I'd let it slide. When she won the recent Black/Blue/White mecate, things had a second chance. When I opened her box, my first words were "I never thought I'd see this again!" It was like magic, transporting me back to the time of one of the TSII's most influential and beautiful pieces. It lay in my hand: the bridle to #422.
Here is the saddle's scrapbook picture, today found on the TSII website (under Parade sets). No. 422 is a portrait of Louise Cottam's Edward Bohlin silver parade saddle. A nod to Eleanor who saw to it that I had the hardback coffee-table book, Saddlemaker to the Stars, which had the reference photos I needed.
Its relevance rests on its combining gold figures within the silver, its elaborate silver spotting (done with Mylar), and its unique stylized-maple-leaf-like shaped silver spots, which I individually made out of aluminum. Each spot had 2 prongs and was clinched in place. Oh and I made the bit. Whether it was sterling or Argentium I'm afraid I haven't had the time to dig out.
At first glance it was clear this would mainly be a polishing job. I wound up polishing before, during and after the repair of a silver oval figure (a flat spot) on the noseband which had broken loose. This post will show both how the spot was fixed and what I use to polish silver on model tack.
At the time of its making, certain methods and procedures were cutting-edge technology for me and I strongly held them secret. But as time has passed, my attitudes have changed. This post (and others) reflects that,... It is becoming clear to me that while model scale braidwork (and its book) is a professional interest of mine, the equally-famous subject of Silver Parade will most likely have its book-equivalent (or whatever) much more of a scrapbook, a gallery or an identification list, (probably) hosted on my website (as it is already partially) and online. Such are the evolutions of ageing.
Here's the bit up close. Although the photo doesn't show the color well, take my word for it, it needs polishing. I've started in with the fine jeweller's file, and the shiny spot at upper right is the result.
Here are my chosen tools of the trade of model silver polishing: Wright's Copper Cream, X-Acto knife, fine rattail jeweler's file (leather braided handle), microbrush (thanks Robin!), and Q-tips.
The scissors cuts off the ends of the Q-tips when they get too blobby and dirty. You then have a smaller Q-tip, which is more useful than before. Note I do not use a cloth or paper towels, except during cleanup! Thank heavens the aluminum did not need polishing.
The method of construction of the silver bands, or plates, on the cheekstraps and noseband, had been very advanced for me. Essentially a strip of what I called bonded aluminum had been laid underneath a leaf-spot on one end and a pinned domed concho (a Rio Rondo concho) on the other. The strip was held down by the leaf clinches and pierced by the pin. Seeing the piece again after 23 years gave me priceless data on what had worked and what hadn't. The cheeks were fine. The nose, that place of maximum flexion and bending, had broken. I have found this to be a near-constant in the silver parade sets that come back to me for repair: the places of greatest bending are always the places that break.
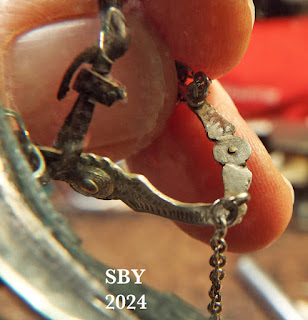
Below you can see how the broken end of the oval flat spot curls up after the break. I'm peeling off the lining leather in order to get to the backs of everything. I had to gently coax it off with the knife; the glue was not really water-soluble. This was rather nerve-wracking as the lining leather was so soft and fragile. (The third and fourth fingers hold the face ornament on its chains.)
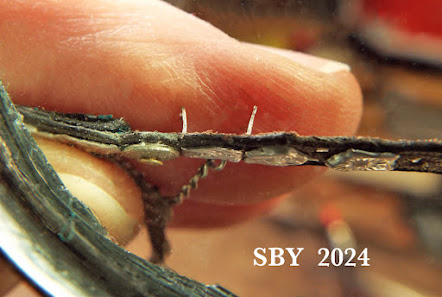
Here's what's underneath. The largest rectangle-shaped silver is the two prongs from the leaf, showing they were placed pointing inwards, viz., their cuts stressed the leather in the least harmful direction. The tiny silver dots and curls (one shows at uppermost left) are the Mylar lacing of the teeny spots. The green corrosion, verdigris, is from the brass pin used to hold down the concho. Wipe and scrape clean.
Here we see the pulled-out broken spot, at lower left. Next to it is its replacement, cut from a piece of bonded aluminum. This is a term I made up to refer to silver plumber's tape laid on top of Maid-O-Metal sheet aluminum. Oh how I love that stuff: it can be drawn on, it's easily cut, it doesn't tarnish, it solved so many silvering problems. Best of all, since the adhesive on the tape doesn't touch leather (or indeed, admit air), it did not decay or fall off. The replacement spot has already been engraved, that is, drawn on with a blunt awl point.
Here I am cutting new slits with a needle chisel. The oval spot will be placed between the leaf and the concho. The slits are slightly curved, the better to fit against the existing spots. Skill is called for not to cut too wide a slot.
Here's the coup de grace, pushing the prongs into place prior to folding them over. I'm a huge believer in clinching tack.
There were a couple of unexpected consequences to this repair. (When ever aren't there?!) One was the slender line of dark brown leather to either side of it, missing in the original version since the old silver had run directly into its neighbors. The other was that the color and texture of the silver didn't match. The new was brighter. Twenty-three years of oxidation had had its way. I immediately decided to replace both sides of the noseband. After that, I glued the black lining leather back on. A touch of Leather Glow to the leather parts of the bridle, to protect and shine. More polishing of those ferrules (sidewise stroking of Q-tips with Copper Cream, and stroking with the file). Finally the bridle is done.
Hopefully no one will notice that browband and nose are henceforth subtly different!
For a few moments I regretted I didn't have an expensive finished Western resincast, and then I remembered.
My own NaMoPaiMo horse from 2021, Orlik, sculpted by Margarita Malova. He is that rare beast who can display both Western and English, plus costume, harness, regalia and almost anything else. Multi talented little guy...!
Christie responded kindly to this repair. I can only reflect that more than a bridle has lasted all those years. A good customer relationship is beyond price.


No comments:
Post a Comment