Friday, April 21, 2017

Silver Edge Braiding, Part II


TSII #442, built in 2005.  4-Strand Round Braid on cantle.
The topic of silver edge braiding got away from me, and I had to divide my post in two.  Part II will deal with the braiding itself, as much as I can portray with just photographs.  This post will cover starting, braiding and ending the Four-Strand Round Braid.  I learned this one from Bruce Grant's book, Leather Braiding (1950).  It's on his Plate 35, and he calls it "Second Method."
Cutting the slits is part of edge braiding, but it's a skill I'm taking for granted in this post.  I have made Needle Chisels (as mentioned in my book The Guide to Making Model Horse Tack), out of needles and paintbrush handles, in order to have miniature thonging chisels.  For my current (2017) saddle (TSII #456 Star Wars), I am using my largest Needle Chisel.  The blade is about 1.2mm wide.  The slits are cut parallel to the edge of the leather, a little less than their own width apart.  I'm afraid I space by eye -- experience is the best teacher here.  I'd guess my spacing is about 2/3rds or 3/4ths of the width of the chisel; the above shot and the third one down provide some example.

Of course the first time my Galaxy silver strip is pulled through the slit, all its handcut irregularities are revealed!  My best efforts are not perfect.  I must be prepared to go to an ungodly amount of fuss and care trimming it.
The tinest trimming can make a difference.  I want my lacing to slip smoothly through the slits, and be neither so thin that it's liable to break or to not cover the leather edge when braided; yet not so thick that it sticks and deforms in the process of braiding.  It is possible to close in on the right width for all the 18 inches, but time must be put in at this stage.

To begin, I've learned to always look down on the grain side of whatever I'm edge braiding and start at the extreme left end.  On cantles this turns out to be the off side.  My breastcollars and tapaderos have many sections of edge braiding and each section has to be done individually - just start at the left end.  The braiding thus travels from left to right.
I open the slits with my Needle Awl or miniature fid, one at a time, as they are braided.
 I don't use needles with Galaxy lace.  I just cut a point on one end of my strip.  The point has to be small enough to easily pass through each slit and let me grab it on the other side.  This works out to be about half an inch of point.

The magic number with Four-Strand Edge Braid is four.  Starting with the first slit, the next slit is the fourth one to the right.  The starting slit will turn out to be useless -- the end will be withdrawn later --  so leave about two inches of dead end at this time.
Tension, or how hard to pull, is essential to the skill of braiding.  With Galaxy lace the tension turns out to be critical, nothing less than the heart of the silver braiding effect.  A strong yet controlled pull is needed:  enough to deform the lace slightly and mold it to the shape of the leather below it, yet not so much as to break it or stretch it so much it discolors.  Only experience will give this sense of how much tension to use.  My most common failure is not pulling enough.

The Four-Strand edge braid basically follows a figure-8 path.  Here the first pass back is shown, through the second slit.  Once through, the lace is bent again to go to the right.
The next picture shows two steps, so I'm showing it twice.  The silver strip has passed through slit 5 and been pulled tight.  Meanwhile my Needle Awl blade is entering from lower right and poking into the pass made in step one.  This is where the working end will go next.
The whole path of the working end describes a figure 8.  Now it comes back towards the left, pulls tight and slips under the old pass laid down in the first step.  From now on it must pass beneath itself, once on the grain side and once on the flesh side, every lap.  This makes the appearance of a braid of 4 strands.
Care must be used to avoid breaking the silver with the Awl.  The Galaxy can stretch, but only to a certain degree.  Here is really where experience comes to aid; I am always surprised at how strong the lace is, but I have had my share of breaking it.

View of the back side (flesh side).  Having passed under, the working end enters slit 3 (remember him?) and emerges.  It's held under my thumb here.
The next action is to bend to the left (or right if viewed from the grain side), and slip under the silver immediately to the left.  To put it another way, go under what's coming out of slit 4.
I find the action of silver edge braiding consisting of a great deal of time running the strip through my fingers, trying to keep track of the silver side.  It is both boring and soothing.
The Four-strand Round Braid really does follow a figure 8 path, overlapping each pass one slit to the right when viewed from the grain side.
Here's the grain side view.  After passing the working end through, it will slip through slit 4, on top of the silver lacing already there.  Each slit, each pass, must be enlarged gently with the Needle Awl.
I can't emphasize it enough:  Even Tension is the difference between rough, clumsy-looking braiding and smooth, professional-looking braiding.

And then there's Problem-Solving!!  My point has become so worn and frazzled it's delaminating.  When this happens, I shorten the lace a little and cut a new point.
How to end the braid?  The quick answer is to pass through the same slit twice.  What to do with that standing dead end at the beginning?  Here, it is withdrawn, pointed, and braided in reverse for a couple of passes.  I mean the figure 8 is done in a backwards direction, with the silver filling in gaps and extending the braiding back to the start.  The last pass can be merely a loop crossing over the leather edge, as shown.
The Galaxy end can be glued down on the flesh side with white or brown glue.
Here's the top of my new breastcollar shoulder.
For reasons of design, the edge braiding was done before any figures or pictorials were added to this breastcollar.  Normally, all tooling and silvering is done Before any edge braiding.  "Do as I say, not as I do!"
I will end this pair of posts with the same shot of my unfinished, completely silver edge braided saddle, TSII #456.  When this shot was taken, the seat had not yet been fastened on.  Only time will tell whether entirely edging a saddle with silver braid was a good idea!  The beauty is fantastic but the increased delicacy and fragility will require dainty handling.
TSII #456 'Star Wars' unfinished.


Silver Edge Braiding, Part I

TSII #422, built in 2005.  Blanket by Snow
Silver Edge Braiding Part I contains an introduction and shows the preparation of the material I use.  I wanted to cover when and how this fabulous miniature effect came to be part of my model tack repertoire, what it looks like and how to make the silver strips.  This post covers just one of the four methods I use, but it took up so much space and had so many pictures that I chose to use a Part II to cover the braiding itself!  Obviously I'm practicing for my next book...
TSII #422, built in 2005.  Four-strand Round braid on cantle.
The idea of silver edge-braiding on a Western saddle came from, of course, Lisa and Loren Skyhorse, the famous full scale saddlemakers, who made it a trademark.  I encountered their ideas in a two-page magazine ad sometime after 1990.  (I always thought it was Western Horseman, but I still have those pages, and looking at them now, it probably was Arabian Horse World!)  As for the material, at the time I was enamored of Galaxy lace.  This was a 5/32" plastic lace used on belts and saddles and sold by Tandy's.  I had been told about this material by one of the first model horse specialty shop owners, Cheryl Abelson of Heather Hills Miniatures, back in the early 80s.  (I'm pretty sure it was Cheryl; but with my slightly slippery memory, there's a 9% chance it was either Sue Rowe or Carol Howard.)  Galaxy lace worked so beautifully I am still using it today, 35 years later. 
TSII #438, built in 2004.  Four-strand Round braid on cantle.
Galaxy lace gave me what I was looking for:  heft and strength, glorious color and a glossy finish that did not tarnish or rust.  It was a material relatively easy to get hold of, it could be custom-cut to size and it was cheap in bulk.  It was easy to work with, and incredibly tough, lasting through many passes in the course of braiding.  It had some stretch, so skill was called for in its use, which suited me down to the ground.  Its few drawbacks were that it took patience to prepare, and if overused or stretched too much it would delaminate, the gloss layer peeling off, followed by the silver layer.  In some circumstances, such as a dry climate or in direct sun, it would dry out and harden over time, and, in worst case, become brittle and break; but these cases were rare.  I loved Galaxy lace and used it on my own belt for decades, until the silver wore off!  For model tack uses it was just about perfect.
Seat to TSII #456.  Four-strand Round braid on cantle.
What I could not have predicted, when I bought an entire spool in the early 80s, was that by the time I used it up (2017), Tandy's would have discontinued Galaxy lace.  I am so dreadfully sorry to confess I need every inch I still have!  I have looked for it online, and possibly found it in a specialty leather store, Springfield Leather; but I still need to determine that theirs is truly the product I use.  Their pictures show a curiously grained or wrinkled surface; it should be smooth.  The 25-yard spool I bought c. 1982 would have cost the equivalent of thirty dollars or so.
All I've got left.
I employ two different materials with 2 different methods of braiding for miniature silver braiding.  The second material I sometimes use is Mylar tinsel, sold at fishing shops; it has one side silver and one side gold.  Braiding done with Mylar tends to have a goldeny undertone, while the Galaxy has more of a grayish-bluish silver color.  The first method, which these posts cover, is called Four Strand Round Braid;  the second method of braiding I use is Spanish Edge Lacing of 2 Loops.  It's not that I never use any other material, or that other braids couldn't be used; but these 2 braids make up the vast majority of all silver edge braiding I do.
 (Can you tell I've got 2 different lamps on my bench?!  Incandescent left, florescent right)

Although Mylar tinsel makes a smaller braid, I find it more difficult to work with -- it's stiffer and much harder to control.  Nonetheless it is easily obtained and you don't have to cut it to size.  It comes precut in 4 handy widths.
Here's the back of my test piece, revealing much:
This (above) shows the texture of the Galaxy lace as opposed to the Mylar.  Galaxy is thicker and has a white plasticky body, whereas the Mylar is quite thin.  It should also be obvious that the Mylar tinsel ends are a lot harder to glue down;  they have escaped my gluing with ease, so I taped one end down with Scotch Tape.
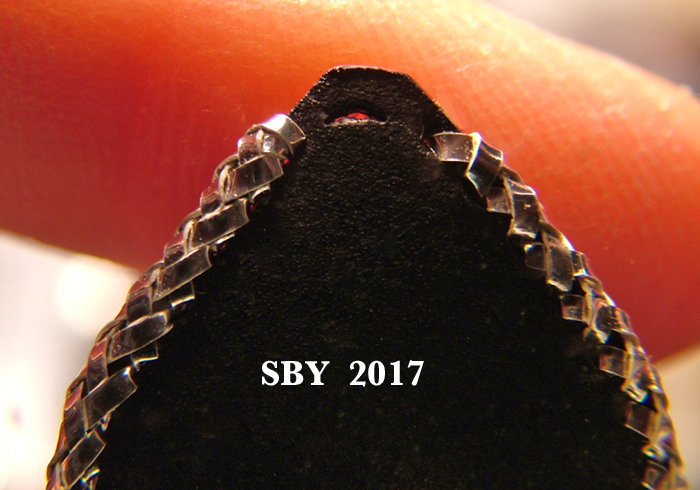
TSII #447, built in 2008.  Spanish Edge Braiding of 2 Loops on the cantle.
Normally I use silver edge braiding only for the cantle, horn and gullet.  I guess that's one reason a spool of lace would last 35 years!  The saddle I am currently (2017) building (TSII #456, Star Wars) has ambitiously aimed to be completely silver edge braided, something I've never done before.  I am utilizing both my preferred methods of silver braiding with it.  The larger, wider Spanish Edge is being used for the cantle and gullet, the rear of the fenders, the base plate (bottom skirt) and other places where weight, heft and thickness are desired.  The smaller, more compact and smoother 4-Strand Round is being used everywhere else.  Needless to say, I'm going through my Galaxy supplies like there is no tomorrow.
TSII #456 'Star Wars', unfinished

TSII #444, built in 2006.  Spanish Edge Braiding of 2 Loops on the cantle.
Traditionally I have used Spanish Edge Braiding (also called Lacing) of 2 Loops for my cantles.
TSII #454, built in 2015.  Spanish Edge Braiding of 2 Loops on the cantle.
 Galaxy lacing needs to be opened, flattened, peeled carefully and cut into strips.  I have always used shears to do my cutting.

I start with about 18 inches of Galaxy lace straight off the spool.
Straightening out the curl is important; otherwise, wrinkle problems occur.  I smoothe it out by hand, straightening it with my fingers.
There is a seam on one side.  Galaxy lace has a 'stuffing' or inside body of netted fibres, which must be removed.  Start the removal process by folding back the lace longways, parallel to the seam,  exposing the netting.  Fold gently, avoiding wrinkling as much as possible.
I pry with my fingernails, opening up the end, at first just one side.
This is what takes patience:  gradually flattening out the lace and its fibres without distorting it.  Being only human and unable to do the whole 18" slowly, I do a few inches at a time.
It takes fingernails to start the peeling process.  Off with the netting.
It does not take a lot of strength, just careful pulling.  I use about as much force as peeling a green banana.  The extracted netting is thrown away.
The trick is have the side flanges open before peeling off the netting.  A hard lesson to learn!!  It's so tempting to peel everything at once, fast!
 But if I do that, I get this:  warps, ripples, twists, distortions.  The lace is stretchy and once past a certain amount of stretch, it cannot go back.  Yes, it is tough, but in the end Galaxy is a one-time-use material.
Only experience can teach how fast and how much force to use to peel off the netting.  In this picture below, the lower right was peeled slowly, with opening of the sides, and the upper left peeled fast, with less opening of the sides.  I hate those ripples!!
 This is a closeup of when things go wrong.  The gloss layer has delaminated (lifted) and the body is warped.  This curled section cannot be used.
Once peeled and the netting thrown away, the lace is flattened gently again.  I want as few ripples as possible.

I gauge my silver braiding strips to one of the chief tools I'll be using for edge braiding, my big Needle Chisel. This shot shows the blade of the Needle Chisel (with red wrappings) held against the oh-so-handy markings on the inside of the peeled Galaxy lace.  The Chisel cuts the slits in the leather this lace will be fed through.  It so happens that my chisel equals about 1  1/2  to 2 "squares" of the markings.
The start of cutting.  As I've said, I use shears for this job.  Thus I have absolutely no data on how Galaxy would behave under other types of cutters.  However, it should be possible to cut it with whatever is familiar!
Here's where the real skill comes in.  I cut long strips by hand, measuring totally by eye.  Honestly I've never counted but it's about 8 strips per lace.
Taa - daa!!
I use tape cases for storage -- that's just what works for me.  These are the plastic round flat boxes that rolls of vinyl tape are sold in.  Yes, I got them at WalMart.  I tie my stored strips together with a spare bit of sinew, in just a half hitch.  It's important to be able to untie it easily.

Part II will treat the Four-Strand Round edge braiding.

Saturday, April 15, 2017

Charleston and the HSO House

 For Spring Break, March 3rd thru 12th, we went to Charleston SC.  We were our own tourist guides and treated ourselves to a fine walking tour of the old city south of Broad St.  In the process we discovered a house with a horse-shaped-object (HSO) in every window -- and none of them were Breyers or Stones!  We also availed ourselves of the city's excellent horse-drawn carriage trade - of course I am including a few harness shots.   This destination choice, so different from our normal canoe-trip ones, was made necessary by the timing of George's classes this semester... and by the discovery of the timing of flood season in our otherwise-chosen-destination, NC's Lumber River.

Although this post has a huge number of pictures, it shows part of one day, out of those ten days of our trip.
I'll start in White Point Garden, the park at the end of most of the tours in Charleston.  It's a fine slice of trees and greenery, fountains and lawns, and it had lots of azaleas.  My husband is crazy about flowers, so the timing was perfect.  I loved this fish fountain -- I have a soft spot for Victorian decorative design (it must be the ragtime carousel fan in me).  There are more famous fountains in the city, but this was my fav.
The walking-tour part of Charleston has a lot of alleys.   I put in a great deal of research to come up with a good route, but in the end we just followed our noses.
 Something extremely delightful to encounter was fully-grown mango trees.  I buy mangos and eat them and plant the seeds, and I've sprouted a few.  But I'd never seen the mature adult tree.  Here they were, in all their tropical glory.
As one who has raised and watered and struggled over a potted mango sapling, this was amazing to me.   Those little yellow blobs:  baby mangos!
More alleys.
The ironwork on the many gates and fences and doors was intriguing to one who is always seeking patterns and designs.  I'm sure there is a book somewhere on just Charleston ironwork.  We snapped a few gates:
 The sense of a private garden 'just around the bend' is very strong.  To one with imagination it is a pleasure to peer through these fences.
 OK I'm leaving out some of the most important parts!!  Naturally we had to sample the horse drawn services.  As I said on my FaceBook,  I chose Old South Carriage Company.  It was the best bet for us and we were given a very good ride.  Note for other customers:  we got lucky and drew Zone 1, the best of the 3.
My husband pointed out that at a walk, pulling 8 people, our draft horse outpaced a jogger.  I had not noticed.
We didn't actually shoot pictures while on board; however, we did get these.  The horse's name was Ben.  Since we live in Central Pennsylvania, imagine our pleased surprise to discover Ben was of Amish origin.
As a harnessmaker, what was interesting to me was the sidestrap.  I'd never seen it run through the rein terrets and fastened to the collar.
Which just goes to show that after 38 years of studying harness and making models of it, you can still find something new.

Charleston is truly a beautiful city, and for southern charm it is well preserved.  We staged several passes through the lower blocks, walking for a total of about 5 hours.
 
This one is called the Gate of Swords.

 This was a personal fav.
Since both of us are ship-loving romantics, and since this tour is highly personal, you will not be surprised at the next 3 shots.  The outer boundary of the lower city is the sea.  What should we spot but a cargo ship coming in -- it instantly drew our attention (and our lenses).
Naturally, we had to watch it all the way in, which took a fair amount of time.
You do know, I hope, that the current incarnation of the Timaru Star is a cargo ship?  Of course, this was not her; but it still was very interesting to us.  Must tell this story sometime (see my earlier blog post, How the Timaru Star II got its name).

Back in the city, we found many beautiful flowers, doors and other objects.
Did I mention I like Victorian decorative design?
And that George likes flowers... ?  The flowers were just getting started, and the rest of our week featured great masses of azaleas, amoung others.
There are two natural endings for this post: the graveyard and the HSO house.  I think I will put them in that order, though it's rather arbitrary.
 The public is able to stroll through this graveyard.  The carving on the large cross was well worth studying.

Somewhere south of Broad St, in the eastern half, deep in the brick houses zone, we came upon this:
There had been the odd lawn statue about - I had seen pigs -- but this was indubitably equine.  Except none of them were Breyers.  Nothing modern at all!!  To my startled eyes it became clear that this house's collection was intentionally nineteenth-century... but that the urge to collect and display horse shaped objects transcends any such limits as mere time and place...
All but one of the objects were horses, of one sort or another.  Who needs plastic?

Even the white shed on the left had one.  Material?  I could only guess.
This one looked wood.
 And this one had to be brass.  Just like a doorstop I had at home - the other side is probably prettier.
This one also looked wooden.
This one amazed me.  It looked ceramic.  I pride myself on recognizing familiar horse molds, but I'd never seen 'hide nor hair' of this.  It was big!!

More oddballs.

This one, again, I think, was wood.  There must be a relationship to those carved-fish signs, and by extension, to ship figureheads... (and we're back to the TSII again, somewhat roundabout!).
This one was clearly metal.
And here my photo tour ends.   Hope you enjoyed your time in the city!


If you ever get to Charleston, be sure to wave at this house for me.