Friday, March 27, 2020

TSII #457: Fixing Problems

So many things I could've blogged about, yet what comes out?!  Fixing conchos on the breastcollar of TSII #457 -- !!  Sometimes this narrow focus is something to despair over.  Other times it is a gift, a blessing.  Today it's what's on my mind right now and what my camera caught.
Like most great model tack, this breastcollar is still teaching me lessons.

For starters, I really didn't like that little concave-arched concho under the center medallion.  Here it is as we last saw it:
Even if you wiggled it level, there is a noticeable asymmetry.  I'm not sure how it escaped me as long as it did.  Sometimes I blindly rush ahead (yeah, never happens, right?!).  I must have thought I could file it down into shape.  Also, for days I've been wondering how I was going to disguise the cuts in the leather to its right:  A challenge worthy of the greatest leatherworker.  Yesterday it finally dawned on me that the best solution was to make a whole 'nother concho, from scratch.
So I did.
Here it is before engraving.  You can see the improvement in the overall shape.
Here's a rare sight:  testing before engraving, to check size and fit.
I was very happy with how it covered up most of the right-side cuts.  I also tooled those cuts down.  This after-the-fact smoothing is as close as I can get to erasing tooling.  It helped.
Once engraved, the concho fit beautifully.

There is more going on here than just replacing one concho.  See the upper right (offside) of the central piece?  The slight bulge is an attempt to raise the leather and hide the gap between silver and tooled edge of its 'pocket' or indicated space.  I've used the equivalent of repoussee, a silverworker's term for 'hammering from the back.'  I suspect the more correct term is to 'just stick in a shim.'
Below you can see the leather shim or 'plug' I put in there.  You can also see the embarrassing mess of laces holding down the various conchos of the martingale part.  This was necessary because of the different angles of soldered loop, and because of the replaced concho.
Other problems included a gap between the near side of the central concho and its tooled leather pocket edge (I still don't have words for these things)(indicated edge?). Here I'm using the same idea of pressing from behind to bring up the surface.
And gluing in a shim piece.
It helped!

Next is setting the conchos, that is, gluing them in and lacing them down.  Can you believe I needed to re-learn to glue them first...?!  This is where test-fitting them reveals that more tooling needs to be done.  The next pair of shots shows the same pocket two different ways.  I've cut wider lines and tried to tool the edges 'down and out' so as to better embrace the concho.  The goal, as stated before, is to form a 'shadow line' around the silver edge, making it look as though the whole concho is sunk into the leather.
In real life I shouldn't think it'd be nearly as hard as it is in one-ninth-scale miniature.
Finally I am happy with it.  I discovered from my earlier (2014) notes that I called these in-between, concave-sided ones "X conchos."  Good enough.

This really is only a small portion of the subjects I could blog on.  Like so much else,
we'll just have to see what happens.

Wednesday, March 18, 2020

TSII #457: Silvering the BC

It looks like I might be blogging somewhat more often for the foreseeable future.  Note that blogging is one of my relief valves (as well as a great pleasure), so at beginning, middle & end expect a bit of ranting and philosophizing, if not downright history!
Today's post covers engraving silver on TSII #457, the Clyde Goehring II Mexican Silver Parade saddle.   In particular, I took a series of shots showing the process of engraving one of the pieces flanking the central concho.  I wish I had a word for each silver piece's shape on this breastcollar, but I don't!  not even a number.  I have a hard time calling something not round a "concho."   But that's probably what they're called.
(For the curious, the word concho comes from the Spanish 'concha,' meaning shell.  In days long ago, cowrie shells were used for horse tack ornamentation.  Their pearly white smoothness looked very good against dark leather.  Think of elk teeth used on Native American costumes; contrast is king.  The word concho came to mean shell-shaped and circular pieces of silver on tack.)

As mentioned before, TSII #457 is basically a repeat of a saddle finished in 2014, #451.  This post is also something of a repeat.  In May of 2013, I was making the forerunner of this very breastcollar, and posted all about its silver:  Goehring Breastcollar Engraved
This post has even more detail.

While I'm not very happy about how slow progress has been on  #457, I might justifiably claim I was otherwise engaged!  Where are we going??  and why am I in this handbasket -- ??
While we don't know where we're going,... I am sorry indeed to see so many activities cancelled and postponed (I was supposed to judge a show this very weekend!),...  I do know there are far worse things than being encouraged to stay home and make tack.  The magic of the Web gives the hobby a connectivity it did not have when I first started in it.  The foundation of that mail-order life is with me still; I look forward to writing more letters.  In fact, I'll probably be notifying the owner of #457 about progress by snail mail, out of a personal preference for doing the solidly old-fashioned thing!  Those days had more time and less stress, something I could value.

Here is a close-up of #457's central breastcollar concho:
My gaze leaps to the mistakes.  Yet I dare think that those are not the first things seen by the casual onlooker.  I can adjust the angle of the concho by tweaking the lacing in the back.  It is considerably harder to tweak the surrounding leather, but there are some ways to 'encourage' it to lie properly in relationship to the silver.  You can see the start of one such encouragement above the left of the central concho, where I'm hoping to squeeze the leather closer to the metal.  The pre-tooled 'pockets' don't always match their pieces.  I'm considering how I might change my procedures so that they would better match.

Here's a peek at the back.  Note how the tiniest concho (curved bar shape)(bottom-most) has got a loop that is not lined up with the rest.  The leather lace's natural attempt to lie straight is causing the concho to twist.  I later solved this problem by cutting the lace between it and its neighbor above.

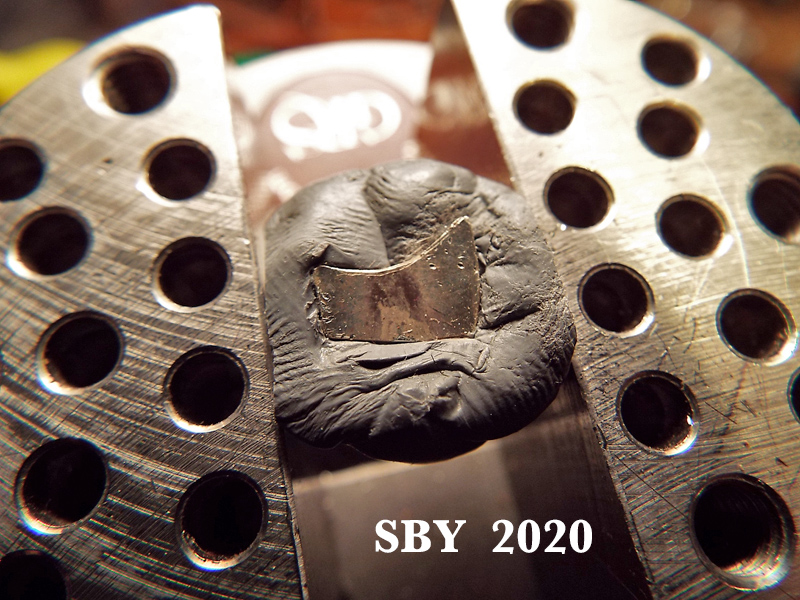
Every one of the conchos is entirely handmade in a multi-step process.  First they're cut out of the sheet silver (Argentium) and filed to rough shape.  (In fact first they're designed and drawn on paper.)  Then the loops on the back are soldered on.  Then they're set in Thermo-Loc, a heat-softened plastic.
It took me 45 minutes to set the 10 lumps seen here:  half of one breastcollar, 12 pieces of silver. Desperate for efficiency, I tried something new:  2 pieces per lump.  Thermo-Loc solidifies, cools, very quickly.

This nifty little vise is the smallest made by GRS.
GRS Microblock Ball Vise
Small as it is, my pieces are too small to fit between the posts intended for the holes, so I use the Thermo-Loc almost exclusively.
For this concho I used only 4 gravers (the blades to cut and engrave the silver with).  I wrote them down:
GlenSteel V-point or square   GlenSteel V-point graver
GMT HSS 37   flat       GMT gravers
Muller  8  6     flat      E C Muller.com
Muller  14   4    flat
As far as handles go, I have quite the smorgasbord:  one round wooden, several rosewood ones I bought from Rio Grande, and several made from plain old hobby-grade wooden dowel by yours truly...!  Amazingly, no leather braiding on them yet... nor intend to.  Gravers need to have smooth handles, as you are always pushing on them with your bare palm.

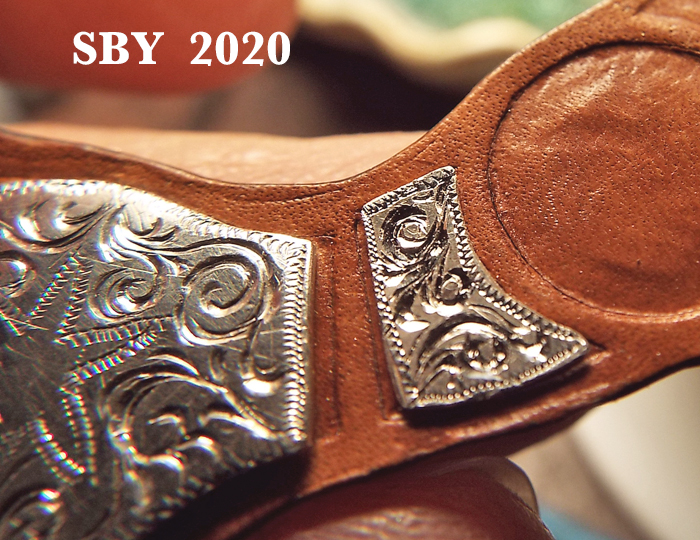
First, rocker-engraving around the border of the piece.  This is the nearside flanking concho to the central breastcollar concho.
Next, draw the lines of the chosen design on the surface, lightly, with a dull awl.  The first actual engraving starts with a diamond-shape graver that cuts these lines.   Design-wise, the pattern 'grows from opposite corners."
Next, I start engraving with a series of tapered flat gravers, the smallest first.  Engraving silver, at least for me, is a process of gradually cutting deeper and deeper, making a v-shaped-in-cross-section channel, of which one side is wider and faces upward.  It doesn't happen all at once.  Each line is gone over many times, each time smoother and wider.  At least, that's the idea!
The ball vise rotates to whatever angle I need.  Each curve is attacked at whatever angle would best cut it.  If that means starting at the tip of the curve, that's where I start.  I can only cut half a curve at a time anyway!  You're supposed to hold the graver steady with the right and move the vise with the left.  But I use both hands, together, in a sort of combination between leather tooling and silver engraving, turning and twisting and digging all together.  The graver is always held in my right hand,... but I'm cutting both to the left and the right.
See that straight line?  Slipped blade.  When they're dull they slip.  And boy oh boy, are they hard to keep sharp ----  I'm constantly stropping and polishing ---
Tip:  use an inch of heavy tape, like gorilla tape, to protect your left hand from being stabbed.
Ask me how I know.
Deeper and deeper.  I'm using the larger gravers now.  The idea is to sweep the cutting blade along the curves like a bulldozer blade sweeping up snow.  The shiny canyon-bottom left behind is the goal, and the smoother the better, because smooth = shiny.  It really is like tooling leather.
Back to the smallest flat to add in some tiny decorative cuts in the middle of the largest plain areas left.  Here, they are along the top right and springing out of the top left corner.  This step is like decorative cuts in leather tooling.
It does seem coarse close up, but remember how small this really is.

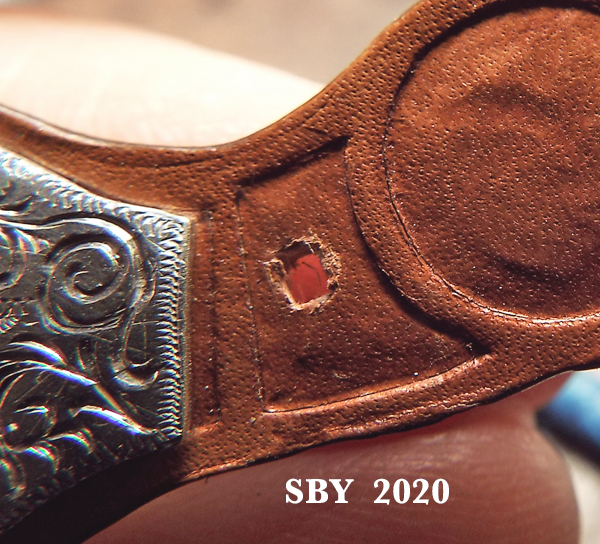
I pop the flank concho out of the Thermo-Loc with a little pressure from the dull awl.  Next comes cutting its hole in the breastcollar, which is tricky, to say the least.
Since the most uncontrollable part of this whole process is the soldering, those loops can wind up anywhere.  Cutting the lacing hole, then, has to come afterward.  It's really very difficult to get a lock on where that hole must be.  The concho does not, of course, lie flat against the leather during this stage.
My largest Needle Chisel is perfect for this job.
Not too bad.  A later step of gluing will help hold down the flank concho, eliminating that blackshadow gap seen along its lower edge.
******************

What interesting times we live in.  In some ways I've been here before.  Every chemo patient gets to find out what it's like living with no immune system. I learned then that wearing a mask was akin to wearing a hijab.  People suddenly don't see you.  You hide right out in public.  Behind the veil, you are both shielded and made vulnerable.
The mask itself is surprisingly comfortable and easy to get used to.  But I'd like to see ones in a different shade from light blue.  That is not my natural skin tone (much as I love Decorator horses).  I'd love an art form for these....  Colored pencils, anyone?

Gone back in time.  I feel like I'm on a ship,... with a crew of two,... and a hold full of the most magical model horses.  JAH magazine published a story of mine about that magical ship in 1983.  Today I'm buying stamps and manning the radio.
Sail on!


Wednesday, March 11, 2020

Signing

Archivally signing one's model horse paint job is important.  I got my ideas about signing from two places:  Decades of making saddles ... and having been tattooed myself*.   However, I confess, after signing both Ambolena and Marimba just now I seem to have chosen a method that is seriously difficult for the average hobbyist.  This post tries to show both the hazards and the advantages of this particular approach.

Brasenose's signature is seen above.  The Cyrillic letters are Margarita Malova's, indicating the sculpture was done in 2016 in Russia (Bologoye, northwest of Moscow).  I am proud to relate that this signing (the SBY 2018 part) has gone 2 years without any seeping, leaking, fading or spreading.  Water does not affect it and it does not stain.  Nor can you really feel it when you run a finger across it.   It is inert:  it meets the goals of an archival signature.

At the time, 2018, I noted only that I used drafting ink and the same dental tool I used to sign all my saddles with.  It's a HU-FRIEDY  H6/H7, with curved pointed tips, kind of like a nut pick.  One tip has a minute sidewise kink at the end which makes it perfect for the job; this was an accident done in the deeps of time, probably by dropping.

When I finally got my act together this year I had two horses to sign.  I had skipped this most important step with Ambolena last year.  One tiny excuse is that M. Malova did not sign her; another possible excuse is that her tummy was a lot smaller than Brasenose's.  Below is my penciled signing, done in 2019, first step to a more permanent signature.
2020:
I put a drop of ink in the glass dish, dipped the dental tool hook in and tried to press tiny dots into my filly.  It didn't work.  The ink wouldn't stay on the hook, and the hook was too big and blunt.  Despite the tool's having an excellent handle and thus my having excellent control, I was pressing too hard.  Her finish flaked off.  At this point I was feeling very embarrassed, shamed and sorry.   How it hurt.  You can see my original sins around the "S" and the "B."
Who'd've thunk it:  Ambolena's pose makes it very hard to photograph this part of the horse!!  Another side-angle shot:
Having flaked off the bits around the S and B, I felt I had no choice but to go on.  I'd have to fix up her flakings later; who better than myself to do that.  Now was my chance to learn, again:  I had done tattoo signatures once, successfully;  I had to recapture the knowledge, even though it cost me my reputation.  And so I kept trying.  Gradually I learned that my mistake had been to push too hard.

From my NaMoPaiMo record notebook:
"Press Very lightly seems to be the key. ... Important to be very sharp and have a good handle."'
"The ink separates so stir it frequently!"
"Load the hook and lightly, gently, press a row of 3 to 5 dots, leaving a stripe of ink. ... Let dry - I know this is scary - scary!  Wipe off with mouth-moistened Q-tip." 
"A pierce deep enough to disturb the plastic is too deep! ...  When a stripe catches, that is, when the blob of ink on the hook 'grabs' or contacts the horse and starts spreading, that is the successful start of a row of dots.  Which you have to place blind, under the ink,... I'm up to 6 dots sometimes..."

I practiced on the bottom of a hoof:  N M P M.
"Use only clean parts of the Q-tip!!  Otherwise you're just spreading the ink around..."
"... mixed liquid ink; hook w/ small drop; draw dots within stripe of ink; let dry.  Wipe off dried ink carefully w/ Q-tips, always clean.  This seems to be the secret."

Hair-raising.
"A great many Q-tips were sacrificed in the making of this animal."
I put what I learned into practice on Marimba's belly.
Success.
Here you can see that Margarita left only an MM in the sculpture.  I did not take it upon myself to carve the rest of the letters in; I did, however, deepen them.   (Not to be confused with Mel Miller!)

Earlier in my chronicle of NMPM I documented how decades of making my own dyes caused me to turn to rubbing alcohol as a paint medium.  Now, when it came time for signing, there was something wholly appropriate in using the same tool that had signed all 456 of my leather saddles.  It does not seem possible that a dental tool could make such tiny holes, so smoothly and tightly,... yet I assure you it did.

In my experience, many marking pens turn purple and bleed when used to sign a horse.  Most ball point pen inks leave purple smears on leather.  The fact that I could wipe off dried ink from my horses convinces me that plain inking (at least this brand) is not archival enough.  However, tattooing as outlined here is clearly not for everybody!  It's psychologically terrifying to put black ink on your horse and only someone who's used to it should be working with it.  I believe there are other artist pens out there that would do a sufficient job.


*Don't go getting the wrong idea about this staid stuffy old artist having been tattooed.  MY tattoos are eight tiny dots, "The Signature of Radiology."  Not that I wanted them.  They surely saved my life;  in that respect they were tolerable.  The dots exactly line up the limbs for the radiation machine.  They're great for party talk -- no one who knew me would believe I had tattoos.  But the most shocking encounter was with my dermatologist's assistant.  "What're these little blue dots on your skin?!?"  I was proud to tell him, though I was left wondering just what they taught in dermatology school -- !

Saturday, March 7, 2020

NaMoPaiMo Index


I mentioned I'd written 19 posts on National Model Painting Month.  Having said that, I am obsessed with the idea of indexing them.  Each one dives into much more detail than is mentioned here, and has many more illustrations.  You should see the conclusions!!

And now there are 20.  :)

2017:   Thoughts on NaMoPaiMo     This one praises Jennifer to the skies, while showing models I painted and etched between 1979 and 2015.


2018:   Me and NaMoPaiMo   My first victim's arrival, mane creation, and reasons for joining.
            Prepping   Documents the start of Jypsi, my test medallion, and prepping Brasenose.
Jypsi in Repose, sculpted by Sarah Rose
            Jypsi Layer 7
            Jypsi Layers 8 & 9: A Drop    The worst that could happen, dropping the horse, turns out to be recoverable...

            Brasenose Layer 3    Brasenose is my chestnut Akhal Teke stallion and my first NMPM horse.  The post shows my first painting party, at Kristian Beverly's.
          
            Brasenose Layers 6, 7 & 8    Such excitement.  There is nothing like first love.
            Brasenose Layer 11: Finished

Brasenose, "Gazyr" by Margarita Malova, finished and mane by SBY
            Brasenose in Tack    NMPM is not about tack, but the chain of connecting logic is a short one.

2019:   Resolutions, FL and NMPM    Only the last third of this post deals with NMPM, but it gives the source of Ambolena's name.
            Ambolena Arrives    We see Orion and Bahkrom, other sculptures from M. Malova.

           Prepping    Short and useful as a tutorial.
           Ambolena Layer 4
           Ambolena Layer 7: Fixing a Shoulder Spot    Another useful miniature tutorial:  What would you do with an unsightly bubble?

            Ambolena Layers 8 & 9: Almost Went Appaloosa    Details about recovering from accidents.
            Ambolena Layers 10 & 11: Gilding The Lily    By far the most important of my Akhal Teke posts, this discusses metallicism and [isopropyl] alcohol.

 2020:   Marimba 1 thru 6    In these titles, the word 'layer' is understood.  Perlino was a new color for me.  The idea of doing Pearl-Ex with alcohol underwent some serious adjustments.

           Marimba 7 thru 10
           Marimba 13: Finished


Needless to say, I've had the time of my life.   National Model Painting Month has been the most amazing adventure.   At first I utterly rejected the idea:  I was (and am) allergic to crowds.  But then magic happened and I was drawn in;  I adapted it to my own needs -- the format proved robust enough to tolerate me.  After that it was all a wonderful exploration of something I'd seen my fellow hobbyists do often enough but never myself.  I will still pay for professional finishing;  the conclusion I came to in 2018 about that has not changed!  But my dreams are galloping where once they walked.  Now as never before I am listening for the answer to the question:

What color would you like to be?

Note:  In 6 years this collection has changed considerably.
I still have a dozen unfinished resins of every scale.  Oh yes:  and I just contracted to buy another!!!
I have a 1:6 as well as a handful of mini Roses.  :)   I have a Criollo pony, a TB, a Hornet, a Hillingar.  I have a carousel horse --- make that two;  You all never met Rogallo!!  Ah there's a dream -- almost too big to contemplate, that one.  But that's what NaMoPaiMo is all about:  
helping dreams come true.