Saturday, September 26, 2015

Purple Reins

 When I got my purple Donna Allen Western set back in April, it looked like this.  The reins were black braided floss.  It looks better on this horse, and in this picture, than it does the rest of the time, "in normal life," -- you'll have to take my word for it.  (And please pardon the bit not-in-mouth -- I really wasn't looking!!)
I had designed this set, using elements from 4 other Donna Allen saddles.  I hadn't designed the reins.  When it arrived, I loved it -- but I somehow took a dislike to those reins.  The only other black on the set was edges.  I thought those reins should have been purple.
As it turned out, Donna did too;  she said, "I was gonna make the reins purple, but I thought it would be too much for you!"   Alas for mistaken impressions. 
In time, I took this as permission to fix the situation myself.

Last week I needed an excuse to walk, and to do a little something for myself that was "not silver parade."  JoAnn Fabrics was a mile away.  I had been studying the black reins.  I concluded they were made of Pearl Cotton, a material I had never used.  I decided this was the perfect opportunity to start my acquaintance with Pearl Cotton.  I packed the horse ("Bonne Chance," thank you EJH) in a pony pocket and sneaked it into JoAnn's Fabs.  Lousy lighting in there, but--!!

I found a good Pearl color, a dusky lavender.  I bought some matching DMC for good measure.  The color number on that was 3041, in case you're curious.  Remember that all 4 colors of purple on this set (blanket, edge braiding, seat, and bridle/bc buttons) didn't match each other.
I dug out exactly the same snaphooks as the blacks and made two same-gauge rings.
This picture doesn't make it look like it, but take my word:  the purple reins didn't match.  They just clashed.  They drew attention away from, and darkened, the purple edge braiding, made of nylon sinew (which I didn't have).  Texture-wise, color-wise:  my idea didn't work!!
Now what!!

I spent some time staring at this set.  What would it, itself, want to be reined with?  What would be a good color, that wouldn't clash, if I was going to use that 4-strand braid texture?  I pawed through my 2 bags of embroidery floss.  I found some nice dark browns.  One in particular was a lovely milk-chocolatey tan which went well with the leather color of the tooling.  (Photo makes it redder.)
This hank was not DMC and it had no number.  It was labelled "Designs for Needle:  Made in Mexico."  In a flash I knew what had happened to a bundle of extra floss I had been given by my mother-in-law, a bundle I had been looking for recently.  I had already distributed those hanks between my two bags of ready-to-use floss.  Supreme organization is not my forte; my floss is divided into warm and cold colors, nothing else.
More snaphooks, more rings.
And now I was happy!!  Now the various purples stood out, each with their own strength.  Now elements went together, didn't fight.  My eye got used to the whole set very quickly, a sure sign the right decision had been made.  I'd had my little fling and felt much refreshed.
I felt more: I was inspired.  I tried to tie some purple floss buttons on the brown reins.  After all, the bridle and breastcollar had those, didn't it??  But here I failed.  Not only couldn't I match what threads Donna had used for her buttons; I couldn't tie a 5P6B button on those reins, which was what the bridle & bc used.  During the first button I gave up.  It caused me to ponder deeply on when to stop, always a problem with the artistic sort.  Just let this one be...

So now I had some extra purple reins.  As it happened, I had a headstall, by Danielle Hart, that had no reins, but four colors of buttons:  white, 2 purples and pink!  Huzzah!!  Matchmaking was a natural by now...
(Please excuse the too-close-to-eye;  I really wasn't looking again!!)  This time the purple reins looked right at home.  I now had Pearl Cotton and another beautiful bridle!  Snaphooks are a perfect in-scale device for rein changes.  Problem solved.

Keep up the good work, D. and D.

Bonus Shots:  Purple English. 
This outfit has been accumulating for at least 15 years.  Fara Shimbo of Boulder, CO made the saddle back in the 1980s; it has her cast-Aluminum-dust stirrups.  I made the bridle.  I honestly don't recall who did the various leg bandages, boots and wraps -- they came from various sources.  (All I can recall is Ensor.)  The earnet, the last of all the parts to be attained, was made by Virginia Sherman, who was at Region X Regionals last year (2014).  When I saw that earnet I knew I had to have it.   Now you know why!
The horse is an O.F. Breyer resin.
The bell boots need replacing; they are badly cracked.  Any leads would be appreciated...
Happy Collecting.

Sunday, September 20, 2015

The Copper Queen Puzzle

For at least 10 years -- ever since I found out how to search eBay -- I've been looking, on and off, for this puzzle.  My relationship with this image goes back to childhood.  Imagine, then, my electrified, astonished delight when I discovered this lovely toy from the 1970s, in amazingly good shape, on Sept 9.  I hit Buy It Now very quickly, before I checked out the buyer or saved the images.  It's a wonder I even looked at my balance.  But you may guess that 10+-year obsessions can generate behaviour that instantly reaches critical mass.  Thank you, o thank you eBay!

When I was a kid, my grandparents contributed to my inevitable-equine-spoilage by getting me and my sister horse-themed toys and books.  Family legend has it a patient of my grandfather's (he was a doctor) named Claire Sittler started this.  But I think I added a good deal on my own.  Who can tell?  Is horse fever explainable?  My love of jigsaws was certainly started back then, with Springbok round and octagon puzzles, purchased in Tucson toy stores and worked in my grandparents' home in Tucson.  They weren't all horsey -- we have an Early Motor Cars one -- but my absolute favorites were the horse and carousel ones.  (Some day I'll do a post on how the carousel one influenced the TSII head logo.)  Today [2015] my collection of jigsaws numbers about 150.
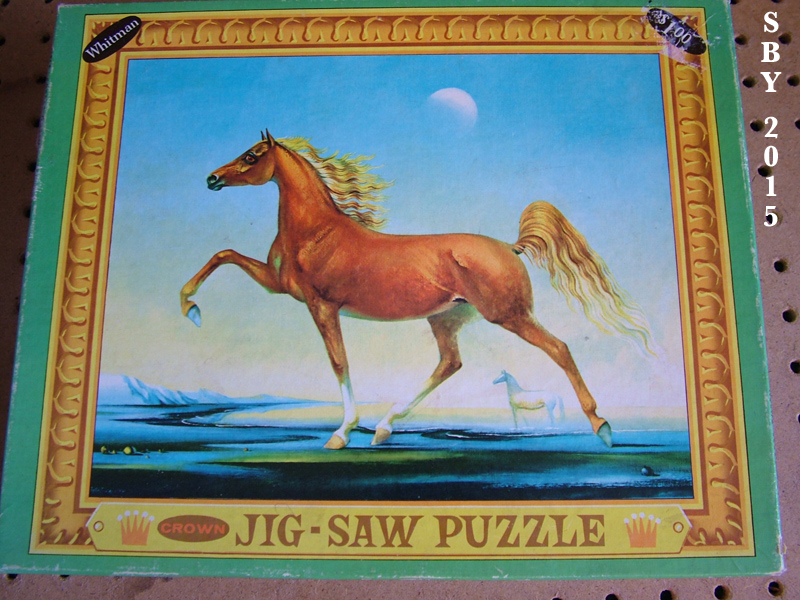
My earliest memory of Copper Queen, the above Saddlebred, painted by Ruth Ray, is doing a puzzle of the image when I was about 10, circa 1970, in the basement of the family home (Fox Hills, Boulder, CO).   Copper Queen had a particularly difficult cut.  The pieces had almost no interlocking.  With the slightest bump or jostle, great cracks would appear, and everything had to be pushed back together again.  Exasperating for a ten year old, whose patience was still developing.  Yet the image itself, so compelling and supernatural, really burned into me.  It has stayed with me with astonishing power.  It is timeless.

In the early 80s, during college, somewhere in an art shop, I found (and instantly bought) 4 small studio cards carrying images of horses that Ruth Ray had painted.  Copper Queen had siblings!!  Other people have documented these Donald Art Prints; thank you so much, Paula.
http://www.spookhouse.net/angelynx/horses/ruthray-mainpage.html
Part of my story is that I somehow managed to lose track of those 4 cards for years.  I can only dimly guess when -- late 80s? early 90s? -- amd even dimmer as to when I rediscovered them -- sometime in the middle to late 2000s.  When I finally dug them out, I carefully made a scrapbook called Horse Images.  I started remembering the puzzle around then.
Madly, wholly without grounds, I began wondering if puzzles existed of all four.  Searching the Internet was now part of my life.  I'd used it to find horse stamps, not to mention model horses and tack!  I slipped into a pattern of occasionally searching eBay with 'horse jigsaw puzzles.'  This was not at all steady or committed, just whenever I felt like...  a drunken binge of eye candy.

In the fall of 2013 I hit pay dirt.
Another moment of instant recognition, of thank god for Buy It Now.  Gold Seal, a division of Whitman, had produced this puzzle.  It had 500 pieces.  "Handsome Witch," which I had remembered, incorrectly, as Night Witch.  It was in superb condition.  I put it together at Bay To Remember in New York, in January of 2014.
The cut, while poorly interlocking, was not quite as bad as my 10-year-old self had remembered.  The most revealing aspect, however, was the side of the box.  It listed other titles in the series:  Moulin Rouge,  Madeline,  After the Rain,  Sierra Morn,  Peaceful Vista.  None of these could remotely invoke the other 3 horses.  Was my memory wrong?  But I was immensely reassured.  The puzzle existed and I had found it; the sister horse was a reality.  I had a chance.  Back to the occasional search.

When Copper Queen arrived, I was amazed at its condition.  Only the bottom of the puzzle box revealed any ageing.
Still carrying traces of the original tape, by gar!
Whitman again, but a different line:  Crown.  The number of pieces was 713.  No date.
The side of the puzzle was disappointing.  No chance of Golden Ruler or Storm King, alas.   "French Provincial,  Quiet City,  Copper Queen,  Village Lane." 
When I opened it, I got a strong impression of long-preserved virginity.  Many of the pieces were still stuck together, always interlocked pairs.  Separating them was hard --  the factory, I thought, had failed at this job.  The cardstock was immensely thick; this is one of the thickest puzzles in my possession.  Only wooden ones were thicker.  The 60s and 70s overbuilt some things...
This shot shows the pieces after I had separated most of them, so the side-by-side alignments and parallelism, something that would happen over a very long period of storage, was not photographed by me.  But it was there.
Although at first I thought the puzzle was truly virgin and unworked, over the course of doing it I found evidence it had been, at least once.  I found hairs, one damaged piece and one bent piece with tape on the back.  But the tape was as old as the narrow tape on the box.
It took two days to do.
The beginnings were the small "moon-horse" and the moon itself.  Moons must have been important to Ruth Ray.  Next, overall arrangement, chestnut pieces going in the middle, darks at the bottom and blues towards the top.  The mane and tail are coming together, then the head.
Unlike my S.O. I do not necessarily do the edge first.  Working this brought back many fuzzy memories of how I had struggled with these pieces.  I could remember it!!  Eerie!!
 Words are not going to be able to capture the way handling these peices made me feel.  Handsome Witch's box calls them "scroll cut;"  Copper Queen's just says "machine cut."  What they evoked was an amazing sense of Art Deco, only in a wonky, nerdy 70s way.  Spaciousness is part of it; comfort, as of an old blanket;  so also is a smell, cardboard-y, almost fresh, like a beach.
 With Springbok, Ravenburger, Schmidt, Educa, Buffalo Games, and many other puzzle makers under my belt (not to mention recent additions such as SunsOut and Cobble Hill), I began to see why Copper Queen might have remained unworked for forty years.
Indeed it was worse than Handsome Witch.  The cut was very "untight," loose, slidey, not liftable one bit.  So many edges of pieces were nothing but gentle curves, no 'noses' or 'wings' at all.  Only the border pieces fully interlocked.  My husband suggested this would be easier for children to fit.  I had never thought of it that way.  Amazingly none of the curves got confused or tried to fit one another; they were all different, in subtle ways.  The Young family has a term for pieces that are so close to one another you get them confused: you've been "Ravensburgered."  This puzzle, Copper Queen, could not have been further from that particular fault.
You can see the one damaged piece near the left edge, one nose of torn paper.

Right about now, my own beloved model horse hobby caused me some discomfort.  It has trained me, for many years, to look critically at a horse, and judge its conformation.  How I wished, now, I had never been taught that -- for once!  Alas, it's true:  her head is too small.  In desperate defense, I note that her off foreleg is also too small.  In fact the whole horse seems to get bigger as you move from nose to hindmost hoof.

The pose is tremendously iconic.  It shouts breed.  Yet the setting is magical, mystical, haunting.  In fantasy the viewer may make of images what they wish.  I will justify the small head on grounds of Victorian fashion; old masters portrayed horses like this in the 1800s, laying the groundwork for the Arabian.
But that's another story.


Friday, September 11, 2015

Enhancing a Crown Strap

 If you collect other people's model tack, it really helps to be able to fix certain flaws.  This beautiful bridle came to me just about ready to break.  This post takes a close look at the process I used to repair it, and incidentally shows how I make holes in leather lace.

It's almost funny how some model tack winds up with a mix of extremely heavy, hefty parts and light, thin, friable, ready-to-break parts.  Call it style, call it ease-of-making (speed!); whatever it is, it greatly enhances the possibility of breaking-in-use.  This bridle, acquired some months ago with a saddle, had a big heavy earpiece and cheekstraps, but a crown strap of dainty fragility.
I loved the color, the design and the intensity of the (real pins!) pinhead silver spots.  The strappage of the ear and cheeks was cut very thick where the pins were.  But for some reason the crown was made of leather so thin it was on the verge of breaking.  The lowest hole in the picture has already ripped.
I knew I'd have to do something.  Usually, when I collect tack, I like to leave it 'as is,' honoring all of the artist's work.  But there are times to bend this rule... (Just like there's times to fiddle with Breyers, which I call The Black Art of O.F. Enhancement.  The skill ranges from white magic on down; maybe more on this later!)  Tinkering with another's work is a vast subject, worthy of thick books and forests of terms: Conserve, preserve, repair, refurbish, replace!  The field of model tack being relatively new (and most questions being relatively minor), I have worked out my own standards.

 Whether the artist has produced a lot of pieces influences me.  When the piece is really broken, is missing something or when fixing requires a skill I need to practice (the 'teaching value' excuse), it's repair time.  If I think I can get away with strengthening or enhancing,  I'll fix it to the best of my ability and time available -- and take notes.  The bottom rung of this ladder, I confess, is "I wanna 'cause it's mine now."  But at least notes are kept...

In this case I thought I'd "line" the crown strap with another piece of lace.  The upper surface would remain the same, but the strap would be thickened.  In model tack thickness equals strength.  I had to find lace that was the same color, type and density, matching as closely as possible. 
This approach called for a whale of a lot of delicate skiving.  I didn't photo that part...  sharpen the knife...  After the edges were feathered to the limits of my skill, the new liner was glued on, flesh side to flesh side, and let dry.

Now for the holes:
 You see here my needle chisel, a miniature slit punch made from a needle and an old paintbrush handle.  Since the holes are already present, one merely cuts through the liner.  Moistening the lace can be done by wet fingers or by mouth.  The needle chisel is inserted and twisted around so as to widen the hole, making the hole circular.  When the leather dries, the circular opening will stay.
Yes, stresses of pulling will close up that opening in time; but an impression will remain (especially if used often).  The impression makes it easier to find the slits.  Slits put much less stress on the lace than punched holes.

A final step is to use a rattail needle file to further open the holes.  The lining has given the crown strap leather to spare.  Since the original featured round holes, this was part of matching the previous artist's style as closely as possible.
 This is what the crown strap looks like now, from above:
And from below:
I was only opening the holes I knew I'd be using.
The earpiece is unusually large.  Proportions are a challenge eh!?  I had to hunt all through the herd for a horse with big enough ears!  Even the Stone Thoroughbred was small for this bridle... The saddle that came with it was Trad scale, and it also showed some proportion challenges.  I did draw the line at shortening the earpiece.  Excuse the thread on the nose; that's only me hating sticky wax and not bothering with PhotoShopping it [the thread] out.
Even on the Breyer Clock Saddlebred, the earpiece is easily too large.  But I still love the design.
The reins drape beautifully and all the elements match well.  It's ready for years of use.