Wednesday, April 24, 2019

Akhal Teke 1 Finished

I am pleased beyond belief to present the completed prototype of my Akhal Teke set No. 1!!  Yesterday's photo session tried it on two other molds and many different colors, with surprising results.  Shahzada the Perlino was a clear winner in the beauty contest!
Until Emerson, I would have said Breyer's closest mold to the Akhal Teke was Lonesome Glory.  As it happens I have quite a few of them (tries to hide a smile) and while some are Appies, others are solid colors, much more fitting for the Teke breed.  The moment I tried this set on Shahzada, I learned that for all his length of leg and giant frame, Emerson / Palatlakaha has a small head and a skinny neck.  He also hasn't got much mane.
That made for some creative photo angles.
In the ensuing fun fuss of tacking up, I learned that tongue buckles had indeed been the right choice for this piece.  Their level of detail matched the overall, a great goal of mine; and their adjustability really helped.  Whether to put the straps on the mane or the throat turned out to depend on both mold and angle; I wound up trying both.  Lest you worry that Shahzada is having trouble breathing -- (I assure you he has just as much air inside as ever!) -- scroll down to where I tried a different orientation.

Here is Palatlakaha in his full glory with the finished breastcollar.  All praise is due Rio Rondo for their cunning little dangles.
I spent a lovely two evenings listening to movies whilst creating 52 stainless-steel rings for the leaf etc drops, stringing and hanging.  Only now did I realize I'd shorted myself sufficient leather on the off side for them.  How blind can I get!!  I had to glue on a whole side strip of more leather.  Long gone are the days when I refused to use glue...
As a break in the monotony (!) I used 2 little bars on each jewel-plate instead of more leaves.  The horse was big enough to justify the maximun leaf size, i.e. I left the end circles on.  I suppose the rings are a bit big, but any smaller and I wouldn't have been able to manipulate them.
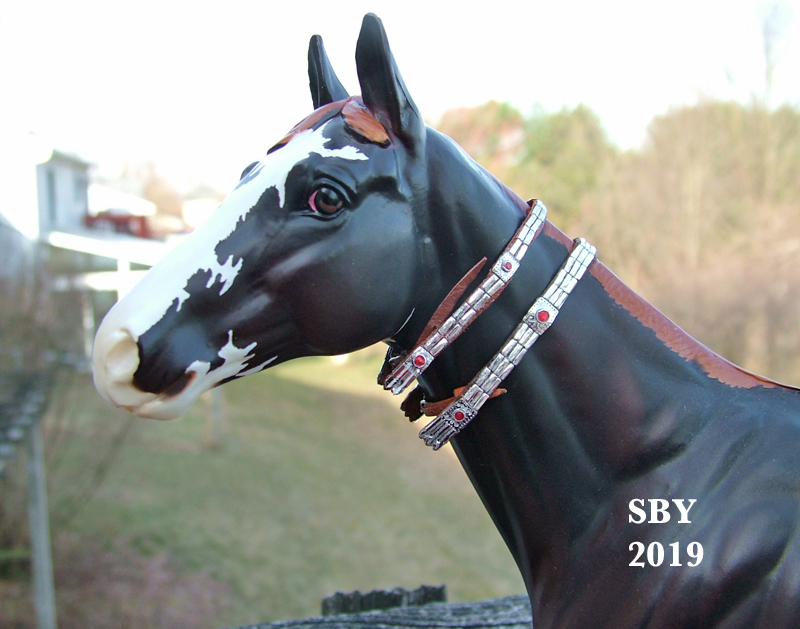
Palatlakaha pretty much needs the straps to pass under the throat.

But the arched neck of the Lonesome Glory presents a challenge.  The mane was a real obstacle.  When I tried a new orientation of strap, I was pleasantly surprised:
Not only was the neckpiece less obviously hung up on the mane, there was more room for the horse to breathe!  always a plus.  The breastcollar being nearly too small was forgivable due to sheer beauty.
Birds-eye view again.
 This angle shows how dainty the tongue buckles are.  What is less obvious is that the poll buckle has to be opened to get the bridle off, AS WELL AS the throatlatch.  There's no disguising the time  it takes to switch this set from horse to horse.  Slow and steady is best.

Akhal Tekes famously come in black, and I happened to have a Charcoal Lonesome Glory (thank you Eleanor & Robin).  I thought the set would look fabulous on this horse.  Photography isn't quite the same thing as in person, though.  This is the best I can do:
Still looks pretty cool!
 By now I had figured out how to fit the set to the Lonesome Glory mane. The full scale references sometimes have both orientations at once:
photo by Tamara Gooch
Where to pass the strap appears to depend on the mold, how much silver you're dealing with and which side of the horse looks best.

Some reference photos I've been using:
photo by Heather Moreton; used by permission
Photo by Heather Moreton; used by permission
The temptations, vagaries and struggles I went through making the breastcollar could be captured in a single shot.  After 40 years in the model tack business I have quite a few jewels.  This one nearly undid me.  For a few moments, the incredible lure of a light-gathering cabochon had me considering tearing out all my hard-earned authentic 'carnelians' and sticking in little glass beauties:
Caught in this in-process pic (above) is a glass bead in the central concho.  The hole in the middle didn't help and couldn't be covered up.  I cut it out and started again, not without great yearnings.

I am insanely proud of this set, and secretly relieved I don't have time to auction it off until after return -- possibly not til BreyerFest.  I get to keep it for a while.  :)

A little math:
Nearly 70 hours (69.4) and almost 5 weeks (March 20 to April 21), finished on Easter.
24 jewels and their plates:  each plate handcut, holed, cleaned, stitchmarked, engraved and bezeled, then 'carnelians' painted in layers and glossed, often with microballs glued inside for forms.
8 other plates, with end tips handcut, engraved etc.
8 handmade tongue buckles, with sewn keepers.
327 handmade metal spots, each 1mm x 3mm, shaped and stamped then hot-glued.  This is counting those that were cut up to make the smaller spots for reins, throat and poll.
52 leaves and bars and their rings; each leaf filed for smoothness on both ends.
It was worth it to get this 'test' piece done, even though it all but destroys my chance of making a NaMoTackMo piece for myself.  I wanted to use up my mistakes.  I sensed it would take a long time and started early; I just didn't realize HOW long it would take!  Finishing AT1 has opened up a whole new field for me, and with it, possibilities long desired but mostly despaired of.  To the question of faceted light-gathering versus merely opaque colorful, my answer is now:  Some of both!
Here is a Test Sneak Peek to help you get the idea:
Yes, that is a genuine Ruby, Emerald and Sapphire.

The last shot is of Brasenose looking bemused, but finally proper, in his borrowed finery.  He is smaller than Emerson and it shows in the breastcollar.
At last I have what was so long dreamed of...  and a whole lot more inspiration to go with it.


Thursday, April 18, 2019

AT1 - Bridle finished

This post covers a one-horse, one-bridle photo session and its news.  As of Sunday the bridle is done, the neckpeices solved and the breastcollar well started.  In the larger scheme of things, this was when I submitted to the necessity of sticky wax.  As you will know, I hate the stuff!  but sometimes it is necessary... and it can solve otherwise unsolvable problems.  Whoever gets this set will find traces of my sticky-wax efforts on it -- !!  How else d'you suppose I got the cape to lie the way I did...

When last we saw this set I was struggling over the orientation of the buckles in the neckpieces.  I may say here I went to the trouble of reversing them again.  (That makes three x gluing and sewing on, and twice ungluing et al.)  I trimmed strap ends even more and decided that bent and squished lace was going to be right whether it showed or not.  But the real solution was sticky wax.  Finally everything looked like what I'd wanted.
Most snaffle bridles do not require a curb strap, of course.  This 'curb' is there only for holding purposes, to position the bridle and hold the bits in place.  (To me a model bridle is not a bridle if it doesn't encircle the muzzle completely...)  It's a standard TSII curb with one friction buckle and two sewn keepers.  I have seen these curbs on the references, so it's not completely outre'.

I don't think Tekes come in pinto!  But what a pretty horse.  This photo was cleverly cropt to hide what looked like enormous front feet:  Optical illusions!
The buckle at the bight of the reins is the same carefully handmade-from-stainless-steel-wire tongue buckle that the rest of the set enjoys.  The drape of the reins, however, was achieved only by virtue of the garment leather.  I used dark brown Edge Cote on this set to depict the effect of edge-slicking, which (for me) was physically impossible to execute.

This photo turned out a favorite.  He looks so plaintive!  The background makes it.  It's a little difficult to get both sides of the bit even.  (You can't see both sides at once in a photo, a mercy I am thankful for.)  The nosepiece may be a smidge short; however it slides up and down well enough.
The above shot also makes him the most "Teke" with the elongated, almost ewe neck.

A Birds Eye view for bridles is not something you normally see.
But I was trying to show the details.  The cape slides along the crown strap.  The neckpieces have center jewels to match the bridle.

Now for the traditional shot in front of our huge old Gallery Pear tree.  It's quite rare to catch that tree at the moment of just budding out -- when it is pink rather than white.  I can't recall any of my famous tack photos that have done so.
Up close.  The pinks match his mane... and eye.
As you may have guessed I am well along with the breastcollar.  The breastcollar of the Akhal Teke set is its climax, as the serape on a Silver Parade set is the center of attention:  the tack's largest, loudest element.  I have conquered the center and am working on the sides.  I already know how I want to hang the leaves.  The next post will be the last on this piece.

It's becoming ever clearer that while I can finish this set, I shan't be able to make another before the end of the month.   Alas for my NMTM hopes!  (At least I now know how to make them!!)  I also feel there is not time to market and sell it properly before May, when I disappear.  I was already feeling guilty for abandoning my earlier projects, two saddles and a book!  Bear with me...

  My current plan is to finish AT1, then start a couple of neckpieces for Brasenose and see how far I can get on his (mine own) set.  We leave on the 3rd of May and return the 9th of June, Lord willin' and the creeks don' rise (read: nobody dies).  Upon return I will attempt to put this set, Akhal Teke Number 1, up for auction.  Then it's back to work on the 2 saddles etcetera.

But you never know what I'm going to fall in love with next.  Stay tuned!  and Thanks for reading.

Monday, April 8, 2019

Akhal Teke 1: Starting the Bridle

Another short post about a work truly in progress!  Within the past week, great mysteries have been solved, the cape was done and the bridle well started.  I still have to do the reins and breastcollar, but at long last my Rio Rondo order(s) have come in.  Happy tackmaking over here!

When we last saw this piece, the struggle was over the buckles on the neckpieces.  By the way I found out 'neckpiece' is what a fellow model horser who makes full-scale Akhal Teke tack, Mayfield Magic Farm, calls them -- and that's good enough for me.  The native word for them is Aladja or Alaja.  The neckpieces were earned as prizes for racing stallions or given in recognition of superior performance.

I did reverse my two buckles, and thought I had solved the problem.  Look at it:  The tongue is protected by projecting leather on both sides, the strap end goes inside, and metal contact with plastic is light -- I felt very light.  Trust your OF -- this is the same stance as in the Guide:  a touch is not a scratch unless dragged.
That was before I tried to put them on the horse.  Alas, I had to practically turn them inside out to reach the buckle at all.  Clever as it was, it wasn't going to work.  As of this writing I haven't solved this particular problem.  :(

One mystery that was solved was where the heck my Rio Rondo order had been.  Carol had shipped it but it hadn't arrived in more than 2 weeks.  On Saturday the 6th I found out it had been hung up in Pittsburgh due to a mercury contamination scare!  It arrived today, and now I have more than enough Teke leaves...

The next part to be finished was the cape.  Mayfield does not name this part (that I have found).  I am choosing to call it that myself.  'Poll piece' would also work, or 'crown.'  I tried something new with this one.  I had needed a bead, tiny ball or seed-bead inside the 'carnelians' to help doming and bascule.  Microballs were too small for the cape jewel, so I found rose-colored glass seed beads, but they turned out too big.  So I hit one with a hammer.  :)  Glass particles (spicules!) at that scale are NOT round whatsoever, but some outer parts retained their original finish.  I glued one in as a base.  It looked beautiful.
If I had not tried so hard to imitate carnelian on the rest of the set, this might have passed.  But in fact this bit of glass does not fill the bezel.  You can see the sharp glass edges.
Here is Brasenose modelling his cape.  This is after the 'carnelian' was applied.  There were times it truly seemed a crown.

Now at last I could start the bridle.  I normally don't work with garment leather;  it is very hard to skive.  But I wanted softness and flexibility above all, and it supplies that -- at the price of being almost impossible to edge-slick.  Normally I soften up leather with oiling... but the hot-ironed spots are stopping that with this set.  Glues and oils just don't mix well.  It was worth the effort to me to keep the flexibility.
I made the bits from stainless steel 18ga wire and some silver-plated brass rice beads which I cut down.  I'm not sure it's real silver; it could be chrome or nickel or some 'pot metal' (they weren't expensive enough for real silver).  Filing off the pliers' teethmarks caused a faint golden color to show.  Generally I avoid exposed brass in model tack, but in this case it would be far from touching leather.
Once again, the difficulty of the jewels is causing me to build them in sections:  bezels next, then microballs or spicules, and color after that.
A last-minute photo of everything together on Palatlakaha (Emerson) shows how far we've come... and how far we've got to go.
The sneak peek on Breyer's website of what looks like a dun or perlino Emerson is causing me to make the wildest accusatory connections.  For of course I think Emerson would make a dandy Akhal Teke.  And of course Tekes are famous in their perlino color.
And that's the color I'm dreaming of for my next painted horse.
And we know Breyer haunts this blog, as it does others...

Stay tuned!


Tuesday, April 2, 2019

Akhal Teke Buckle Questions

This is supposed to be one of those short posts, suitable for a Works-in-Progress glimpse in the midst of a larger project.  Yeah, we tried this before and it wasn't that short!  Let's see what happens...

I am proud of my design of this smaller ring.  (Alas I don't even know their correct names!  Neck rings?  Neckbands?  Collars??)  It's a diminutive of the first neckband, matching and yet complete in itself.  A lot of experimentation is paying off with the jewels, which still have to be done in layers.  This shot shows the top of the neck (sort of).  Yes, they are adjustable.
 Having got here, however, a problem is revealing itself.

 How to do the buckle and strap?!  It looked like I knew what I was doing.  Heather Moreton's fabulous close-up reference photos showed tongue buckle and strap on the inside, so that's what I made.  But knowing what the full scale guys do is only half the battle.  I still have to adapt, Translate, that for the model scale:  for human fingers working around a 1:9 scale model horse, and for the horse himself.  I prefer at least an inch of strap; and not wanting to scratch the horse, I naturally set the buckle so the tongue was away from the horse. 

And suddenly the strap had no place to go.
Bad enough that I can barely get the tongue in the slits.  Bad enough the strap end is so short on the larger collar.  The smaller collar is driving me nuts.  I can't go on like this.

I can think of 2 solutions.  One is to reverse (or flop) the buckles and have the strap pass to the inside:  to be hidden inside the collar.  Tricky, bothersome, but it could be done, much as breastcollar tug straps are done.  It would mean risking scratching.

Another solution would be to switch to friction buckles.  Easier to fasten and adjust and take on and off, a huge concern with the TSII:  I build for use.  These would have much less risk of scratching.  Great idea!!  Who needs a king??  ---- umm, the nominal king we all worship, devotion to reality!?!!  Friction buckles would 'dumb down' some of the most incredibly-detailed miniature tongue-buckled tack I've ever made.

I always have this problem.
It goes to my core:  Workability, playability, durability, use-ability clashing with detail and authenticity.  So many owners today would never think of taking model tack on and off 20 horses in a day, or hanging the horse by his bridle --- my standard strength test.  Playing with it??  What's that??  Are ye crazy lass??

I guess I am.
The answer lies in finding a happy medium, a 'sweet spot,' a compromise.  If my fingers can fasten this and adjust it reasonably easily that's good enough.  Could the straps be shorter than an inch?  Could there be something over the tongues, a chafe maybe, to protect the plastic throat and mane?  Are friction buckles really so dumb?

I designed the bridle with a drawing.
Wait and see.