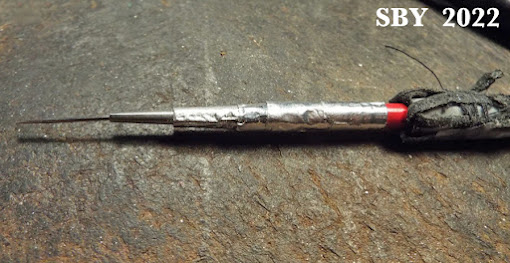
This is my oldest, best and favorite Needle Chisel. I honestly don't know how old it is! This portrait is a snapshot, one glimpse of a tool that has changed over time; we're talking probably more than 20 years. It may change again, who knows. This post is about one of those changes. The story begins when I bore down on it too hard (possibly sidewise) and it crunched and folded in my hand:
The first step is to expose the damage. On a braid-covered handle, I start by undoing and tying back that end's leather lace; rebraiding will come later. I'm using thread and Scotch Tape to hold back the leather. Next, form a plan of battle. This photo shows both the action plan: A Pin! and some of the tools to execute that plan: the Pin Vise and a wood file.
What had broken was the wooden handle. Unlike the last broken Needle Chisel [Part I], this one still had its already-perfected needle end, blade and ferrule intact. All I had to do was stick the halves back together. I don't have a photo of the wood handle before I filed it smooth (above). I decided a pin, made of wire pointed on both ends, was the way to handle this join (o pun not intended... maybe....).
The wire is probably hammered slightly for strength. I drilled a hole in the ferrule's wood and inserted the pin. I'm not sure whether I glued it. Friction is amazingly functional and tight at this scale.
Next is drilling the hole, same size, in the handle. Here the hard part is keeping things lined up. I'm afraid I rely solely upon feel and eye for this.
Here is something we saw with Part I's broken Needle Chisel: using Aluminum tubing to make a ferrule. In this case it isn't really a ferrule but a sheath, a sleeve for strength and alignment. I've hacked open one end to help it fit.
This next step is some real magic. To achieve a taper, I'm squeezing part of the tubing together, tightening the remainder. Heavy wrist pressure can do it; I'm using my normal pliers.
More magic. I am adding aluminum tape (the much-vaunted Silver Tape, or plumber's metal mending tape) to this seam. That's a folded rectangle of silver tape standing on its edge above the chisel, with the white paper of the used part still showing.
The goal is strength, smoothness and tightness. I rub out any wrinkles and file smooth anything that needs it. Rebraiding is somewhat unorganized as I figure out I was using a 6-strand round braid. I even things out as best I can and re-use the gold-plated wire that was originally holding down the lace. There is also a good deal of new waxed thread wrapped around it. My braided handles use thread, wire or both to hold down the leather ends.
Ready for another 20 years!


No comments:
Post a Comment