Here at the end, it's almost anti-climatic. As I write I'm waiting for the nail polish on the eyes to dry. (Photos were taken later.) It's taking more than one coat, although the first coat did most of what I was hoping for. Did I read tutorials? Yes (see the Thank You list below). Am I following them? Barely. I'm like Leonardo daVinci: read up on something and then forget everything and just do it. In this last sprint -- details, the homestretch --, I'm reverting to my tackmaking experience of 39 years, and using liquids instead of powders. Outside of my test piece, a medallion started in January, and Rinker the Appy Etch (completed in 2015 - he took 2 1/4 years), Brasenose is the first 3D model horse I've finished since about 1983. He was begun the 10th, finished the 20th. Hard to believe: eleven days, 11 layers! This record speaks of a lot of pent-up-ness.
This post will show Brasenose without tack, as he was the night he was finished and I sneaked out at midnight to photograph him. I also went out next morning (the 21st). After all the dire forecasts, the blue sky was rare and wonderful. Pictures of him wearing tack were, of course, the main part of the 116 shots (clear evidence of infatuation), but those will be in another post.
 |
| Layer 11: Finished |
Thank You:
First and foremost, Jennifer Buxton, for birthing the idea of NaMoPaiMo and patiently listening to me when I said I'd never. May she ever feel proud of what she's created.
Margarita Malova, who sculpted and cast this lovely resin. To get the conformation as good as this speaks of many long hours and of other sculptures. How is it the Russians have such a thriving hobby scene? I'm jealous.
Olivia Miseroy, who posted the tutorial that I followed the most: Painting a Chestnut
Bobbie Allen and Lisa Smalley, who encouraged me with emails at the times it mattered most.
Sarah Rose, who sculpted Jypsi and then gave me one: my precious test medallion.
Uncle Eli's, the art shop in State College which sold me some Jack Richeson pastel sticks, Pearl Ex and brushes.
George Young, my husband, who helped me clear out the storage barn (amoung many other things).
Last but not least, the Russian Post Office deserves mentioning. For not much moola they shipped a horse halfway around the globe and let me track him. Following his progress through some of the ground so familiar to my war-gaming George was a great pleasure for both of us, and a lesson in how other countries ship stuff. I wish my own P. O. could be that good.
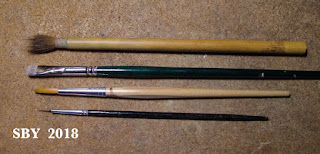
Pastelling is painting with powder. His body and much of his mane and tail were done that way. Never having painted a horse before, let alone an Akhal Teke with their metallicism, I was making up this color as I went along. I kept no recipe. I shaved the pastels into the bowl and mixed by eye, adding Pearl Ex in every layer. I wore a mask and gloves. By the end I had my favorite approach, scrubbing in the sparkling powders with a very short, broad brush, dusting with Mom's old Japanese moth-eaten bamboo and then going out to the storage barn to spray him. The third brush down is the dedicated Pearl Ex brush.
Copper sparkles got EVERYWHERE.
This is a rare glimpse of how I carried him. There was a lot of carrying, as the barn was across the driveway and around the end of the house. That was one aspect that surprised me: learning to smuggle him under my poncho, in plastic wrap, through all kinds of weather!
 |
| Layer 9 with wrap |
Delightfully, the rump patches that had troubled me earlier were consumed in the ever-darkening layers.
On the 18th I peeled away his blue tapes. His star had nothing to do with pigments, merely being scraped clean by a knife... ! The stockings started similarly, but needed gesso to cover up some wire armatures that showed through.
I was not ashamed to be using nail polish on his hooves and stockings. I put on a light spotty coating to enliven the gesso - it gave a living-skin color, texture and protection. I even used it for his eye whites. The color was right, a pale translucent-y pink. I'm ignoring warnings about longevity. I've painted horses' hooves and eartips with nail polish since the 80s. I'm only sorry I can't remember the name of the model airplane glue I painted King's hooves with back in 1982 or thereabouts. It's still there and has lasted far better than anything else.
The above is from Layer 11: not really another layer, but what I'm calling the detailing. The front feet had been used for handling and the hooves had a coating of 'everything.' I lightened them and added one coat of pink nail polish, and that was it: I was happy.
Here's a look at the last pastel layer.
 |
| Layer 10 Near |
 |
| Layer 10 Off |
 |
| Layer 11 Near Forequarter |
 |
| Layer 11 Near Outside Rail |
I'll finish with a private glimpse of what my horses' lives are like. You didn't think it wouldn't happen! Completed hip drops from the restoration of TSII #378.
Next post: headgear time.


He is beautiful! I have enjoyed following his progress. Congratulations on this big accomplishment!
ReplyDeleteThank you Lynn. I really had a lot of fun.
DeleteGreat job! He is absolutely beautiful! I would've never guessed that this was the first 3D model you'd finished in so many years. I think you handled the issues that came up like a champ!
ReplyDeleteThank you Tina. That means a lot to me.
DeleteHe really turned out great and I LOVE that you used a touch of Leather Dye on him - so appropriate!
ReplyDelete