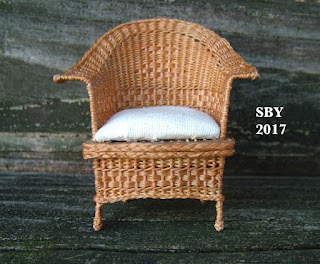
Also, I used a much simpler cushion. Miniature upholstery, despite being that blog's main offering, is not my forte.
This chair was finished so quickly that no pictures exist of doing the entire lower half, nor of finishing out the top rim. This is where I caught up:
Here (above) we see the top has been woven to the correct width and has had its binding put round. In full scale this "edge braid" is made from the stem wicker somehow (I've always wondered!!) but in model, the effect is easier to achieve. A simple overlay does the trick. I did wonder whether my white-glue choices would work on the sinew. Up to now, my braided rawhide bridles have hated glue and I've used as little as possible on this material, turning to fingernail polish in the last extreme (as for end conchos). However, Elmer's and Aleene's worked well enough... what a relief!
Above, the ends of the stems on the bottom are uncut. I've started one of the legs, wrapping sinew down from above. This is my original working end. The other legs will use separate strands.
Clipping the stem ends would've been even more fun if my nippers had been SHARP. As it was I used scissors along with them.
I had grand plans for those legs. First I had to insert separate strands for the three, and wrap them down, gluing all the while -- there wasn't any way to keep them wrapped before I braided my buttons.
Instead of merely gluing my sinew standing ends, I tried to bury them, as is proper in rawhide braiding. This is a shot of where the needle had to go to thread a standing end. It looks simple but the needle tip just about jammed into the seat binding.
(Above) That needle is actually bending, to avoid the seat binding. You can see it pressing down on the seat binding. Because it could bend, this worked.
Leaving the legs for a moment, the seat binding, two rows of 3-strand braid of double sinew, was something I had to invent on the fly. The original tutorial called for one row of braid. I tried 4-strand and then 5-strand braid, but these were too narrow. In the end I decided to go with the plainest, most obvious solution. Although I'm not pleased with how the butt ends met up (I had to forcefully glue them)(center of back, visible below) the rest of it is fine. There is a heavy, elegant simplicity to that binding; it is not out of scale with the rest of the chair.
The binding of the lower half was similar to the upper rim, with one difference: I was able to bury my ends very nicely, and make it look much more like the braid flowed together, -- as if it was continuous. On the upper rim the binding ends just turn under and stop. Charmingly, the lower binding made an arch out of the center front edge (see below). This happened totally by mistake but it gave the chair an understated elegance.
Back to the legs: this was my first try of a braided button for a leg. Emphasis on "try" as it turned out a failure! A 3P5B (Spanish Ring Knot) was the wrong size for such a long, narrow diameter. I went for Pineapples (4P5B) and was happier.
What I hadn't realized was that it mattered which direction I wrapped the sinew around the leg. In two of the 4 legs I had to go back and re-wrap, so that the sinew came up from below and left, instead of from above and left. That was the best way to do the buttons -- have the dead end fastened at lower left.
And before I knew it, all weaving was done, ends glued and hidden. I made a cushion out of fleece padding and white denim. I knew from saddle blanket-making that white denim is perfectly in scale for canvas, and I wanted a very simple white cushion. In the event it is probably a little too simple. It's also probably a little short. But I like it.
I signed the chair underneath. Now for the last step: dyeing.
I had known all along that this project would require dyeing, unless I wanted white stems to remain. I had even taken a bottle of dye all the way to Colorado, in readiness. In the event, the dyeing took place at home, in PA. I used a color I'd made up myself, called Half Tan. It was four-fifths solvent, a very light dye. It matched amazingly well, darkening things only a little bit.Outdoor photo shoot!!
This truly looked like wicker. Apparently I've got the mythical "good ol-fashioned shrinking-ray." (quote from Julie Froelich)
Like a good saddle, the ultimate test seems to be whether it looks comfy to sit in.
I wish I had a suitable model setting...

Come and visit room 610 at the Clarion!!


Speechless!!
ReplyDeletePositive site, where did u develop the information on this posting? I'm pleased I discovered it though, ill be checking back soon to discover what additional posts you include..sichtschutz
ReplyDeleteWonders to self "Is there nothing she can't do?" Bravo!
ReplyDelete