 |
| TSII #442, built in 2005. 4-Strand Round Braid on cantle. |
The topic of silver edge braiding got away from me, and I had to divide my post in two. Part II will deal with the braiding itself, as much as I can portray with just photographs. This post will cover starting, braiding and ending the Four-Strand Round Braid. I learned this one from Bruce Grant's book, Leather Braiding (1950). It's on his Plate 35, and he calls it "Second Method."

Cutting the slits is part of edge braiding, but it's a skill I'm taking for granted in this post. I have made Needle Chisels (as mentioned in my book The Guide to Making Model Horse Tack), out of needles and paintbrush handles, in order to have miniature thonging chisels. For my current (2017) saddle (TSII #456 Star Wars), I am using my largest Needle Chisel. The blade is about 1.2mm wide. The slits are cut parallel to the edge of the leather, a little less than their own width apart. I'm afraid I space by eye -- experience is the best teacher here. I'd guess my spacing is about 2/3rds or 3/4ths of the width of the chisel; the above shot and the third one down provide some example.
Of course the first time my Galaxy silver strip is pulled through the slit, all its handcut irregularities are revealed! My best efforts are not perfect. I must be prepared to go to an ungodly amount of fuss and care trimming it.
The tinest trimming can make a difference. I want my lacing to slip smoothly through the slits, and be neither so thin that it's liable to break or to not cover the leather edge when braided; yet not so thick that it sticks and deforms in the process of braiding. It is possible to close in on the right width for all the 18 inches, but time must be put in at this stage.
To begin, I've learned to always look down on the grain side of whatever I'm edge braiding and start at the
extreme left end. On cantles this turns out to be the off side. My breastcollars and tapaderos have many sections of edge braiding and each section has to be done individually - just start at the left end. The braiding thus travels from left to right.
I open the slits with my Needle Awl or miniature fid, one at a time, as they are braided.
I don't use needles with Galaxy lace. I just cut a point on one end of my strip. The point has to be small enough to easily pass through each slit and let me grab it on the other side. This works out to be about half an inch of point.
The magic number with Four-Strand Edge Braid is four. Starting with the first slit, the next slit is the fourth one to the right. The starting slit will turn out to be useless -- the end will be withdrawn later -- so leave about two inches of dead end at this time.
Tension, or how hard to pull, is essential to the skill of braiding. With Galaxy lace the tension turns out to be critical, nothing less than the heart of the silver braiding effect. A strong yet controlled pull is needed: enough to deform the lace slightly and mold it to the shape of the leather below it, yet not so much as to break it or stretch it so much it discolors. Only experience will give this sense of how much tension to use. My most common failure is not pulling enough.
The Four-Strand edge braid basically follows a figure-8 path. Here the first pass back is shown, through the second slit. Once through, the lace is bent again to go to the right.
The next picture shows two steps, so I'm showing it twice. The silver strip has passed through slit 5 and been pulled tight. Meanwhile my Needle Awl blade is entering from lower right and poking into the pass made in step one. This is where the working end will go next.
The whole path of the working end describes a figure 8. Now it comes back towards the left, pulls tight and slips under the old pass laid down in the first step. From now on it must pass beneath itself, once on the grain side and once on the flesh side, every lap. This makes the appearance of a braid of 4 strands.
Care must be used to avoid breaking the silver with the Awl. The Galaxy can stretch, but only to a certain degree. Here is really where experience comes to aid; I am always surprised at how strong the lace is, but I have had my share of breaking it.
View of the back side (flesh side). Having passed under, the working end enters slit 3 (remember him?) and emerges. It's held under my thumb here.
The next action is to bend to the left (or right if viewed from the grain side), and slip under the silver immediately to the left. To put it another way, go under what's coming out of slit 4.
I find the action of silver edge braiding consisting of a great deal of time running the strip through my fingers, trying to keep track of the silver side. It is both boring and soothing.
The Four-strand Round Braid really does follow a figure 8 path, overlapping each pass one slit to the right when viewed from the grain side.
Here's the grain side view. After passing the working end through, it will slip through slit 4, on top of the silver lacing already there. Each slit, each pass, must be enlarged gently with the Needle Awl.
I can't emphasize it enough:
Even Tension is the difference between rough, clumsy-looking braiding and smooth, professional-looking braiding.
And then there's Problem-Solving!! My point has become so worn and frazzled it's delaminating. When this happens, I shorten the lace a little and cut a new point.
How to end the braid? The quick answer is to pass through the same slit twice. What to do with that standing dead end at the beginning? Here, it is withdrawn, pointed, and braided in reverse for a couple of passes. I mean the figure 8 is done in a backwards direction, with the silver filling in gaps and extending the braiding back to the start. The last pass can be merely a loop crossing over the leather edge, as shown.
The Galaxy end can be glued down on the flesh side with white or brown glue.
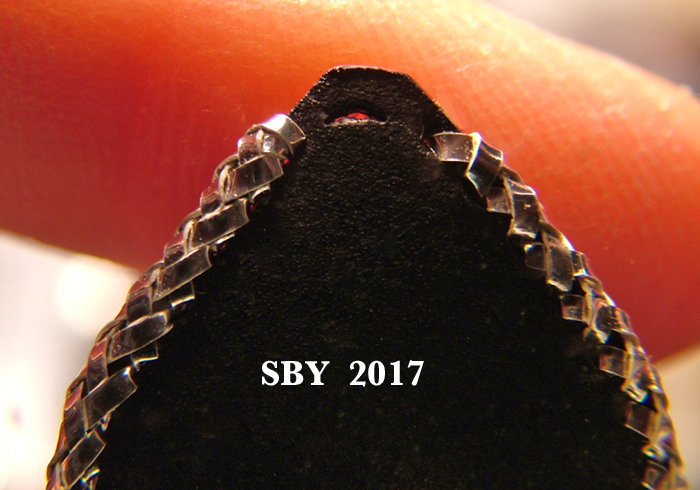
Here's the top of my new breastcollar shoulder.
For reasons of design, the edge braiding was done before any figures or pictorials were added to this breastcollar. Normally, all tooling and silvering is done
Before any edge braiding. "Do as I say, not as I do!"
I will end this pair of posts with the same shot of my unfinished, completely silver edge braided saddle, TSII #456. When this shot was taken, the seat had not yet been fastened on. Only time will tell whether entirely edging a saddle with silver braid was a good idea! The beauty is fantastic but the increased delicacy and fragility will require dainty handling.
 |
| TSII #456 'Star Wars' unfinished. |


I have no words... Your work is stunningly beautiful.
ReplyDeleteThank you Lynn!
DeleteThat detail of the edge braiding! I think I need to start looking at your tack through a magnifying glass to appreciate the details.
ReplyDelete