Timaru Star II Western Saddle #452 is following in the footsteps of its more famous brethren: It is taking forever to build!!! In some small defense, I can claim I had other, more important, things on my plate.... But as of now, mid-July, we can safely state the health matters are taken care of, and the "more normal" operation of this tack shop can re-commence. What fun!!
Many thanks to the outsize patience of our current customer, owner of this saddle. Let's begin with some saddle parts I'm actually proud of: Fenders with real rawhide oxbow stirrups.
TSII #452 is more or less a copy of #419, Celtic Cutter, made in 2001. The stirrups here are a notable improvement from that saddle.
They both are made from real rawhide (cow), but the new ones are much more detailed (and exhaustive notes kept). They use a dark tread wrap instead of light, for color purposes; remember the black and blue scheme.
This shot shows that you should always place the worst side facing inwards!! : ) Yes, a pin was used in the necks. What you can't see is the aluminum tubing inside the necks. I have found it the perfect material for this need. Cut it open with the X-Acto and fit around the neck pin. Then cover it with the neck wrap, which should match the foot tread material. The "lacing" on the tread is plain waxed-linen thread.
More progress. The second skirt is in place, the lacing is done (matching the gullet) and the corner plates are on. These are Sulser Saddlery plates I've had hanging around for ages. They were cast from white brass. Note that #419 had only a sheet Aluminum corner plate, with rough holes punched in for a border. Detail is king!
Another reason for using these corner plates is that they match some conchos I am planning on using.
The pommel/shoulders had so many adventures I would like to post on that part alone, at some future (hopefully not too far out!) time.
Meanwhile, something COMPLETELY DIFFERENT and today's laugh:
I had developed a desire for another fuzzy-inside blanket for my horses, and not being able to go to BreyerFest just made it worse. I thought this NewMarket blanket looked pretty spiffy, so I bought one off eBay (Thank you Cheshire Horse). I swear I never noticed anything unusual about it until I had it on my horse, Perquiman!!!
No, that is NOT PhotoShopped or retouched in any way!!!
The Breyer patch really is upside down!!
Somebody in China must have been bored.
Thursday, July 17, 2014
Wednesday, July 16, 2014
A Very Long Button: Finishing
Way back in May, I promised a post on finishing the super-long button used on Anya's breastcollar. We have already seen the tightening of that button, here. Yes, it's been a long dry spell: things have been busy in the interim! But pictures for the finishing were already taken, waiting since May as well. In an attempt to jumpstart my little tack shop, which really is perking along (thanks everyone for their patience and prayers), I thought finishing would be a good subject with which to break my drought.
These pictures were shot through a magnifying glass, which explains the curved edge sometimes seen.
These terms, "tightening" and "finishing," are words I'm using for my own convenience. Like so much of braiding technology (and model tackmaking!), there isn't really a standard terminology. I was influenced by Gail Hought and Tom Hall, not to mention the great pioneer Bruce Grant. I had to have some means of distinguishing the various steps I use to make a miniature braided button, so I borrowed and invented.
Finishing is the art of securing the thread ends in such a way that they don't pull loose and can't be seen. You gotta fix 'em, hold 'em and hide 'em. You sure don't want to bulk up the button in doing so; but the absolute worst thing that could happen is they'd pull out somehow. "Know when to hold em, know when to fold em." Just tying ends together adds terrible bulk, but merely tucking under doesn't quite hold them; and how I hate glue! The skill of finishing could be the heart of the TSII's one-ninth-scale model braidwork.
When we last saw this button, after tightening, it looked like this:
Note there are two colors, light and dark (black and light blue in this case) with the light being the interweave and the dark being the foundation. Although the picture doesn't show it well, there are two lengths of ends to each color, short and long. I use a short (about an inch) end to indicate the standing (or dead) end, and a long end to indicate the working end. This reminds me which is which, and what direction they were headed in. That turns out to be critical!
It doesn't really matter which end finishes first. Neatness and convenience weigh in at this stage: whichever presents itself best and most clearly. Look for flattest in relation to the lace (it's much harder to finish around corners or over edges). It's convenient to me to do each color separately; for example, here, blue and blue then black and black.
One of my secrets is the right tool: a sharp needle. Even if a blunt was used for the braiding, I'd switch to a sharp for finishing. A blunt needle will not pierce thread half so easily, smoothly and controllably as a sharp. Each thread needs to feed back into itself: to become one with itself.
Miniature magic happens when the fibres of the thread 'grip' and help
hold a pierced thread in place. This is why piercing is such a bad idea
while braiding, yet is perfect for finishing. At this scale, I can just
barely control the piercing!
Beginning with the long end of the interweave (the light color), I aim the needle back into and underneath the button, in the direction that thread came from. The needle goes in first without any thread. I thread the needle after I'm satisfied with where it's going.
Note how the needle emerges inside of (buried within) a light color pass. It could just as easily have gone into the pass above the one it did; two or three passes up from the end of the button is ideal. I would not have used the end pass (too shallow an angle of attack, and not enough thread to hold). Four passes up is too steep an angle for my taste, and risks bulk.
To finish this button it is necessary to re-thread the needle four times, once for each thread end. This dictates the length of the shortest end: long enough to re-thread the needle with. I can't tell you how many times I've gotten short ends too short. Then, you push the needle through as far as you dare, lick the little stub end of the thread, manuever eye and thread like crazy and hope you've got steady hands.
Here I've pulled the long end of the interweave through. I've said many times finishing is where, having avoided piercing for the whole of braiding, you get to pierce on purpose!! It's very satisfying!
Now for the short end of the same color. In this photo the needle is already threaded.
Note again how the needle comes out within a pass of the intended color: the light blue. I seem to be devoted to the second pass of interweave up from the end, as a place to emerge. Thread the needle with the short end and pull... and let the thread slip out when through.
And the light blue is finished!
Tension, of course, matters: too much pull and you'll get wrinkles and bulges. Too little tension and you'll have leather showing and loops sticking up. You should have gotten a sense of even tension while braiding; the same gentle but firm tug will do the job here.
Now for the black, the foundation button ends:
This photograph caught the needle threaded. Threading the needle beforehand is fine when the end is long enough, of course; this is the working end. The needle emerges embedded in the black, right next to where it emerged before. Pull the thread through and lift off the needle.
Only one more end to go!
In this photograph I've changed the angle of view, but not that of attack. Here is an example of finishing close to an edge: the needle is mashing down the leather a little, under the button. So long as the leather doesn't get pierced, finishing across an edge will work -- it just takes more patience. Now it's the short black end's turn. The direction of travel is back along the path it came, which is the standing, or dead, end.
Finished!
Alas, no pictures exist of the next step: clipping the ends. Some skill is required here, but mostly everything depends on the sharpness of your scissors! Cut the thread ends flush, and throw them away. Try not to cut the button itself. Ideally the button thread fibres close over the exit points and nothing can be seen. At this scale and with these materials, less than perfect often does just fine.
I have neglected to mention the true final step, coating. Fray-Check to the rescue. It's a funny thing but after all that work the thought of more steps is anathema. Still, coating and sealing is very necessary -- one must think of archival purposes. Tissarn's Hackamore used nail polish, and while it darkened the colors a bit more than Fray-Chek I like how it's held up. I usually use Fray-Check and sometimes use nail polish. This is probably a whole 'nother post subject.
I have chosen the longest button on this breastcollar because it was the easiest to photograph and show everything. It's a 21P 4B with 9 rings. The principles of braiding, tightening and finishing apply to any length button in this scale (Breyer Traditional) made of cotton and cotton-type threads. Naturally this implies there is a limit on how small one can get. Indeed, I have a "smallest button" in my collection of button formulae: it is the 4P 3B.
But more on that later.
These pictures were shot through a magnifying glass, which explains the curved edge sometimes seen.
These terms, "tightening" and "finishing," are words I'm using for my own convenience. Like so much of braiding technology (and model tackmaking!), there isn't really a standard terminology. I was influenced by Gail Hought and Tom Hall, not to mention the great pioneer Bruce Grant. I had to have some means of distinguishing the various steps I use to make a miniature braided button, so I borrowed and invented.
Finishing is the art of securing the thread ends in such a way that they don't pull loose and can't be seen. You gotta fix 'em, hold 'em and hide 'em. You sure don't want to bulk up the button in doing so; but the absolute worst thing that could happen is they'd pull out somehow. "Know when to hold em, know when to fold em." Just tying ends together adds terrible bulk, but merely tucking under doesn't quite hold them; and how I hate glue! The skill of finishing could be the heart of the TSII's one-ninth-scale model braidwork.
When we last saw this button, after tightening, it looked like this:
Note there are two colors, light and dark (black and light blue in this case) with the light being the interweave and the dark being the foundation. Although the picture doesn't show it well, there are two lengths of ends to each color, short and long. I use a short (about an inch) end to indicate the standing (or dead) end, and a long end to indicate the working end. This reminds me which is which, and what direction they were headed in. That turns out to be critical!
It doesn't really matter which end finishes first. Neatness and convenience weigh in at this stage: whichever presents itself best and most clearly. Look for flattest in relation to the lace (it's much harder to finish around corners or over edges). It's convenient to me to do each color separately; for example, here, blue and blue then black and black.
Beginning with the long end of the interweave (the light color), I aim the needle back into and underneath the button, in the direction that thread came from. The needle goes in first without any thread. I thread the needle after I'm satisfied with where it's going.
Note how the needle emerges inside of (buried within) a light color pass. It could just as easily have gone into the pass above the one it did; two or three passes up from the end of the button is ideal. I would not have used the end pass (too shallow an angle of attack, and not enough thread to hold). Four passes up is too steep an angle for my taste, and risks bulk.
To finish this button it is necessary to re-thread the needle four times, once for each thread end. This dictates the length of the shortest end: long enough to re-thread the needle with. I can't tell you how many times I've gotten short ends too short. Then, you push the needle through as far as you dare, lick the little stub end of the thread, manuever eye and thread like crazy and hope you've got steady hands.
Here I've pulled the long end of the interweave through. I've said many times finishing is where, having avoided piercing for the whole of braiding, you get to pierce on purpose!! It's very satisfying!
Now for the short end of the same color. In this photo the needle is already threaded.
Note again how the needle comes out within a pass of the intended color: the light blue. I seem to be devoted to the second pass of interweave up from the end, as a place to emerge. Thread the needle with the short end and pull... and let the thread slip out when through.
And the light blue is finished!
Tension, of course, matters: too much pull and you'll get wrinkles and bulges. Too little tension and you'll have leather showing and loops sticking up. You should have gotten a sense of even tension while braiding; the same gentle but firm tug will do the job here.
Now for the black, the foundation button ends:
This photograph caught the needle threaded. Threading the needle beforehand is fine when the end is long enough, of course; this is the working end. The needle emerges embedded in the black, right next to where it emerged before. Pull the thread through and lift off the needle.
Only one more end to go!
In this photograph I've changed the angle of view, but not that of attack. Here is an example of finishing close to an edge: the needle is mashing down the leather a little, under the button. So long as the leather doesn't get pierced, finishing across an edge will work -- it just takes more patience. Now it's the short black end's turn. The direction of travel is back along the path it came, which is the standing, or dead, end.
Finished!
Alas, no pictures exist of the next step: clipping the ends. Some skill is required here, but mostly everything depends on the sharpness of your scissors! Cut the thread ends flush, and throw them away. Try not to cut the button itself. Ideally the button thread fibres close over the exit points and nothing can be seen. At this scale and with these materials, less than perfect often does just fine.
I have neglected to mention the true final step, coating. Fray-Check to the rescue. It's a funny thing but after all that work the thought of more steps is anathema. Still, coating and sealing is very necessary -- one must think of archival purposes. Tissarn's Hackamore used nail polish, and while it darkened the colors a bit more than Fray-Chek I like how it's held up. I usually use Fray-Check and sometimes use nail polish. This is probably a whole 'nother post subject.
I have chosen the longest button on this breastcollar because it was the easiest to photograph and show everything. It's a 21P 4B with 9 rings. The principles of braiding, tightening and finishing apply to any length button in this scale (Breyer Traditional) made of cotton and cotton-type threads. Naturally this implies there is a limit on how small one can get. Indeed, I have a "smallest button" in my collection of button formulae: it is the 4P 3B.
But more on that later.
Friday, June 6, 2014
TSII #452: Breastcollar
Somewhat belatedly, we present the breastcollar! Considering that it was "born from a cheekpiece," I think it passes muster. When you have nothing to go on but one picture of one side of a bridle, sometimes you have to make things up. I used the same colors and patterns, just elongated and enlarged. The silver buckles took the most time and effort.
Yes, those tug buckles are solid sterling silver, hand formed and engraved. The matching keepers (slide loops) were made the same way as those on the bridle. For my own tack I tend to prefer braided keepers, even though they might seem to lack strength. Strength here refers to the keeper staying open through lots of use; it can be achieved with braided keepers by using a coating. Metal, of course, is the strongest keeper of all.
This set is in transition. I am thinking of replacing the bit.
Here is the breastcollar in place, with an old saddle out of my own collection: TSII #117!! built in the heady year of 1992. That year I was 4 years married and living in a rented house next to a church -- we would buy our own house the next year. This saddle was my first basketweave.
If you're wondering why I cut the horse's head off, it was distorted by camera to look way too large -- I hate this effect but can rarely prevent it. : )
Here, indeed, is a braided keeper. I thought the martingale needed something, and since the strap end was long, the solution seemed obvious.
Not shown: progress on TSII #452. Much of the tooling is done, and we are deep into the stirrups: very nice rawhide oxbows! I am having to brush off my saddler's techniques... how to do the seat, the horn, the shoulders... it's coming back...
Thursday, May 22, 2014
Three Mecate Artists
There are only three mecate pictures in today's post, but I think you will find them compelling and interesting. I first thought of putting them all side by side when I saw Danielle Hart's pink and brown mecate on FaceBook, in August of last year.
She was using a method I had never seen before applied to the model mecate. I had seen it, a little, in experimental form, for Arab costumes and halters, in the hands of Kate Jennings of California. I had also seen it in larger scale, that is to say, full scale (by which I mean "real life") in books in the book store and in sewing stores. It's called kumihimo, a Japanese art of braiding using a wooden form. The separate strands are crossed (braided) according to their patterns, and fed into a central opening; the rope emerges beneath.
I wouldn't have thought anybody could have had the patience and delicacy to pursue an entire miniature mecate -- nearly two feet long! -- with this method!
I had also run across the kumihimo approach, or 'mechanical braiding,' in a book on Victorian human hair memorial pieces, given me by a good friend some years ago. This book did not use the word kumihimo, and claimed the method originated in Europe. But the approach was the same: crossing the strands above an opening and feeding the result down a central opening. Weights are used with this method, on both ends of each strand. Incredibly complex braids resulted.
Picture taken from eBay some years ago.
Danielle's mecate is superneat and clean. It looks as though it was made by machine. Words like 'neat,' 'tight,' 'smooth' and 'polished' come to mind. It gleams, it does not look shreddy. If you prefer a near impossibly perfect mecate, one that might almost be computer-controlled, this might be your favorite method to collect.
At the other end of the spread is Jacquee Gillespie, of Beautiful Horses, down in New Mexico.
This lady does full-scale horsehair braiding, specializing in mememtoes of one's pets and horses that have passed on. Give her some of your departed horse's hair and she will make bracelets, rings, tassels, keyrings, necklaces and other items from it. I am positive she knows how to make full scale mecates and bosals, too.
Confession: this picture is a pinch from MH$P. However, I'm reasonably sure the photographer is Evelyn Frazier.
The shot shows what a good nick was made when Jacquee discovered the model horse hobby. She has made her own silver buckles, conchos and ferrules. In communication with her I found out she uses dog hair and alpaca hair in her model tack. I am nearly one-hundred percent certain this mecate was spun from some type of animal hair. It has the shaggy look of a full scale mecate. If, as a collector, you prefer the charm of the real stuff and its methods rendered in miniature, this is the approach for you.
A full scale, 'real' mane hair mecate. Picture taken from Hagel's Mecate Gallery.
And then there's me.
I find my own method lands somewhere in between Danielle's and Jacquee's. Timaru Star II mecates are indeed hand spun -- there is no wooden form or mechanical approach. (Full scale mecates are often made on turning machines.) They use thread, not hair spun into thread. But they don't use rayon or nylon, just cotton with maybe a little polyester covering to help protect against fraying. (I do not use embroidery floss in my mecates. That stuff frays way too much, and it is the wrong twist anyhow.) The 'checkered' or flecked strands, the ones with two colors, are made from much smaller gauge thread (Hand Quilting). The rest is made from "heavy" thread purchased at sewing stores. The trick, in addition to designing colors and patterns that work, is to find out how many strands of how many threads will form a correct thickness or gauge for the Traditional, or whatever scale, model horse.
That is the fun part. I do not seem to be able to leave model braidwork alone. : )
For collectors, isn't it fascinating to find out the variations on a theme? There is no such thing as "the best" model mecate. There are only individual artists' different methods of portraying the same item of real horse tack. The only "best" should be what you, the collector, like best.
Happy collecting!
She was using a method I had never seen before applied to the model mecate. I had seen it, a little, in experimental form, for Arab costumes and halters, in the hands of Kate Jennings of California. I had also seen it in larger scale, that is to say, full scale (by which I mean "real life") in books in the book store and in sewing stores. It's called kumihimo, a Japanese art of braiding using a wooden form. The separate strands are crossed (braided) according to their patterns, and fed into a central opening; the rope emerges beneath.
![]() |
| Photo by D. Hart |
I had also run across the kumihimo approach, or 'mechanical braiding,' in a book on Victorian human hair memorial pieces, given me by a good friend some years ago. This book did not use the word kumihimo, and claimed the method originated in Europe. But the approach was the same: crossing the strands above an opening and feeding the result down a central opening. Weights are used with this method, on both ends of each strand. Incredibly complex braids resulted.
Picture taken from eBay some years ago.
Danielle's mecate is superneat and clean. It looks as though it was made by machine. Words like 'neat,' 'tight,' 'smooth' and 'polished' come to mind. It gleams, it does not look shreddy. If you prefer a near impossibly perfect mecate, one that might almost be computer-controlled, this might be your favorite method to collect.
At the other end of the spread is Jacquee Gillespie, of Beautiful Horses, down in New Mexico.
This lady does full-scale horsehair braiding, specializing in mememtoes of one's pets and horses that have passed on. Give her some of your departed horse's hair and she will make bracelets, rings, tassels, keyrings, necklaces and other items from it. I am positive she knows how to make full scale mecates and bosals, too.
Confession: this picture is a pinch from MH$P. However, I'm reasonably sure the photographer is Evelyn Frazier.
The shot shows what a good nick was made when Jacquee discovered the model horse hobby. She has made her own silver buckles, conchos and ferrules. In communication with her I found out she uses dog hair and alpaca hair in her model tack. I am nearly one-hundred percent certain this mecate was spun from some type of animal hair. It has the shaggy look of a full scale mecate. If, as a collector, you prefer the charm of the real stuff and its methods rendered in miniature, this is the approach for you.
A full scale, 'real' mane hair mecate. Picture taken from Hagel's Mecate Gallery.
And then there's me.
I find my own method lands somewhere in between Danielle's and Jacquee's. Timaru Star II mecates are indeed hand spun -- there is no wooden form or mechanical approach. (Full scale mecates are often made on turning machines.) They use thread, not hair spun into thread. But they don't use rayon or nylon, just cotton with maybe a little polyester covering to help protect against fraying. (I do not use embroidery floss in my mecates. That stuff frays way too much, and it is the wrong twist anyhow.) The 'checkered' or flecked strands, the ones with two colors, are made from much smaller gauge thread (Hand Quilting). The rest is made from "heavy" thread purchased at sewing stores. The trick, in addition to designing colors and patterns that work, is to find out how many strands of how many threads will form a correct thickness or gauge for the Traditional, or whatever scale, model horse.
That is the fun part. I do not seem to be able to leave model braidwork alone. : )
For collectors, isn't it fascinating to find out the variations on a theme? There is no such thing as "the best" model mecate. There are only individual artists' different methods of portraying the same item of real horse tack. The only "best" should be what you, the collector, like best.
Happy collecting!
Saturday, May 10, 2014
A Very Long Button: Tightening
This is what Anja's breastcollar looks like right now: unfinished, but you can tell how it's going to wind up! If the buckles match the bridle (and they will), it should be striking.
Getting the right braiding string for this particular ring and dees was hard. I tried two different threads and actually braided a central ring with a third material, sinew, but I wasn't happy with any of them. Too red. Too fat. Too shreddy. Finally I took the "light banana" thread I'd used in the buttons, and peeled it apart. It has three warps or whatever the term is: inner plies. I peeled off 1/3rd and was left with 2/3rds. I then combined two 2/3rds, making a thread fatter than my typical Topst (Topstitching). It now measured the same diameter, or gauge, as my favorite, Heavy (Button & Craft). This is a percentage in many of my notes: Heavy = 1 + 1/3 Topst.
Just a note: the sewing store calls my topstitching "heavy."
This was Anja's breastcollar up to yesterday. Can you spot the difference? Yup... it's the small buttons, the "white" (actually light banana) and deep turquoise ones, bracketing the longer, black-and-light-turquoise ones. Got the middle ones backwards! When you compare this to the bridle, you realize that Yup, I goofed.
I didn't put the white touching the ends of the long central button! Would people notice? I went ahead and did a lot of work on the other side of the breastcollar before my professional conscience started to bother me about it. Tack, be it model or real, MUST be symmetrical... unless there's a darn good reason not to. And personal pride/laziness is, unfortunately, not a darn good reason. After a bunch of tightening, I went back and cut out the white buttons on that side and moved the deep-turqouise ones, and braided in new white ones.
Why not cut the turquoises? in theory, you want to cut out the "worst done" ones, either color. But with this particular breastcollar, the deep turquoise thread is hand-spun (from thinner thread), and thus has higher "value." I know I just talked about hand-joining the "white" thread, but that was only for the ring and dees. The buttons' light banana thread is straight off the spool.
This button is one of the longest I have ever made. It is a 21 Part with 9 rings of interweave, 4 Bight casa (as Tom Hall uses the term). The light turquoise has to be hand-spun up to a matching guage with the black. It started life as Gutermann's, which is a very thin thread. I love Gutermann's colors, but they just aren't thick enough for this type of braiding.
Here is the button after braiding, but before tightening. I thought you might like to see the process of tightening. Again, I haven't shown everything: the tool I tighten with is a homebuilt needle awl. I should put up a post about custom tools... and about hand spinning... If you think the above button is done, compare its ends' distance to the rings, and look at the top pictures.
It is hard to believe, but every button I braid is done twice: once for the braiding and once for the tightening. Why not do it tight the first time around? Because I can't manage it, that's why. It's too hard to see the laps, manipulate the needle, or avoid piercing the thread. It's simply easier for me to do every button twice... and once started, a successful habit is hard to budge.
On to tightening.
In the previous picture you can see there are four ends of thread, two light and two dark (black). I always start tightening with the outer, or foundation, button; in this case the black. There should be a shorter end and a longer end for each color. The shorter end is called the standing or dead end. I start tightening with the dead end.
I am lifting up each pass as the thread goes along, following the whole thing, from the dead end onwards. I am using the same amount of pressure each time. Gradually a loop forms, as the slack is taken up and accumulates.
The button starts to look drunken, shrunken and weird.
Right about here you hope the heck you know what you are doing.
Notice how the light-turquoise passes are starting to stand up? The black is becoming properly tight, and it's the other color's turn to have slack.
Who knew there was that much slack in the black?! But this is a LONG button, one of my longest. Ths slack is about right for the size.
Here we're starting to tighten the light-turquoise, the interweave color, beginning with its own dead end.
Around and around, just as if we were braiding it in the first place. This sort of process really "learns" you your buttons... you see where everything goes... repeatedly!
The second color is forming up a nice long bight. God help you if there are any pierces (one thread passing through another). One has to be very careful with the teeny pointed scissors if there are any pierces... and there usually are a few snags. That's why I use blunt point needles for the braiding... another subject. : )
The important thing in miniature braiding is to maintain even tension. Each pull of each pass has to be just exactly the same pressure. This may sound impossible but you get into a trance state and it's not hard.
Notice how tight the whole button is getting. It's half the size it was.
I kind of suspected I'd have to do the black a second time. This step is unique to super-long buttons; normally, once through is sufficient for tighening. As a general rule, thread cannot withstand working through more than about three times. It shreds up and loses color. After three or four you're better off ditching it and getting a new piece. So we're up against my limits here.
And it's done.
We'll have to look at finishing, or burying the ends of the threads, another time.
I hope you have enjoyed this little lesson in tightening.
Sunday, April 20, 2014
TSII 452: The Bridle
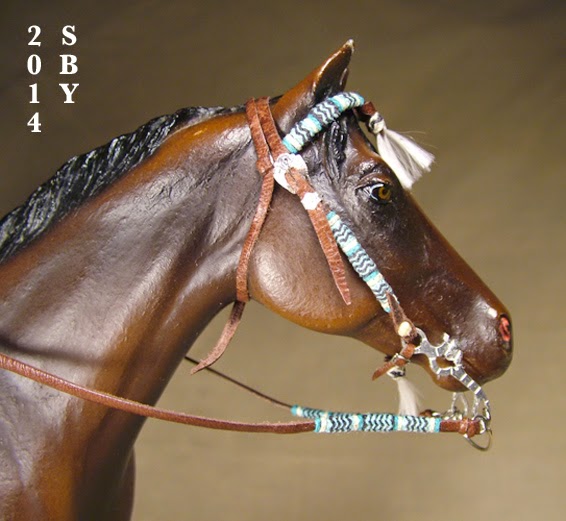
It's hard to believe we're hot on the trail of our next saddle, TSII #452. In the last three (3) years we've completed only two (2) saddles, the gold sunburst #450 and the Goehring #451. But the times they are a-changin!! It is with great relief that I announce the finishing of Schmidt's Turquoise bridle! That is, it stood still long enough to be photographed... but already I'm thinking it needs tassels on the ends of the reins...
I started out working with my Red Leopard Appaloosa Lady Phase, but by the time I reached this stage I was searching for a dark horse. Such a bright bridle needs a darker background; never mind the dark brown of the lace.
The hard part was the buckles.
They are individually hand made from sterling silver, and of course hand engraved. Those itsy-bitsy keepers are the smallest silver parts, to date, I've ever made. The reference picture I had (see below) did not show the throatlatch fastening, nor the near side of the bridle at all. One has to rely one's experience for such things... on the near-universal pattern of symmetry and matching parts in horse tack. No matter how tempting otherwise, unless there is a specific reason not to, tack must be made symmetrical.
As ever my buckle tongues, and the brow concho wire in this case, are made of stainless steel.
I could not resist putting this newly-finished beauty on my newly-acquired Snowman:
This is how you find out, as a tackmaker, how big each new mold is. (This's my first Idocus.) Snowman/Idocus is considerably bigger than Lady Phase [LP]. Still it fit him. He looks great! Normally I don't care for greys and cold colors, but this boy sneaked in under the radar... I guess sometimes I need something different, for at long-separated but regular intervals I have fallen for grey horses, and those few remain some of my absolute favorites. Perhaps their lack of color accents their personality.
As a designer of complete saddle sets, I'm always looking for ways to unite the piece. We know what the customer asked for with the bridle:
But here's the saddle she asked for hers to be based upon: TSII #419, built in 2001, called the Celtic Cutter.
Apologies to Andrea; I haven't your email and so can't ask permission to re-post this picture. : ( It perfectly shows the carving pattern and the front of this saddle, as well as a closer look at the tassels. Tassels! Here is the design element that I will be using to help connect the two rather disparate halves of my customer's saddle set.
You would think the obvious link would be the braiding of the cantle, pommel, horn and stirrups. Aren't I famous for braidwork on saddles? But think: triple-color (let alone 4-color, which this bridle is) braiding is extremely difficult (I've only done tri-color once on a cantle). Something in me resists the idea of a fairly plainly carved natural saddle overdone in screaming turquoise. She didn't ask for that. She gave me free rein, bless her heart.
It's a challenge. Should I use sinew, so clearly (and beautifully) shown on TSII #419? But where is the sinew on the bridle? It didn't use any. Putting some on afterwards is kind of out of the question... I've painted myself into this corner: What to use for the edge braiding, since there must be some?
I thought about black and offwhite. That would be loud, but possible. I rather like the pure-rawhide approach. Would just the offwhite / pale-banana-color thread work? Here are the threads and their leftovers:
This picture, incidentally, shows the work that went into two of the 4 colors of thread, the two on the right (turquoise and light turquoise). Since the thread off the spool was too thin (too small a gauge) I spun it larger, doubling it. It was a bit of a mistake making long strands of the darker turquoise, since that is only needed for a small knot. I should have made longer strands of the light turquoise, and I did: only short lengths are left, as you see.
What I have determined so far is that the buttons for the saddle tassels will be the same as on the bridle, black and offwhite.
I am seriously considering some Amish harness shop linen thread I have, the same color as the offwhite but heavier. I used it for TSII #423, Eleanor's Braided.
I also thought about something heretofore not really considered: the blanket. You can see faint penciling of the blanket in the above drawing. The blanket really is the most powerful tool in connecting bridle with saddle, other than the rider! which we are not considering in this order.
I found a perfectly-matching sample of UltraSuede for a seat:
Trust me, that square really does match, even though this picture makes it green (and not square)! I also found a Chris Armstrong blanket pattern I really liked, Rialto, from her Model Horse Saddle Pad Cross Stitch Patterns. Chris Armstrong Volume I
Here's where total indulgence comes in. I have yet to allow myself to count hours spent on cross stitching blankets as tackmaking. The reason is that you can buy blankets for ten to fifteen, or commission them for about 25, but it takes me ten to fifteen hours to make one!! Plus it is just too fun, much more mindless and relaxing than even tack, which heaven knows is a great luxury and indulgence in itself. I must be a Calvinist or something. Perhaps I should invoke my birthday and just have fun making a blanket. Spring is in the air, and we all deserve a bit of ease.
Thank you for your patience, Anya.
I started out working with my Red Leopard Appaloosa Lady Phase, but by the time I reached this stage I was searching for a dark horse. Such a bright bridle needs a darker background; never mind the dark brown of the lace.
The hard part was the buckles.
They are individually hand made from sterling silver, and of course hand engraved. Those itsy-bitsy keepers are the smallest silver parts, to date, I've ever made. The reference picture I had (see below) did not show the throatlatch fastening, nor the near side of the bridle at all. One has to rely one's experience for such things... on the near-universal pattern of symmetry and matching parts in horse tack. No matter how tempting otherwise, unless there is a specific reason not to, tack must be made symmetrical.
As ever my buckle tongues, and the brow concho wire in this case, are made of stainless steel.
I could not resist putting this newly-finished beauty on my newly-acquired Snowman:
This is how you find out, as a tackmaker, how big each new mold is. (This's my first Idocus.) Snowman/Idocus is considerably bigger than Lady Phase [LP]. Still it fit him. He looks great! Normally I don't care for greys and cold colors, but this boy sneaked in under the radar... I guess sometimes I need something different, for at long-separated but regular intervals I have fallen for grey horses, and those few remain some of my absolute favorites. Perhaps their lack of color accents their personality.
As a designer of complete saddle sets, I'm always looking for ways to unite the piece. We know what the customer asked for with the bridle:
But here's the saddle she asked for hers to be based upon: TSII #419, built in 2001, called the Celtic Cutter.Apologies to Andrea; I haven't your email and so can't ask permission to re-post this picture. : ( It perfectly shows the carving pattern and the front of this saddle, as well as a closer look at the tassels. Tassels! Here is the design element that I will be using to help connect the two rather disparate halves of my customer's saddle set.
You would think the obvious link would be the braiding of the cantle, pommel, horn and stirrups. Aren't I famous for braidwork on saddles? But think: triple-color (let alone 4-color, which this bridle is) braiding is extremely difficult (I've only done tri-color once on a cantle). Something in me resists the idea of a fairly plainly carved natural saddle overdone in screaming turquoise. She didn't ask for that. She gave me free rein, bless her heart.
It's a challenge. Should I use sinew, so clearly (and beautifully) shown on TSII #419? But where is the sinew on the bridle? It didn't use any. Putting some on afterwards is kind of out of the question... I've painted myself into this corner: What to use for the edge braiding, since there must be some?
I thought about black and offwhite. That would be loud, but possible. I rather like the pure-rawhide approach. Would just the offwhite / pale-banana-color thread work? Here are the threads and their leftovers:
This picture, incidentally, shows the work that went into two of the 4 colors of thread, the two on the right (turquoise and light turquoise). Since the thread off the spool was too thin (too small a gauge) I spun it larger, doubling it. It was a bit of a mistake making long strands of the darker turquoise, since that is only needed for a small knot. I should have made longer strands of the light turquoise, and I did: only short lengths are left, as you see.
What I have determined so far is that the buttons for the saddle tassels will be the same as on the bridle, black and offwhite.
I am seriously considering some Amish harness shop linen thread I have, the same color as the offwhite but heavier. I used it for TSII #423, Eleanor's Braided.
I also thought about something heretofore not really considered: the blanket. You can see faint penciling of the blanket in the above drawing. The blanket really is the most powerful tool in connecting bridle with saddle, other than the rider! which we are not considering in this order.
I found a perfectly-matching sample of UltraSuede for a seat:
Trust me, that square really does match, even though this picture makes it green (and not square)! I also found a Chris Armstrong blanket pattern I really liked, Rialto, from her Model Horse Saddle Pad Cross Stitch Patterns. Chris Armstrong Volume I
Here's where total indulgence comes in. I have yet to allow myself to count hours spent on cross stitching blankets as tackmaking. The reason is that you can buy blankets for ten to fifteen, or commission them for about 25, but it takes me ten to fifteen hours to make one!! Plus it is just too fun, much more mindless and relaxing than even tack, which heaven knows is a great luxury and indulgence in itself. I must be a Calvinist or something. Perhaps I should invoke my birthday and just have fun making a blanket. Spring is in the air, and we all deserve a bit of ease.
Thank you for your patience, Anya.
Subscribe to:
Posts (Atom)