Sunday, April 20, 2014

TSII 452: The Bridle

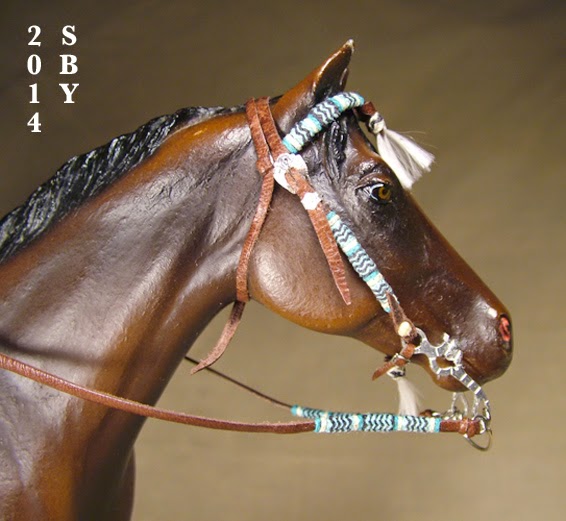
It's hard to believe we're hot on the trail of our next saddle, TSII #452.  In the last three (3) years we've completed only two (2) saddles, the gold sunburst #450 and the Goehring #451.  But the times they are a-changin!!  It is with great relief that I announce the finishing of Schmidt's Turquoise bridle!  That is, it stood still long enough to be photographed... but already I'm thinking it needs tassels on the ends of the reins... 

I started out working with my Red Leopard Appaloosa Lady Phase, but by the time I reached this stage I was searching for a dark horse.  Such a bright bridle needs a darker background; never mind the dark brown of the lace.
The hard part was the buckles.
They are individually hand made from sterling silver, and of course hand engraved.  Those itsy-bitsy keepers are the smallest silver parts, to date, I've ever made.  The reference picture I had (see below) did not show the throatlatch fastening, nor the near side of the bridle at all.   One has to rely one's experience for such things... on the near-universal pattern of symmetry and matching parts in horse tack.  No matter how tempting otherwise, unless there is a specific reason not to, tack must be made symmetrical.

As ever my buckle tongues, and the brow concho wire in this case, are made of stainless steel. 
I could not resist putting this newly-finished beauty on my newly-acquired Snowman:

 This is how you find out, as a tackmaker, how big each new mold is.  (This's my first Idocus.)  Snowman/Idocus is considerably bigger than Lady Phase [LP].  Still it fit him.  He looks great!  Normally I don't care for greys and cold colors, but this boy sneaked in under the radar... I guess sometimes I need something different, for at long-separated but regular intervals I have fallen for grey horses, and those few remain some of my absolute favorites.  Perhaps their lack of color accents their personality.

As a designer of complete saddle sets, I'm always looking for ways to unite the piece.  We know what the customer asked for with the bridle:
But here's the saddle she asked for hers to be based upon:  TSII #419, built in 2001, called the Celtic Cutter.


Apologies to Andrea; I haven't your email and so can't ask permission to re-post this picture.  : (  It perfectly shows the carving pattern and the front of this saddle, as well as a closer look at the tassels.  Tassels!  Here is the design element that I will be using to help connect the two rather disparate  halves of my customer's saddle set.
You would think the obvious link would be the braiding of the cantle, pommel, horn and stirrups.  Aren't I famous for braidwork on saddles?  But think:  triple-color (let alone 4-color, which this bridle is) braiding is extremely difficult (I've only done tri-color once on a cantle).  Something in me resists the idea of a fairly plainly carved natural saddle overdone in screaming turquoise.  She didn't ask for that.  She gave me free rein, bless her heart. 

It's a challenge.  Should I use sinew, so clearly (and beautifully) shown on TSII #419?  But where is the sinew on the bridle?  It didn't use any.  Putting some on afterwards is kind of out of the question...  I've painted myself into this corner:  What to use for the edge braiding, since there must be some?
I thought about black and offwhite.  That would be loud, but possible.  I rather like the pure-rawhide approach.  Would just the offwhite / pale-banana-color thread work?  Here are the threads and their leftovers:
This picture, incidentally, shows the work that went into two of the 4 colors of thread, the two on the right (turquoise and light turquoise).   Since the thread off the spool was too thin (too small a gauge) I spun it larger, doubling it.  It was a bit of a mistake making long strands of the darker turquoise, since that is only needed for a small knot.  I should have made longer strands of the light turquoise, and I did: only short lengths are left, as you see.

What I have determined so far is that the buttons for the saddle tassels will be the same as on the bridle, black and offwhite.
I am seriously considering some Amish harness shop linen thread I have, the same color as the offwhite but heavier.   I used it for TSII #423, Eleanor's Braided.

I also thought about something heretofore not really considered: the blanket.  You can see faint penciling of the blanket in the above drawing.  The blanket really is the most powerful tool in connecting bridle with saddle, other than the rider!  which we are not considering in this order.
I found a perfectly-matching sample of UltraSuede for a seat:
 Trust me, that square really does match, even though this picture makes it green (and not square)!  I also found a Chris Armstrong blanket pattern I really liked, Rialto, from her Model Horse Saddle Pad Cross Stitch Patterns.  Chris Armstrong Volume I
Here's where total indulgence comes in.  I have yet to allow myself to count hours spent on cross stitching blankets as tackmaking.  The reason is that you can buy blankets for ten to fifteen, or commission them for about 25, but it takes me ten to fifteen hours to make one!!  Plus it is just too fun, much more mindless and relaxing than even tack, which heaven knows is a great luxury and indulgence in itself.  I must be a Calvinist or something.  Perhaps I should invoke my birthday and just have fun making a blanket.  Spring is in the air, and we all deserve a bit of ease.
Thank you for your patience, Anya.

Thursday, April 3, 2014

A Turquoise Bridle


First let me thank my readers for taking me past the mile mark of ten thousand hits!!!!!   This blog has gone much further than I ever dreamed!!  Thank you, thank you all so very much.  I'll have to think of some way to celebrate this...  I feel like we've barely begun.

Next, we have made great progress on the next Lottery winner, Anya Schmidt of Germany.  You will recall a sneak peek reference from a few posts ago:
As any red-blooded model horse person would do, she chose the blue headstall.  I admit I was greatly intrigued -- read tempted!!  When I finally sat down to try it, my first few attempts came out wrong.  The turquiose thread I initially used was too dark and intense:  both bright and loud.  Also, I originally was using my dyed rawhide-color thread for the pale, non-blue color.  Another mistake:  it was too yellow and again too bright.  I sat down with a printout and changed all my colors.  Both turquoises I wound up using have to be hand-spun from smaller thread.

The trick here, as with all model horse tack, is to capture the essence of the pattern or design.  You must shrink it in such a fashion that it does not look like it's been shrunk.
Here's what I was copying:
And here's what I came up with:
Three buttons near each end were combined into one.  That one button kept its interweaves, two for the browband and three for the cheek in the model version.  (Browbands are always shorter for me.)  This combining also left me with only two single-color buttons to make, instead of three, four times per stretch.  The long, contrasting, black-interweave buttons became fertile ground for reversing:  the two outer ones became turquoise with black stripes, while the inner one became black with turquoise stripes.  While the original has an inner button of black with 5 interweaves of turquoise,  I settled for four.  In practice, all the long buttons could be made on a foundation of 9P 4B.

It is my belief that this blue bridle was made by Lisa Bowring.
Photo by Lydia Ernst
This artist, who was first brought to my attention by Lydia Ernst at BreyerFest a few years ago, made full scale braided tack using Flex lace.  The colors were fantastic, unbelievable!  I found a website, since taken down, that showed her beautiful and breathtaking bridles and breastcollars.  She had settled on 4 patterns that her customers could order.  Only four, yet what a wealth of perfected design lay within them!!  I grabbed a card and made a drawing:
You will see that Anya's blue bridle uses a version of the "Double Center" pattern.

I have the further challenge of designing a saddle to go with this bridle!!  That will be fun... 
In other news, my family is taking another canoe trip this weekend, so I'm out of town for a while again.  Return on Tuesday and take up the reins again!!
Happy Tacking!

Tuesday, March 25, 2014

Clyde Goehring: Done At Last!

The Clyde Goehring Mexican Silver Parade Saddle set is finally finished.  A flourish of mariachi trumpets would not be amiss!!  It has only been... ummm... fifteen months... !!!  This saddle, TSII #451, was officially started January 14 of 2013... and finished March 5 of 2014.   In the 5 years since 2009 (when it was accepted as an order), lives were massively impacted, fortunes changed hands, aged relatives rose into overpowering prominence and new friendships were forged in the fires of unexpected trials and tribulations...   This all sounds so dramatic and overblown, but, in fact, every one of those things happened: most of them during 2013.

When I look at this saddle today I see much history;  but most of all, I see a friend.  This friend helped me overcome the logjam of working on this saddle in a new and refreshing way.  She went above and beyond any call of duty, and positively outdid herself in helping me finish it.  I really cannot emphasize enough how much Ann Bilon must share the credit for finally concluding one of the TSII's most long-drawn out projects.  Thank you Ann!!! 

TSII #451 was accepted as an order in my Lottery of August 2009... the last TSII Lottery ever,  for the foreseeable future.  The order was for a portrait of a real saddle.  The horse indicated was Alborozo, new just the summer before.  Prior to starting work on the set, I had never owned (or, let's be honest, wanted) Alborozo.  He was a grey and I am not fond of greys.  He was an odd size.  He was only mildly tack friendly.  To beat all, he was hard to get hold of.  I had dealt with him before, making a Domo Vaquero saddle on one in 2009.  In that instance I'd borrowed the mold from the customer.  For the Clyde Goehring a similar arrangement was intended; but as it happened, a neighbor (much closer than the ordering customer, who was in Texas) was able to lend me an Alborozo.  She had two.  It was the more scratched and custom-intended horse of the two.  I was very grateful.
As documented elsewhere, that Alborozo spent so much time on my bench I started to fall in love with him.  This is the secret of tack making:  you bond with the horse.  It can be lightly or deeply, but there is a connection established, which forever afterwards will be present in the piece of tack and in that horse.  I have him now, and his name is SnowHammer, in memory of the snows of New York and the beautiful house on Lake Seneca.  He is, umm, waiting to be freed from carrying this saddle, which he is now heartily tired of...

The finishing of this piece accelerated after the blanket came in.  All I had left to do was the serapes and the latigo-strap covers.  The serapes took a day; the covers -- very fancy keepers in real life -- took a couple of days.  Designing them was a challenge, since I still wasn't completely sure of how they worked in full scale.  What you see here are actually clip-ons!  pieces intended to snap onto the tied-up cinch latigo strap.  There was no other way to achieve the detail demanded...  the saddle could not have been fastened on if the cinch strap had to pass multiple times through such an elaborate keeper as well as have such a fancy tip.  Leather at that scale would not have bourne the stresses involved.  Such was my reasoning.

The serape was the absolute last part to be created -- two halves sewn together, with the seam under the back skirts of the saddle.  Such colorful serapes have been used here at the TSII since the earliest of days!!  1979 -- and they all really did come from Mexico -- Nogales, south from Tucson, where I often visit my parents.  It was grandparents in the days of original acquisition, up through the middle 80s...  The reference pictures clearly show a colorful Mexican serape, as do many other instances of California parade saddles.
The two blankets together make a very interesting texture.  The second person to be clearly credited with helping me finish this saddle, behind Ann, has got to be Lizzie the Knitter.  When you discover I just read Zen and the Art of Knitting, it becomes almost a spiritual thing... !

Possibly because of his stance, I find I prefer Alborozo without the serape.  But this is a personal preference.  With it he seems to have color overload.  The serape is detachable, of course -- see earlier.  In contrast, with Carrick (named Valhombra), the serape has plenty of room.  Without it, the set would be somewhat lacking on this horse.
The pose and color of this horse reminds me of a couple of drawings by western artist Joe de Yong.

Editor's Note from the future (Sept 2017).  This is the place to index all 12 (!) other blog posts having to do with TSII #451, so here we go:
Bit Blanks
Goehring Breastcollar Rough Cut
Goehring's Reins
Goehring Breastcollar Engraved
Goehring Bridle & Breastcollar Done
Goehring Stirrups
Goehring's Fenders Etc.
Tree Fun
All Good Things: Goehring Skirts
Stringing Along and Concho Villa
Silver Progress on the Goehring
CG: Almost There

What is next for the TSII?  The number of trips does not seem to be going down:  I just went to MAR last weekend, and the now-typical summer trip to Colorado and Kansas is set.  I'll be able to stick my head in at Springamathing!!  My donation to this year's NAN Auction has already been made:  not a piece of tack, but a Meadowbrook cart kit by Michelle Huskins ("The Wood Wiz") and a copy of the Guide.  I feel my next duty really is to the remaining 6 Lottery winners:  2 Western saddles, 2 parade sets and 1 parade bridle,  and 1 hitched-horsehair bridle & bc set.  In the way of things, that single parade bridle will probably, in the fullness of time, morph into a complete saddle...  that was only to be expected...  Somewhere in there, commensurate with the desires of the artist, will come various auction pieces and trades.   Also somewhere in the next year should come another printing of the Guide... if it does not become available online!!  That's a decision I have not made yet, but for the first time, I admit the possibility.
In conclusion, this little tack shop will carry on much as it has in the past.  Look for horses to be put up for sale:  I have a friend's collection to disperse as well as some of my own.  Look for future electronic offerings of a tutorial sort.  The dream of more pieces as well as another book is alive.


Sunday, March 2, 2014

Chris Armstrong's Camel

A couple of weeks ago I had the pleasure of meeting with some Tucson model horse people.  Chris Armstrong, of Saddle Pad Cross Stitch Patterns fame, brought her camel sculpture.  We were at a local restaurant -- it was Golden Corral on 22nd -- and I can only guess what the other guests thought.  Let alone the manager!  I was so busy looking at the goodies I confess I wasn't paying them any attention...
This was February 19, the first day I landed in Tucson.  I have been very lucky to be able to visit my snowbird parents for a week every February.  (For, oh, many years now.)  Usually I try and time my visit to fall across the great Tucson Gem & Mineral Show, but this year was different.  I'd spent January away from my own home and was looking at a 12-day trip in early March, and I wanted to place the February run right in between, to give myself some breathing space.  Miraculously, a three-leg flying journey was correctly completed on each end of my Tucson week -- this with a husband who has nothing but disbelief in airports' abilities to handle or connect passengers on the ground...

The local hobbyists couldn't manage a weekend off.  Our only time to get together was the very day I flew in.  I am thankful that it all worked out.  Chris Armstrong, Pat McDonald, Debi Roff, and Lauren from Phoenix all showed up (plus Allen) and we had a fine time.  In addition to the camel, there were three model horses and a pile of tack. 
In this shot you can see the tail and hind leg of my Carrick at left... Debi's arm and shoulder... and my TSII #407 sitting at lower right.  I'll have to do a post on this saddle alone:  Five days later it got donated to Tucson's Mini Time Machine on Camp Lowell road -- a museum of miniatures!!  (Squeal!!)  Along with a Stone ISH and one of my own cross stitch blankets -- none other than Mint O'odham, which has its own blog post.  mint o'odham
(I know, I'm one of those crazy  people who actually name their saddle blankets... )  The blanket and horse donation happened later, after I got home. 
Meanwhile, there was this camel... 
I confess, an original sculpture was NOT what I was expecting from Chris Armstrong.  She did "bootie bags," carry bags and purses from old pairs of pants, and she now offers CDs of Western Saddle Blanket patterns.  But the moment I saw "Camelot" I was hooked.  Possibly because the conformation was so correct.  Possibly the scale of him -- this too was correct.  Possibly because, I confess again, after 35 years in this hobby, I am increasingly attracted to deer, antelope and moose models, and a camel just fits right in.  Or it could be that, almost right away, visions of knotted wool halters started to swim in the depths of my mind...
It's not like we don't have any reference for those.

Chris hasn't cast him yet -- he's not finished.  But plans are afoot.  I all but promised I wanted one.  I did that silly thing, that one thing that indicates falling-in-love, and that nearly always results in a sale, sometime in future:  I named him.
Wednesday.
Hump Day.
These pictures were taken by my brother, Allen Bensema.  He happened to be also visiting the family (he lives in Denver), and with great good humour he wanted to tag along.  He isn't the least into model horses, but Allen IS into photography in a big way.  I'm not the only one to see a useful connection!  Plus he's just a wonderful mellow sort to hang out with.  Here is his Flickr page:
AllenBPhotography.

Other TSII news:
As of March 2, the Clyde Goehring Saddle is not finished yet.  I have 4 days to work on it before I vanish yet again for twelve days.  There just seem to be a lot of trips in my life!  I anticipate completion, and starting on the next customer (Anja Schmidt) "in the fulness of time."  Which is to say, much slower than I'd prefer!!  but at least it's not years.  At this point we're looking at the last two weeks of March.  If apologies for inconvenience can be accepted after more than 5 years of delays, they are offered.  On the good side, when I showed the Goehring on Carrick to the museum staff, they were suitably impressed. 
I think it put in a good word.

Monday, February 17, 2014

CG: Almost There


 Progress has moved so far forward on this saddle!  I'm struggling to keep up the blog.  When last seen, there were only two sets of strings, no front girth apparatus and no blanket!  The blanket, you can see, has been happily solved -- by another artist, outside the hobby!  But I want to start in chronological order here... and that means going back to those main cinch rings.
 We returned to State College on the 30th of January.  Shortly afterwards, I made these two rings.  They are sterling silver on the front, with cast whitebrass rings in the back -- engraved ones, almost surely purchased from TWMHC.  I'd had them kicking around for some time, and now, because I wanted the bar at the bottom to have some sort of decoration on it (not be plain), I decided to use them.   They had the further desirability of being cast -- of not having a seam -- so they could withstand pull and stress.  I wouldn't have to solder them shut.
Despite Luis' extraordinary collection of pictures, there are some things you just don't see.  One of them is the back of the Mexican Charro-style girth rings.  God only knows what they look like in real life.  The best I could find was a sidewise view.  But function can dictate appearance (and usually does).  They had to be open enough to allow passage of the suspending straps, the ones that wrap around the tree shoulders.  And they had to come together again at the bottom, because there the rings only support the cinch strap: the latigo strap, just like American Western saddles.
Making the suspending straps, which I called the main girth straps (above), was relatively easy.  The hard part was the lining, and even then it was merely getting things small enough.  Patience was required, but the design work was behind us -- the conchos taught us the material, and the skill called up the X-Acto knife.
This is a blast from the past.  I'm using heat from the red lamp to "hot-oil" the cinch latigo straps, a procedure covered in my Guide [Guide to Making Model Horse Tack].  That yellow stuff is a can of Super 7 leather dressing.   It smells like honey.
Don't go talking about the undesirability and shortage of incandescent light bulbs!!!!!!!!!!!!!!!

At this point, something extraordinary happened.
A saddle blanket dropped out of the sky.  Literally.
Manna from heaven.

I have a friend, Lizzie, who has taken up knitting as a hobby.  She had made me a pot-holder earlier.  She loved horses and knew about my little tack shop, but was not a collector.  I had told her the dimensions of a Western saddle blanket, but I certainly was not expecting anything!!!  I learned that her job required frequent flying, so to amuse herself while in the air, she knitted me this fabulous, incredibly soft, beautiful little gem.  This photo shows the true colors.  The red, green and yellow cover the spectrum and will go with any color horse.
I was amazed, astonished, delighted.  After a quick referral to another model tackmaker who knew more about old-style California saddle blankets than myself (thank you Heather!), I decided my Muse knew what it was doing when it fell madly in love with this blanket coupled with this saddle.
Oh the relief.

And now for the cinch.  Light at the end of the tunnel....
A lot of pictures were taken during cinch making.  Perhaps there is a dedicated blog post here, but for now I'll just include a few.
Thank you Carol Williams.  The idea for the "rack" comes from her.  ("It's a Cinch!")  The skill of tackmaking keeps evolving, so I confess my cinches are now a bit beyond what I've shown in my Guide.  I use this rack instead of hanging them off the anvil.  And in this case, there wasn't any interweaving -- just the color stays.
Even this picture is out of date.  While it shows the central stay and its rings, it doesn't show that I had to replace one of the rings with a much larger one.
But it does show feeding the end of the floss in under the stay wraps.  No knots!!
Making the leather covers for the cinch, clearly shown on my reference.  A little bit of personal, sidewise story:  the lower right covers are made of scrap leather once used on my family car's canoe racks, as padding.  Leather!! one of the world's most recyclable materials...

Voila!  In this picture the concho strings are much too long.   In fact the whole saddle's strings are too long.  Chop chop clip clip point point.  A whole lot of little adjustments happen when you finally put the thing together and fit it on a horse.  Far better to find out if it's going to behave NOW, whilst on the tackbench and in my own hands, than have the customer find out!!   It's not just a pretty-looking miniature, it's a working model, so everything has to actually fit...
The martingale was too long, for instance; and the cinch center ring too small.  Strings too long.
Et al.

And then I realized I hadn't signed it.
The last saddle I signed was the Golden Sunburst back in September of 2011.  Mein Gott, three years...  I can hardly believe it...  And before that, the last saddle I'd signed was in 2009!!  oh my again...  2010 and 2013 really did tear me up...

This photo shows how I carved my initials on the bare tree, something I've never done before.  It also shows circled the year, 2014, cut into the front part of the second skirt extension.

This is the off side.  It shows the saddle number, 451, on the tree.  (The four-hundred-and-fifty-first Western saddle I've made since 1979.)   The circled area also has a 451 carved into it -- extremely hard to see.
This tiny space, under the fender on the base plate, is the traditional place where I sign my saddles.  Alas and alack, there was barely any room on the Goehring; and what marks I did manage to make don't read very well.  I did sign the near side with SBY, but it didn't behave at all.  Hence cutting the tree.  Also, the underside is inked with initials and date.  Drafter's ink, guys, in case you're worrying (rightfully) about pen ink.

So, why am I saying "Almost There?"  Isn't it done?  After a year and a month, isn't it done yet??
Introducing the fancy latigo keeper.
Remember the original reference picture?
For some inscrutable reason, there's always one part of a model saddle that fights to the end -- that I sure wish I could put off.  The blanket and this keeper are it for this one.   I'm actually afraid of that keeper, partly because I didn't know what it was for the longest time (I still don't understand exactly how the back of it goes!) and partly because its size means it's gonna be the hardest part to make.  Such is fate.  I can guess how it folds and tucks -- thanks again to Luis and his Flickr pictures -- so I've just got to buckle down. 
A week in Tucson will be a breathing space.  After a year and a month, another week is no big deal.  But I'd sure love to finish this out.   It has definitely reached the stage of being called "you stupid saddle" and with me, that's a sure sign of an approaching end... !
Look what's next!
The blue headstall...
I can hardly wait.
Thank you, Sue, for your patience.

Sunday, February 2, 2014

Granger and Teller: Rawhide Bridle approaches

 Today's post -- actually a peek at my tack collection -- concerns just two model bridle makers and one style of headstall.  It also answers the burning question Why You Should Never Freeze Your Glue!!  Oh, the adventures of a wandering tackmaker...

The two artists are Margaret Teller, regretfully gone from us now (I should say, making tack in another dimension), and Shannon Granger, delightfully alive and well but probably not taking orders!  Shannon comes first, because today I put together the piece you see above.  I had picked up the reins at BreyerFest 2012.
So much happens inside the ballrooms at the (then) Holiday Inn North!!  now, the Clarion Inn!!  I can remember NAN being held there..  ahem... In that space (just right of the door), during the Artisan's Gallery of 2012,  on July 19th, I had the great pleasure of meeting Shannon Granger, publisher/editor of Model Horse Performance Magazine.  We had corresponded a lot, but I'd never seen her.  A Scandinavian, was my first thought... followed by, How sweet, how nice, how disciplined!  She had brought a selection of peices for sale.  One of my collecting goals is a piece from every noteworthy tackmaker I like, not a small ambition when you've been in the game as long as I have (thirty-six years this June).  But really I just wanted those reins.  They were only $50... believe it or not, all I could afford.
To her credit, she tried very hard to get me to trade, but I was learning 'cash is cheaper than my time' and in the end she let me talk her into the sale.

Sometime later in 2012 (my only clue is an email of mine dated Sept 18 that mentions it), Shannon posted a small contest on her blog.  Whoever made the most comments before her counter reached thirty thousand (I think) would get a small piece of tack.  Well, I had recently gotten bold about leaving comments -- in hindsight, a step towards my own blog.  What a chance.  I must have left lots of comments because I won the contest.  I knew right away what I wanted.
It took a lot of talking.  I had a bit and reins.  All I wanted was a matching headstall.  Shannon was a tackmaker I respected, and to have her exploring my favorite form, the braided rawhide headstall, was a pushover for me.  But as you can see, it also took some patience.  Perhaps this is a good thing.

In the meanwhile, I was able to purchase a complete saddle from her in March of 2013, the Aqua Gaming set.
Photo by Shannon Granger
I was so impressed I did a blog post on it.  Spring Colors
The above 2014 picture shows a tiedown for this very set.  I'd had no idea it even existed until I opened the package two days ago.  Some artists can hold ideas in their heads for a long time.   This should NOT surprise me -- !!!  I am still deeply touched.

So the headstall arrived and I put it together with its reins, made two years before.   The bit is from a friend, similar to those marketed by Marsha Ensor and probably a copy of those marketed by Robin Clark many long years ago.
Shannon kindly listened to me wanting certain decorative elements: the buttons on the tied brow.  She hadn't done such a thing before.  The design of this headstall is the classic Old West sliding doubled loop.  I'm still not sure it has a name... I learned about it in Tom Hall's Western Tack Tips books, and had seen it earlier in museums and books.  These two tackmakers, Shannon and Margaret, are using candlewicking to execute it in miniature scale.  The great part about this design is that it can be completely adjusted without any buckles or hardware.

As soon as this bridle was completed, I turned to my collection and pulled out Margaret Teller's piece, ordered at BreyerFest of 2002, down paymented then, balance paid in September, and arrived on Halloween.
Same material, the offwhite candlewicking.  Same design, a Western headstall that adjusts with no buckles.  Same scale.  And, same price -- fifty dollars -- how about that.
It even used embroidery floss as adjunct materials, in this case the mecate (leadrope).  But here the similarity ends.  Margaret made her buttons with wrappings of matching-color thread, and drew on the interweaves with a colored pen.  Her design is simplified.
Yet when I first saw these pieces, my reaction was the same:  I had to have them.  Does anyone really understand this passion?  Or the pleasure in seeing different approaches to the same thing, the variations on a theme that is the heart of all collections?  I have loved and enjoyed and yes played with Margaret's bridle and hackamore (I was lucky enough to get two pieces that year from her) ever since, which is to say, for the past 12 years.  They've stood the test of time.  Will Shannon's piece do the same?

There are other tackmakers who have used this material to do miniature rawhide braidwork.  It is a splendid sub-collection within the model braidwork canon.  Two names that come to mind are Kathy Wiggins and Linda Spiesschaert.  I have photographs (remember those things!) which I should digitize some day...

MEANWHILE, didn't somebody mention FROZEN GLUE?????

Y'all know I spent two months in New York, and just came back home to central Pennsylvania (Jan. 30).  My family is efficient and we were packed up a day in advance.  I knew cold would not hurt the horses and so they and the tackshop all went out into the truck the evening before.  We had to leave the next morning bright and early.  The cold snap was back in action, but I honestly did not think anything in the tack shop could be hurt.
Was I ever wrong.
What good is it to be dinky and careful about saving glue?!?  In my defense, the bottle does not say "Do Not Freeze," and I had no idea white glue would react this way... this had never happened to me before...  but oh, my, how suddenly solid it all got... 
the consistency of cheese spread.

I dug it out -- talk about recycling, in this case the bottle itself -- refilled the glue with a larger bottle I happened to have (you can see it above right) and rolled on.  Lesson:  use easily-obtained materials if you possible can.

Here is a link detailing a bit about my husband's job while we were up there.
OWLeS: Ontario Winter Lake-effect Storms, by Channel 9 Syracuse
He is in the airplane.